


Ceramic sponge holders are both functional and aesthetically pleasing additions to any kitchen or bathroom. These handcrafted items serve the practical purpose of holding a sponge and add a touch of elegance and personal flair to your space. The benefits of ceramic sponge holders include their durability, ease of cleaning, and the ability to customize them to match your personal style. Unlike plastic holders, ceramic options are eco-friendly and can be designed in various shapes, sizes, and colors to suit your décor.

This article provides a comprehensive step-by-step guide on how to create ceramic sponge holders from scratch. We will cover essential materials, techniques for shaping and decorating, and tips for finishing and firing your creation. Whether you are a beginner or an experienced potter, this guide will help you craft a unique piece that enhances your home’s functionality and style.
Materials Needed
List of Materials
To create your own ceramic sponge holder, you’ll need a collection of essential materials. These include clay, which can be either stoneware or earthenware, and basic ceramic tools such as a pottery wheel, rolling pin, and carving tools. Additionally, you will require glaze to finish your piece, sponges to smooth it and apply water, and water to mold and shape it. A sponge holder mold can be handy if you prefer a ready form.
Optional Materials
Consider incorporating optional materials for those looking to add unique elements to their ceramic sponge holder. Underglaze can be used to introduce color and detailed designs before applying the glaze. Stamps and decorative textures offer personalized embellishments, making your creation one of a kind. A kiln is necessary for the firing process, and a pottery wheel is advantageous for advanced shaping techniques, allowing for more refined and professional outcomes.
Designing Your Sponge Holder
Planning the Design
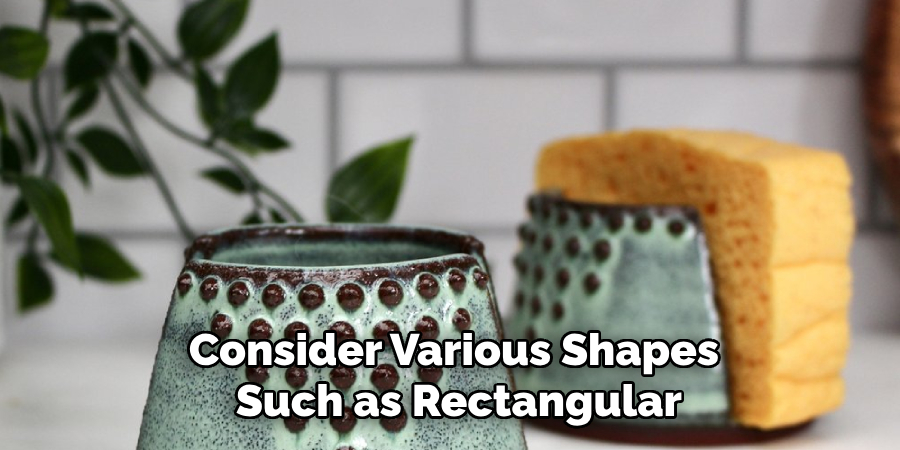
When designing your sponge holder, consider various shapes such as rectangular, cylindrical, or custom silhouettes that suit both functionality and aesthetics. Begin by measuring the typical dimensions of the sponges you intend to use, ensuring that your holder accommodates them comfortably while maintaining an appealing visual balance. Think about the intended placement of the holder, either in a kitchen or bathroom setting, and opt for dimensions that fit seamlessly into the available space. The design should harmonize with its surroundings, offering a practical solution for sponge storage that also enhances the overall decor.
Decorative Ideas
Incorporate unique textures and designs to personalize your ceramic sponge holder. Consider adding handles for ease of movement, drainage holes to prevent water accumulation, or decorative stamps and carving tools to infuse personality into your creation. You can experiment with various artistic techniques, from intricate patterns to minimalist touches, enabling the holder to reflect your style and complement your kitchen or bathroom decor. By integrating these personalized details, your sponge holder becomes a functional item and a distinctive piece that elevates the aesthetic appeal of your space.
Preparing the Clay
Selecting the Clay
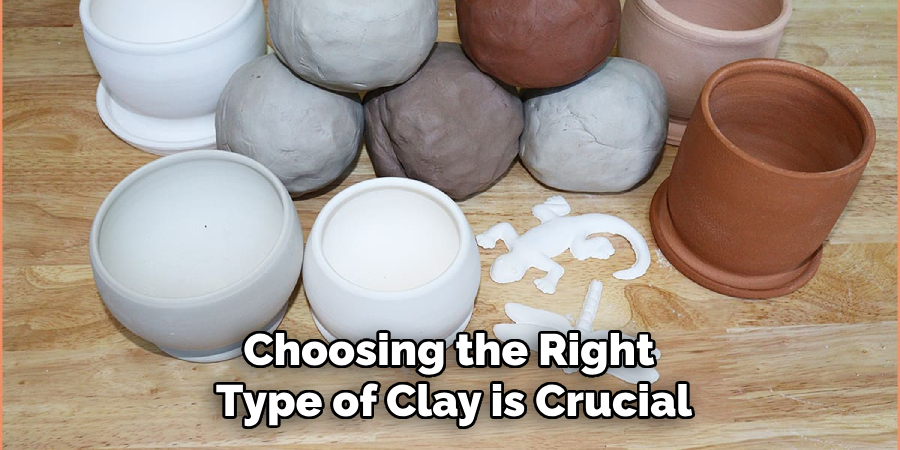
When crafting ceramic sponge holders, choosing the right type of clay is crucial for the success of your project. Stoneware and earthenware are both well-suited for this task. Stoneware is particularly ideal due to its durability and ease of shaping. It withstands daily use and offers a more rigid structure, perfect for sponge holders requiring strength and resilience. Stoneware also provides an excellent canvas for glazes, allowing for a variety of finishes. Earthenware, while softer and easier to manipulate, may not be as durable as stoneware but still serves well for less intensive uses or for those looking to focus on decorative elements.
Preparing the Clay
Before beginning the shaping process, it’s essential to properly prepare the clay to ensure a smooth finish and prevent any structural weaknesses. Start by wedging the clay to eliminate air bubbles that could cause the piece to crack during firing. Wedging involves kneading the clay repeatedly, much like dough, which removes air pockets and helps achieve a consistent texture. Once the clay is prepared, roll it out to the desired thickness using a rolling pin or slab roller. This ensures an even foundation for your sponge holder, providing the uniformity needed for subsequent steps in crafting and designing your piece.
How to Create Ceramic Sponge Holders: Shaping the Sponge Holder
Handbuilding Techniques
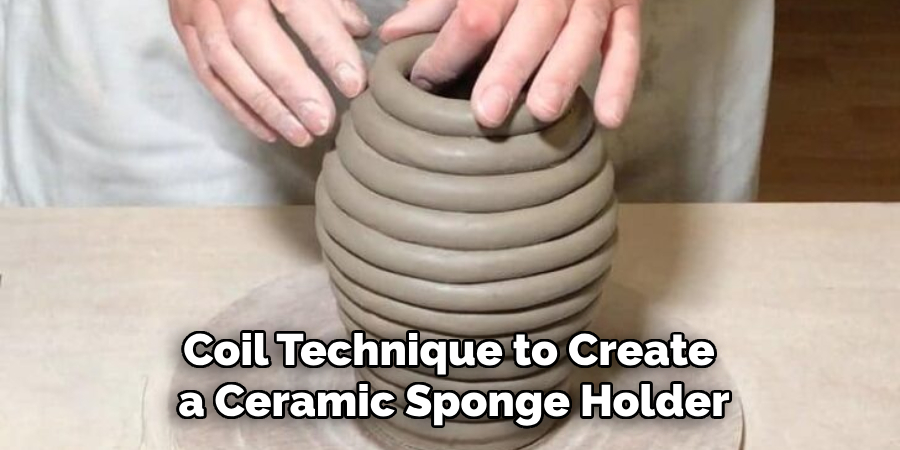
You can employ methods such as the pinch pot or coil technique to create a ceramic sponge holder using hand-building techniques. Begin with the pinch pot method by forming a small ball of clay and pressing your thumb into its center, pinching the sides outward evenly to shape the base and walls. Alternatively, the coil method involves rolling out long, even coils of clay and stacking them to create the desired form. Smooth the coils together as you build, ensuring a consistent thickness throughout. This flexibility in shaping allows for creative variations in design and size to suit your specific needs.
Using a Pottery Wheel
Creating a sponge holder on a pottery wheel offers a uniform and refined appearance. Start by centering the clay on the wheel, which involves applying consistent pressure with your hands to align it perfectly. Once centered, use your fingers to pull the walls upward, steadily increasing the height while maintaining the thickness. Shape the base by pressing inward at the bottom, forming a structure accommodating the intended use. This technique results in symmetrical and polished creations, ideal for those seeking a standard, professional finish for their ceramic sponge holders.
Adding Decorative Elements
Enhance your ceramic sponge holder’s visual appeal and functionality by incorporating decorative elements. Use carving tools to etch patterns or textures onto the surface, adding a personalized touch. You can also attach handles for ease of transport or create drainage holes to prevent water accumulation and keep the sponge dry. Consider elevating the base slightly, allowing air circulation underneath. These elements ensure that your sponge holder is aesthetically pleasing and practical, providing an efficient solution for sponge storage while complementing the decor of your kitchen or bathroom.
How to Create Ceramic Sponge Holders: Drying and Firing the Clay
Drying the Piece
Allowing the clay to dry slowly and evenly is crucial to prevent cracks or warping in your ceramic sponge holder. Place your piece on a flat, non-porous surface in a well-ventilated area, away from direct sunlight or artificial heat sources, which could cause uneven drying. Cover it loosely with plastic or a damp cloth to control the drying rate, ensuring consistent moisture evaporation across the surface. Regularly check the dryness by gently pressing the clay; it should reach a leather-hard stage, where it remains firm yet still slightly pliable, before moving to the next process step.
Bisque Firing
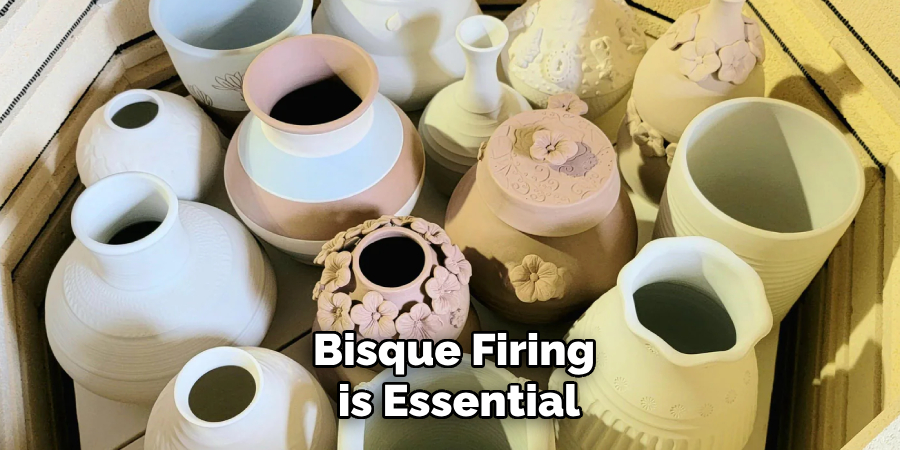
Bisque firing is essential to strengthen the clay and prepare it for glazing. Gently load your sponge holder into the kiln, ensuring it is supported and not in contact with other pieces to avoid damage. Fire the kiln at a low temperature of around 1800°F (982°C), gradually transforming the clay into a more robust structure. This initial firing stage makes the sponge holder more durable, ensuring that it can withstand the glazing process and daily use without breaking. Bisque firing ultimately provides a stable foundation for the final glazing and finishing touches.
Glazing the Sponge Holder
Choosing the Glaze
Selecting the right glaze for your ceramic sponge holder can greatly enhance its visual appeal and functionality. Consider the overall design and choose from a variety of finishes, such as glossy for a reflective, smooth surface, matte for a softer and subdued appearance, or transparent to showcase the natural clay beneath. In addition, experimenting with underglaze techniques allows you to introduce color and intricate patterns before applying the final coat of glaze. This customization step ensures your ceramic piece aligns perfectly with your kitchen or bathroom aesthetics, transforming it into a unique decor element.
Applying the Glaze
Applying the glaze evenly is crucial to achieve a professional finish on your sponge holder. You can dip the piece into a glazed container, brush it on with even strokes, or use a spray gun for a consistent coat, ensuring the entire surface is covered. Pay special attention to glazing the interior and exterior for comprehensive coverage. Leave the bottom unglazed to prevent the sponge holder from sticking to the kiln shelf during firing. This attention to detail during the glazing process ensures a flawless finish and enhances the durability of your ceramic creation.
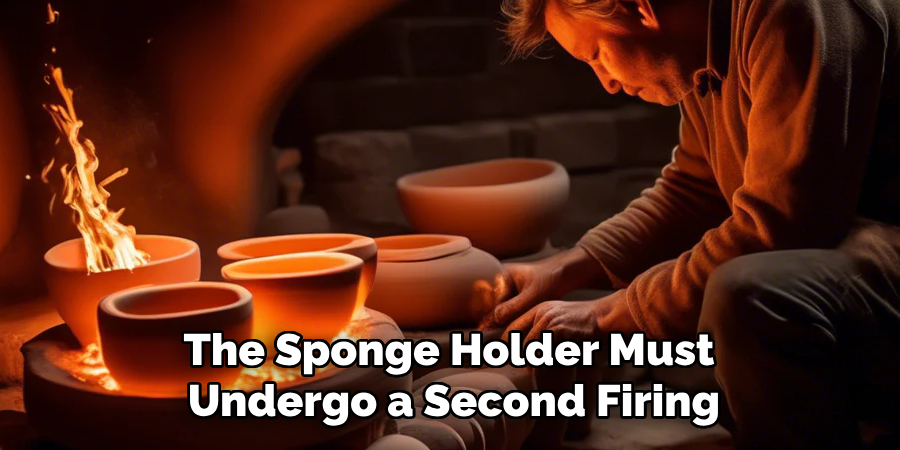
Firing the Glazed Piece
Glaze Firing Process
After glazing, the sponge holder must undergo a second firing, known as glaze firing, at a higher temperature of approximately 2200°F (1204°C). To ensure successful results, carefully load the glazed piece into the kiln, ensuring it is well-supported and does not touch other items, as the glaze can fuse them together. This firing transforms the glaze into a smooth, glass-like finish, making the sponge holder visually appealing and water-resistant. This crucial step completes the ceramic’s transformation.
Cooling and Final Inspection
Once the glaze firing process is finished, monitoring the cooling phase carefully is imperative to prevent thermal shock, which can cause cracking. Allow the kiln to cool naturally, avoiding rapid temperature decreases. Upon removal, inspect the sponge holder meticulously, checking for any imperfections or sharp edges that may require additional smoothing. This final inspection ensures your ceramic piece is aesthetically pleasing, safe, and fully functional for daily use.
Troubleshooting Common Issues
Cracking or Warping
Cracking or warping can occur if the clay is not dried and fired correctly. To prevent this, ensure that your clay dries evenly by placing it flat and shielding it from direct heat or sunlight. When firing, carefully monitor temperatures for gradual increases to reduce stress on the clay. If minor cracks appear, you can often fix them by re-wetting the affected area with a damp sponge and smoothing it out. For more extensive damage, consider refiring the piece once the necessary repairs are made.
Uneven Glaze Application
Uneven glaze application can detract from the final appearance of your ceramic sponge holder. To correct this, apply a second coat of glaze, focusing on areas that lack coverage or reglaze specific spots that need correction. For glaze drips or imperfections, gently sand the area once it has fully dried and cooled. Then, apply a thin layer of glaze to even out the surface, ensuring your final piece is smooth and polished.
Conclusion
Crafting a ceramic sponge holder is a rewarding process that involves careful attention to each stage—from designing and shaping your piece to the glazing and final firing. Ensuring your holder is both functional and decorative requires meticulous effort, especially in drying, bisque firing, and glaze application. Remember to maintain this attention to detail throughout the process to achieve a polished finish. “How to create ceramic sponge holders” emphasizes experimentation with colors, textures, and designs, allowing you to craft a piece that aligns with your style while enhancing your home décor. Embrace creativity and enjoy designing your unique sponge holder.
Specialization:
- Master of wheel-throwing, hand-building, and advanced glazing techniques
- Focus on creating both functional pottery and decorative art pieces
Recognition:
- Celebrated by collectors and art enthusiasts for creating one-of-a-kind pieces that blend artistry with functionality
- Participates in local and national exhibitions, earning accolades for his innovative designs and craftsmanship
Passion:
- Deeply committed to exploring and pushing the boundaries of ceramic artistry
- Continuously experiments with new materials, firing techniques, and artistic concepts to evolve his craft
Personal Philosophy:
- Believes in the transformative power of art, aiming to evoke emotions and connections through his ceramic creations
- Advocates for sustainability in ceramics, using eco-friendly materials and practices whenever possible