


Ceramic baskets are delightful pieces that blend functionality with artistic expression. They are crafted using clay, which is then fired in a kiln to create a durable and aesthetically pleasing object. These baskets are not only decorative but also serve various practical uses.

Often found as elegant centerpieces, they can beautifully display fruits or act as statement artistic décor in homes. Their versatility makes them a popular choice for both modern and traditional settings. The appeal of ceramic baskets lies in their intricate designs and the artisan’s ability to mold them into unique shapes and patterns. This article aims to provide you with a comprehensive step-by-step guide on how to make ceramic baskets. Whether you are a seasoned potter or a beginner, learning the techniques from shaping the clay to applying the finishing touches will empower you to create your own ceramic masterpiece.
Materials and Tools Needed
Essential Materials
You’ll need a selection of essential materials to create a ceramic basket. The primary material is clay, and opting for stoneware or earthenware is recommended due to their strength and versatility, which make them ideal for crafting durable baskets. Stoneware clay provides a smooth finish and is suitable for both functional and decorative pieces, while earthenware offers a more rustic appearance. Additionally, while not required, molds or forms can help achieve consistent shapes, especially for beginners who are still mastering the finer points of shaping clay by hand.
Necessary Tools
Several tools are necessary to effectively shape and finish your ceramic basket. Begin with sculpting tools, such as a rolling pin to flatten the clay, a knife for cutting and trimming, a scoring tool to roughen the surfaces for joining pieces, and loop tools for refining edges. A kiln is essential for firing the clay to make it solid and durable. Finally, glazing tools, including brushes and sponges, are used to apply gloss and decoration, enhancing your basket’s visual appeal. These tools collectively enable you to create a customized, high-quality ceramic basket with precision and creativity.
Planning and Designing Your Ceramic Basket
Choosing a Style
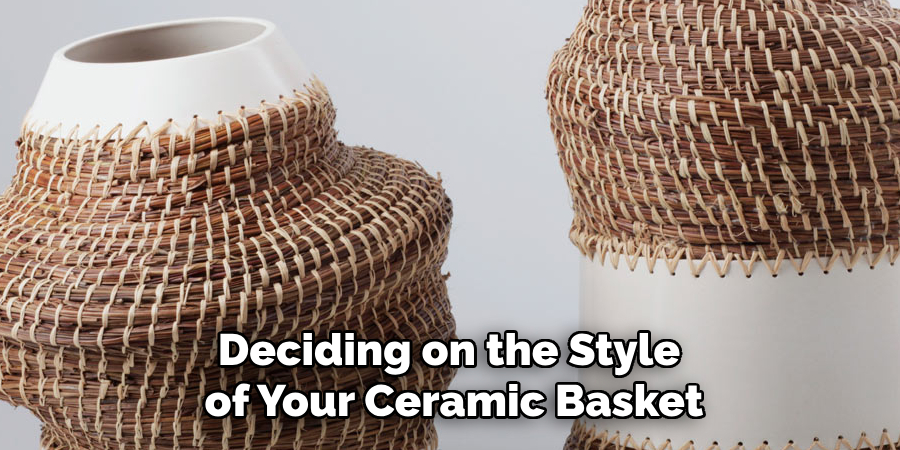
Deciding on the style of your ceramic basket is a vital step in the creative process. You can opt for traditional woven designs that emulate classic basketry or pursue modern, minimalist styles that emphasize simplicity and clean lines. Consider the dimensions by deciding on the basket’s size and depth based on its intended use—whether as a fruit holder or an ornamental piece. Additionally, think about decorative elements, such as patterns or textures, to enhance the aesthetic appeal of your piece.
Preparing the Workspace
Before you start crafting your ceramic basket, prepare a clean, stable workspace where all materials and tools are easily accessible. Having everything within reach will streamline your workflow and minimize disruptions. If you intend to use glazes, ensure the area is well-ventilated to provide a safe environment for handling potentially toxic substances. This preparation sets the stage for a more enjoyable and efficient crafting experience.
How to Make Ceramic Basket: Creating the Base of the Basket
Rolling and Shaping the Base
To begin crafting the base of your ceramic basket, start by rolling out a slab of clay to your desired thickness—typically between a quarter to half an inch, depending on the desired sturdiness of your basket. Using a rolling pin on a flat surface, ensure the clay slab is even, free of air bubbles, and consistent throughout.
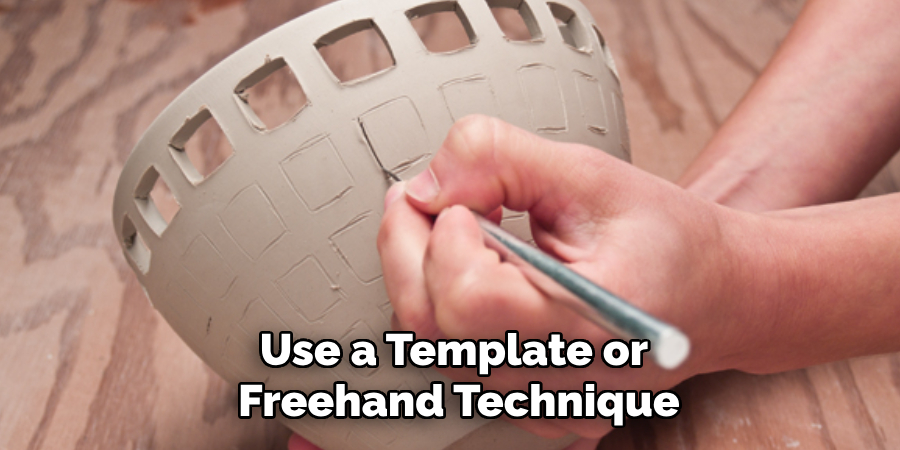
Once the slab is prepared, use a template or freehand technique to cut out the desired shape for your basket’s base, which can be circular or oval. Using a sharp knife or clay cutter is essential to achieve clean edges. Reinforce the edges of your base by gently pinching or adding a small coil of clay around the perimeter. This added reinforcement will help support the weight of the walls when they are attached, ensuring a sturdy final product.
Forming the Basket Walls
You can choose between hand-building techniques such as coil building or slab construction to create the basket walls. For coil building, roll out long, even coils of clay and layer them around the edge of the base, gradually building them up to the desired height. When using slabs, cut strips of clay to size and carefully wrap them around the base.
In either method, securely attach the walls to the base by scoring both the base’s edge and the wall’s bottom with a scoring tool, then apply slip—a liquid mixture of clay and water— to act as an adhesive. This step ensures a strong bond between the base and the walls. As you build the walls, periodically check for even height and use a rib or smoothing tool to blend the joins, ensuring a seamless and professional appearance.
Adding Handles or Decorative Elements
Adding handles enhances your ceramic basket’s functionality and provides an opportunity for creative expression. To sculpt secure handles, shape small coils or strips of clay and attach them firmly to the basket’s sides, ensuring they are ergonomically positioned and aesthetically balanced.
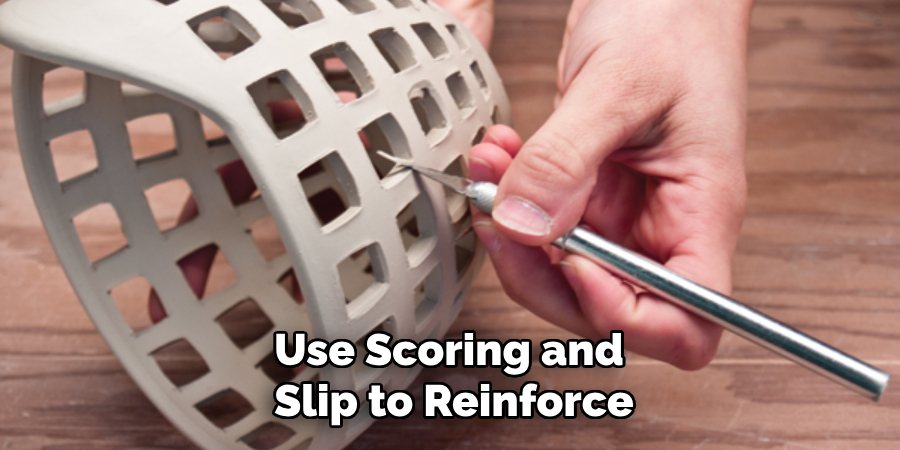
Use scoring and slip to reinforce the attachment points. For decorative touches, you can incorporate carved patterns into the surface of the clay, apply clay appliqués shaped into motifs or designs, or create textural interest with tools such as whisks, forks, or carved stamps. These embellishments add a personal and artistic flair to your basket, making it uniquely yours. Experiment with different techniques and materials to achieve a design that resonates with your vision for the perfect ceramic basket.
Creating a Woven Look
Rolling and Cutting Strips
Start by rolling out clay into thin, even strips to achieve a woven look for your ceramic basket. Aim for uniformity of around a quarter-inch in both width and thickness, as this will ensure the weave is consistent and strong. Utilize a rolling pin and a pair of guide sticks to maintain even thickness, creating a smooth surface. Carefully cut the clay into strips using a sharp knife or a clay cutter, ensuring each strip is of equal size. The uniformity of the strips is crucial to achieving a cohesive woven pattern that holds its shape during the firing process.
Weaving the Strips
Once your strips are prepared, begin weaving them around the basket’s frame by laying them horizontally and then vertically, alternating their placement in a classic over-under pattern. This technique replicates the traditional weaving method used in basketry and creates an intricate texture. As you weave, gently press and blend the connections using a damp sponge or a smoothing tool, ensuring each intersection is seamlessly integrated into the structure. This step enhances the visual appeal and maintains the basket’s structural integrity. Take care to ensure that the strips remain aligned and evenly spaced to create a professional, polished finish.
Drying and Firing the Ceramic Basket
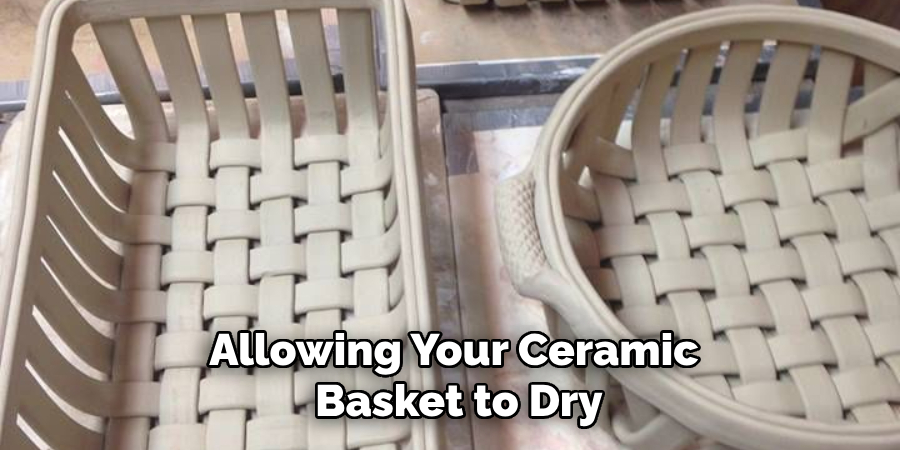
Proper Drying Techniques
Allowing your ceramic basket to dry slowly and evenly is essential to prevent warping or cracking. Start by loosely covering the basket with plastic or a damp cloth, which helps maintain consistent moisture levels. Ensure that the drying area is free from drafts or direct sunlight, which can cause uneven moisture loss. Monitoring thicker areas closely is crucial, as they tend to retain moisture longer. Check the basket’s moisture content regularly by feeling the surface or using a moisture meter, if available. Gradually remove the covering once the basket matures up, allowing it to dry completely over several days.
Bisque Firing Process
The bisque firing process involves placing the dried ceramic basket in a kiln and gradually heating it to a temperature of around 1830°F (about 1000°C), allowing the clay particles to fuse without melting. It’s essential to follow safety precautions during this step, including wearing protective gloves and eyewear when handling delicate pieces. Arrange the basket in the kiln with ample space around it to ensure even heat distribution and prevent items from touching. Start the kiln on low heat to remove any remaining moisture before slowly increasing the temperature. Once the firing is complete, allow the basket to cool completely before handling or further processing.
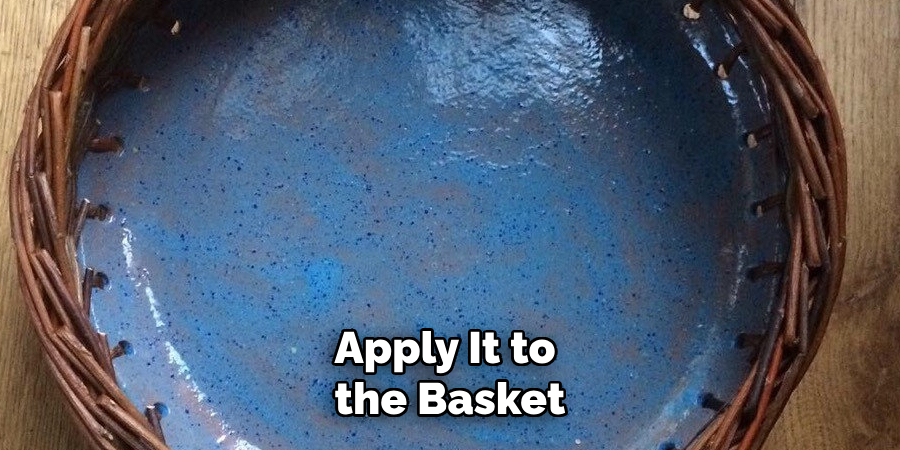
Glazing and Finishing the Basket
Selecting a Glaze
Choosing the right glaze for your ceramic basket can dramatically influence its aesthetic appeal and functionality. Consider opting for colors and finishes that complement the basket’s design and intended use. Matte glazes provide a subtle, earthy tone, ideal for rustic or modern styles, while glossy glazes offer a sleek, reflective surface that enhances vibrant colors and intricate patterns. Textured glazes can add depth and interest to simpler designs, creating a tactile experience. Experiment with glaze combinations on test tiles or small samples to gauge how different glazes react and overlap during firing, which may result in unique, unexpected effects that enhance your piece.
Applying the Glaze and Final Firing
After selecting your glaze, apply it to the basket using a technique that suits your desired finish. Dipping provides an even coat and efficiently covers larger areas while brushing allows for more detailed and intricate application. Spraying glaze results in a smooth, consistent layer and can be used for both subtle and bold designs. Ensure the glaze is thoroughly dry before placing the basket back in the kiln for a second firing. This stage, known as the glaze firing, typically reaches higher temperatures than the bisque firing, finalizing the glaze and providing a polished, durable finish to your ceramic basket.
Conclusion
Creating a ceramic basket involves a meticulous process from base construction to finishing touches. Initially, you shape the base and structure, then enhance it with decorative elements like handles and intricate weaving patterns. After allowing for proper drying, the basket undergoes bisque firing before being transformed with thoughtful glazing and final firing. Through these steps on how to make ceramic basket, you are encouraged to explore various creative designs and techniques. The satisfaction of crafting a unique ceramic art piece not only reflects your artistic vision but also enhances your skills in the craft.
Specialization:
- Master of wheel-throwing, hand-building, and advanced glazing techniques
- Focus on creating both functional pottery and decorative art pieces
Recognition:
- Celebrated by collectors and art enthusiasts for creating one-of-a-kind pieces that blend artistry with functionality
- Participates in local and national exhibitions, earning accolades for his innovative designs and craftsmanship
Passion:
- Deeply committed to exploring and pushing the boundaries of ceramic artistry
- Continuously experiments with new materials, firing techniques, and artistic concepts to evolve his craft
Personal Philosophy:
- Believes in the transformative power of art, aiming to evoke emotions and connections through his ceramic creations
- Advocates for sustainability in ceramics, using eco-friendly materials and practices whenever possible