


Ceramic vases themed after popular cultural icons, such as a Candy Crush vase, hold both sentimental and aesthetic value. These decorative pieces enhance a room’s appearance with their colorful and playful designs and evoke fond memories for fans of the game. The significance of maintaining such items extends beyond mere decoration; it involves preserving cherished memories and personal connections.
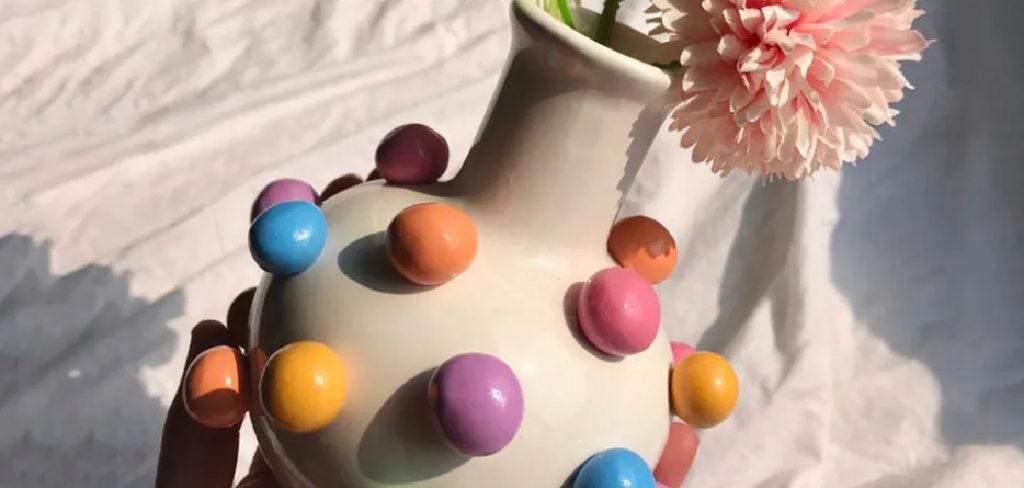
When faced with a damaged vase, many may feel tempted to discard it, yet repairing chipped or broken ceramics offers a more sustainable and rewarding solution. This approach not only conserves the intricate artistry and craftsmanship of the vase but also contributes to environmental conservation by reducing waste. In this article, we will provide a comprehensive step-by-step guide on how to fix ceramic candy crush vase, allowing you to restore it to its original charm and continue enjoying its presence in your space.
Assessing the Damage
Before beginning the repair process on a ceramic Candy Crush vase, it is crucial to thoroughly assess the damage to understand the scope of the repair needed. Careful examination will guide the selection of the appropriate tools and techniques, ensuring a successful restoration. Begin by inspecting the vase under good lighting to identify all affected areas, making note of any cracks, chips, or complete breaks. Handling the broken parts gently to avoid further damage while assessing their condition is beneficial.
Types of Common Damage
Cracks in ceramics are generally categorized as either hairline or deep fractures. Hairline cracks are often superficial and may not compromise the structural integrity of the vase, making them easier to repair. Deep fractures, however, can weaken the vase significantly and may require more intensive techniques to mend. Chips or missing pieces vary in size; smaller edge chips may need a simple filling, while larger breaks may involve reconstructing sections of the vase. In cases where the vase is broken into multiple parts, it is essential to locate and identify all fragments to ensure a seamless reassembly.
Evaluating Repair Feasibility
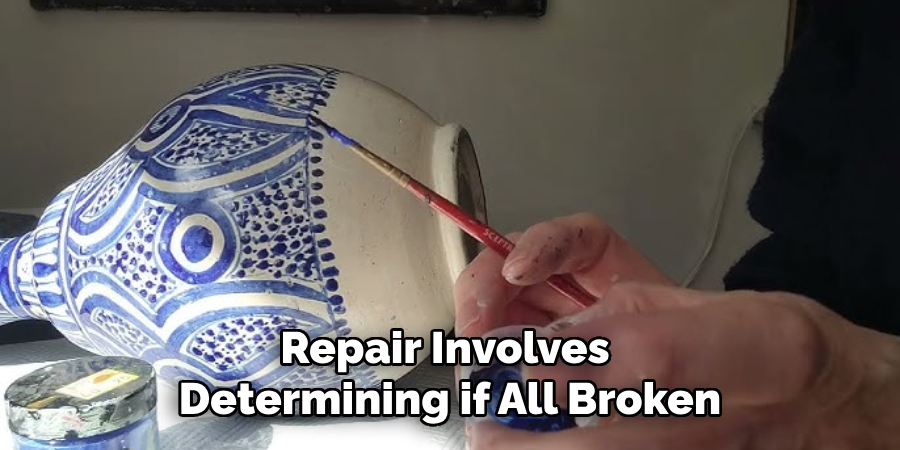
Evaluating the feasibility of a repair involves determining if all broken pieces are present or if replacements must be sourced. This assessment is critical to ensure a complete restoration. Next, identify the necessary tools and materials, such as epoxy, putty, or adhesive, based on the type and extent of the damage. Each choice should be tailored to the specific problem identified during the damage assessment to maximize repair effectiveness and restore the vase to its original state.
Materials and Tools Needed
Materials
To effectively repair a ceramic Candy Crush vase, gather essential materials, including epoxy adhesive or ceramic glue, which will provide the necessary bond for broken pieces. For missing segments, filler material such as epoxy putty or specialized ceramic repair kits can help reconstruct the vase. Additionally, touch-up paint or glaze may be used for color matching, ensuring the restored piece looks indistinguishable from its original state. These materials are crucial for achieving a seamless repair.
Tools
Equipping yourself with the right tools can greatly enhance the repair process for your ceramic vase. A soft cloth, tweezers, and small brushes are useful for handling delicate fragments and applying adhesive precisely. Sandpaper is necessary for smoothing surfaces after repairs, creating an even finish. Masking tape and clamps are essential for securing pieces firmly in position while the adhesive cures. Together, these tools facilitate a professional-level restoration, allowing for both functionality and aesthetic appeal.
Cleaning and Preparing the Vase
Cleaning the Broken Surfaces
Before beginning the repair, thoroughly cleaning the ceramic Candy Crush vase’s broken surfaces is essential. Start by using warm water mixed with mild soap to gently wash away any dirt, grime, or debris that may have accumulated on the pieces. Pay special attention to the edges and fractures, as removing any contaminants is crucial to ensuring a strong adhesive bond. After cleaning, carefully dry each piece with a soft cloth and allow it to air dry completely to avoid moisture interfering with the adhesive during the repair process. This step is vital for preparing the vase for an effective restoration.
Aligning the Pieces
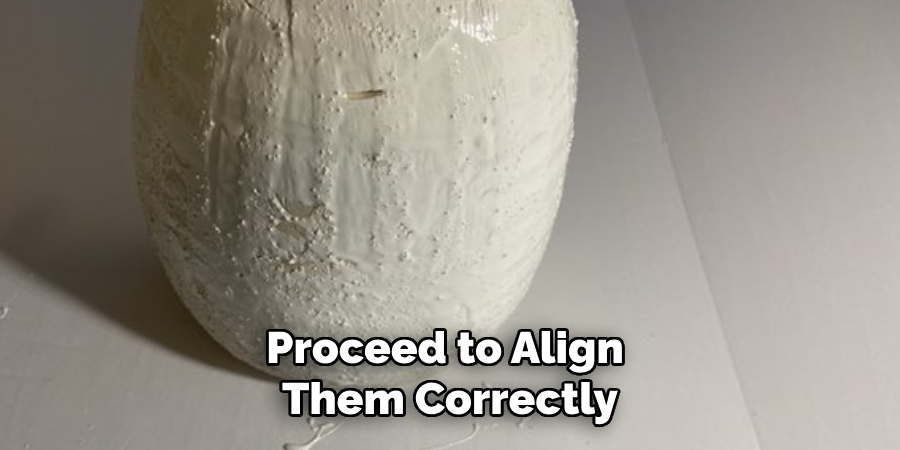
Once the pieces are clean and dry, proceed to align them correctly. Begin by arranging the fragments to identify their original position and slot each one into place without forcing them. This dry-fitting process helps visualize the final structure and ensures that the pieces fit together seamlessly. Use masking tape to temporarily hold parts in place during the alignment phase. By doing so, you’ll secure the pieces in the right order and orientation, which is particularly useful for complex repairs, and you’ll also be able to adjust the positioning before applying the adhesive. Ensuring a proper fit at this stage is critical for a successful restoration.
How to Fix Ceramic Candy Crush Vase: Repairing the Vase
Gluing the Broken Pieces
To begin the repair process, prepare your adhesive by following the manufacturer’s instructions, ensuring you have enough to cover all broken edges. Use a small brush or applicator to carefully apply a thin, even coat of adhesive to each broken edge of the ceramic pieces. For precise alignment, fit the pieces together immediately after applying the adhesive, as this bond forms quickly. Once the pieces are aligned, use masking tape or clamps to securely hold them. This prevents movement while the adhesive cures, ensuring a strong and stable bond.
Filling Chips and Missing Areas
Epoxy putty or ceramic repair kits are incredibly effective when addressing chips or missing sections. Prepare the epoxy putty by kneading it until it becomes a uniform color, indicating it is ready for use. Apply the putty to the chipped or missing area, slightly overfilling it to allow for shaping. Use your fingers or suitable tools to mold the putty into the desired shape, matching the natural contour of the vase. Ensure there’s an even transition between the original ceramic and the new material, as this prevents visible seams and supports a cohesive restoration.
Smoothing and Sanding
After the adhesive and filler have been set completely, begin the smoothing and sanding process. Start with a finer grit sandpaper to gently sand away any excess adhesive or filler, ensuring that the surface is level with the intact portions of the vase. Continue sanding until the repaired areas blend seamlessly with the original surface, taking care not to damage the vase further. For best results, progress from a medium to a fine grit to achieve a smooth finish. This preparation is essential for any subsequent painting or glazing, contributing to the vase’s restored aesthetic appeal.
How to Fix Ceramic Candy Crush Vase: Restoring the Aesthetic
Painting the Repaired Sections
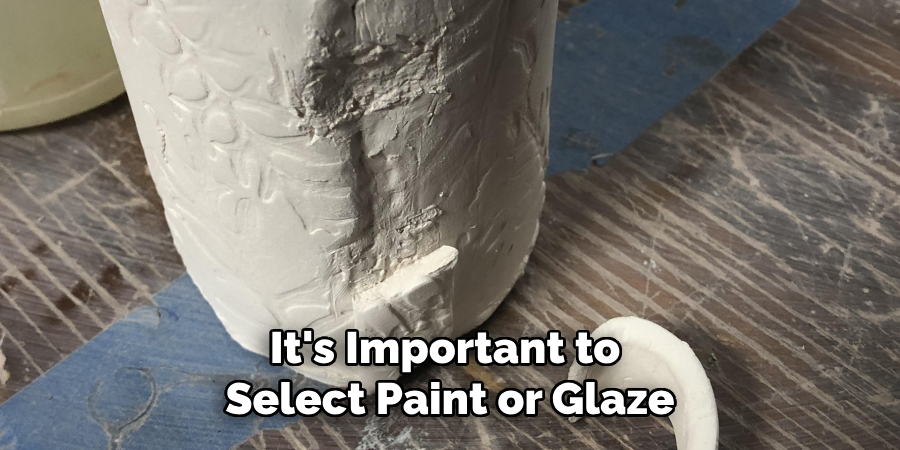
To achieve a seamless restoration, it’s important to select paint or glaze that closely matches the original design of your ceramic Candy Crush vase. Begin by observing the vase’s colors and patterns, taking note of any gradients or nuances. Opt for high-quality ceramic paints that offer a wide range of colors or mix different shades to get a perfect match. When applying paint, use fine brushes to carefully blend the colors, focusing on covering repair lines and ensuring a smooth transition between the original and restored areas. This meticulous blending will help disguise any visible repairs and restore the vase’s aesthetic integrity.
Sealing for Durability
After painting, preserving the integrity and longevity of your repair is crucial. Apply a clear ceramic sealant over the vase’s entire surface, which protects against moisture, scratches, and environmental factors. Use a soft brush or spray applicator to evenly distribute a thin layer of sealant, ensuring complete coverage without pooling. Apply the sealant in a dust-free environment to prevent imperfections in the finish. Allow ample drying time between coats as the manufacturer recommends, typically 24 hours or more, to ensure the sealant sets thoroughly. This final step enhances durability, maintaining both the vase’s functionality and visual appeal.
Preventing Future Damage
Proper Handling and Placement
Consider its placement carefully to secure your ceramic Candy Crush vase from future damage. Display it in a stable, low-traffic area, ideally on a sturdy shelf with secure brackets to prevent accidental knocks or falls. Avoid placing the vase near the edges of surfaces or in locations prone to vibrations, such as near doors that swing frequently. Handling the vase with both hands, especially when moving it, will minimize the risk of new breakages.
Maintenance Tips
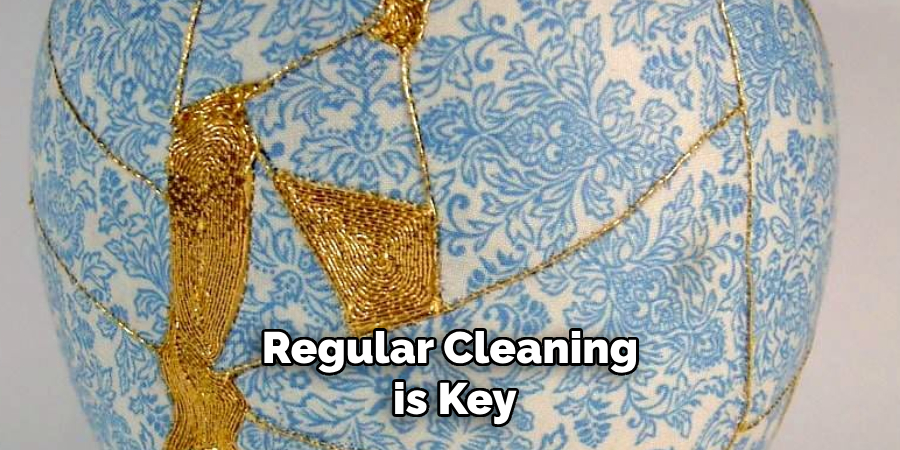
Regular cleaning is key to preserving the restored vase’s aesthetic and structural integrity. Use a soft, dry microfiber cloth to dust the vase gently, avoiding abrasive materials that could scratch the painted surface or remove the sealant. For a deeper clean, dampen the cloth slightly with water, ensuring no moisture seeps into vulnerable areas. Avoid using harsh chemicals or cleaners that might weaken the adhesive or degrade the finish, ensuring the vase remains pristine.
Conclusion
Restoring a damaged ceramic Candy Crush vase can be rewarding, emphasizing patience and precision. This guide has elucidated “how to fix ceramic candy crush vase,” highlighting the straightforward steps for aligning, gluing, filling, and sealing broken pieces to achieve a lasting restoration. By salvaging valuable ceramics, you preserve sentimental memories and reduce waste, cherishing each piece’s unique beauty. The joy of bringing broken pieces back to life revitalizes the vase and imparts a sense of accomplishment. So, embrace the challenge and breathe new life into your treasured ceramics.
Specialization:
- Master of wheel-throwing, hand-building, and advanced glazing techniques
- Focus on creating both functional pottery and decorative art pieces
Recognition:
- Celebrated by collectors and art enthusiasts for creating one-of-a-kind pieces that blend artistry with functionality
- Participates in local and national exhibitions, earning accolades for his innovative designs and craftsmanship
Passion:
- Deeply committed to exploring and pushing the boundaries of ceramic artistry
- Continuously experiments with new materials, firing techniques, and artistic concepts to evolve his craft
Personal Philosophy:
- Believes in the transformative power of art, aiming to evoke emotions and connections through his ceramic creations
- Advocates for sustainability in ceramics, using eco-friendly materials and practices whenever possible