


Making ceramic trays is a creative and rewarding process that allows you to craft beautiful, functional pieces for your home or as gifts. Whether you are an experienced potter or a beginner exploring the world of ceramics, crafting trays provides a perfect opportunity to develop your skills while expressing your artistic vision.
This guide on how to make ceramic trays will walk you through the essential steps, tools, and techniques needed to create stunning ceramic trays that are both durable and unique.
Why Make Ceramic Trays?
Ceramic trays offer a versatile and stylish way to serve food, display jewelry, or organize small items in your home. Unlike mass-produced plastic or metal trays, ceramic trays can be handcrafted to reflect your personal style and taste. Plus, with the right techniques and materials, they can be just as durable and functional as store-bought versions.
It is also a practical and eco-friendly alternative to buying new trays, as you can recycle clay and materials from previous projects to make your trays. Additionally, making ceramic trays can be a therapeutic and relaxing activity that allows you to disconnect from the digital world and create something tangible with your hands.
Essential Tools and Materials
Before starting any project, it is crucial to have all the necessary tools and materials on hand to ensure a smooth and enjoyable experience. For making ceramic trays, you will need:
Clay:
The type of clay you use will depend on your personal preference and availability. Options include earthenware, stoneware, or porcelain. Make sure to choose a clay that is suitable for the firing temperatures of your kiln or studio.

Rolling Pin:
A rolling pin will help you flatten and smooth out your clay to create an even surface for your tray. You can use a traditional rolling pin or opt for a slab roller for more precise and consistent results.
Clay Cutter:
A clay cutter is a sharp tool used to cut out your desired shape from the rolled-out clay. It can be as simple as a knife or specific tools designed for cutting clay.
Tracing Tool:
To create designs, patterns, or textures on your tray’s surface, you will need tracing tools such as stamps, found objects, or carving tools.
Kiln:
A kiln is essential for firing your finished trays. If you do not have access to one, many studios and pottery schools offer kiln rentals for individual projects.
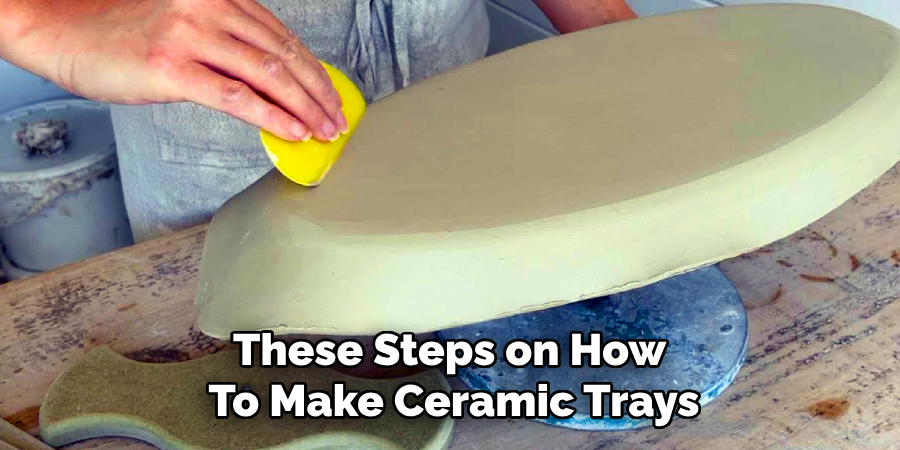
9 Step by Step Guides on How to Make Ceramic Trays
Step 1: Prepare Your Clay
Begin by preparing your clay to ensure it is ready for shaping. Start by wedging the clay, a process of kneading that removes air bubbles and ensures even moisture throughout. Place the clay on a clean, flat surface and press down firmly with your hands, folding and rotating it as you go. Repeat this motion for several minutes until the clay has a smooth and consistent texture.

This step is crucial for preventing cracks or weak spots in your finished tray. Once wedged, roll the clay into a ball or slab, depending on your intended design, and ensure the surface is clean and free of debris before moving to the next step.
Step 2: Roll Out the Clay
Once your clay is prepared, it’s time to roll it out into a flat, even slab. Place your clay on a clean, non-stick surface, like a canvas board or a piece of parchment paper, to prevent it from sticking. Using a rolling pin, gently roll the clay outward from the center, applying even pressure to achieve a consistent thickness. Aim for a thickness of about 1/4 inch, but this can vary depending on the size and purpose of your tray.
For more precision, use guide sticks or rolling pin rings on either side of the clay to ensure an even slab. Periodically flip the clay or rotate it to maintain an even shape and thickness. Be careful not to stretch or tear the clay during this process. Once rolled, the smooth slab will form the base of your tray and is ready to cut into your desired shape.
Step 3: Cut the Clay
After rolling out the clay into a smooth and even slab, you can now cut it into the desired shape for your tray. Using a clay cutter or a sharp knife, carefully outline the shape of your tray directly onto the slab. You can create various shapes, such as rectangles, ovals, circles, or even more elaborate designs depending on your preference and intended use of the tray.
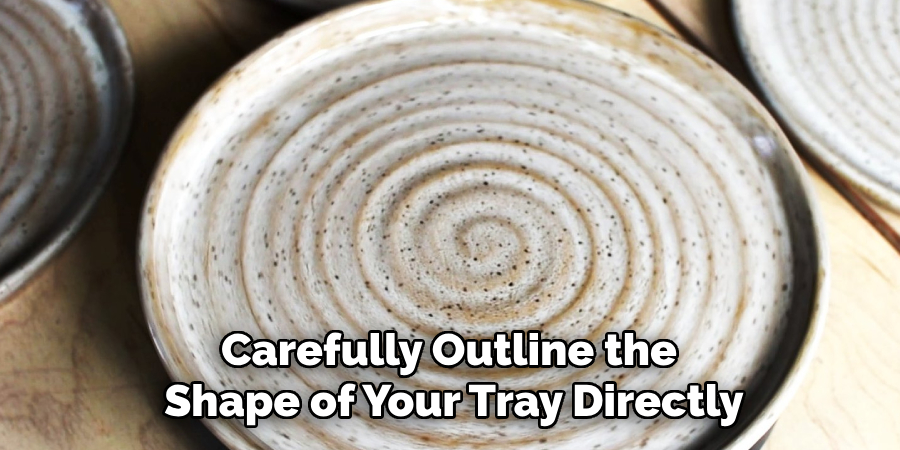
If you want a precise design, consider using a template or stencil made from paper, cardboard, or plastic to trace the shape onto the clay before cutting. Place the template on the slab, press it gently to hold it in place, and then cut around it with smooth, even strokes. Take your time while cutting to avoid jagged edges or mistakes.
Step 4: Add Design Elements
This is where you can let your creativity shine and add unique design elements to your tray. You can use stamps, textures, carvings, or even paint to add patterns and textures to the surface of the clay. Consider using found objects like lace, leaves, or buttons to create intricate designs on your tray. If you prefer a smooth surface, you can skip this step and move straight to shaping your tray.
To add texture with stamps or tools, gently press them into the surface of the clay in a consistent pattern until you achieve your desired effect. For carving or painting designs, ensure that the clay is still pliable enough to work with and that any added elements are securely attached for firing.
Step 5: Shape Your Tray
Once your clay is cut and designed, it’s time to shape it into a tray. Using your hands or tools, gently manipulate the edges of the slab upward to create sides for your tray. You can make them as high or low as you like, but ensure they are raised enough to hold objects without tipping over. Smoothing out the edges will also help prevent them from cracking during firing.
If you want a structured shape, consider using molds made from paper mache, silicone or rubber to shape your clay into specific forms before adding design elements and shaping the sides.
Step 6: Dry the Clay
After shaping your tray, it’s crucial to let it dry completely before firing. This process usually takes around 24-48 hours depending on the thickness of your clay and the humidity in your environment. To avoid warping or cracking during drying, place a cloth or plastic over the tray to slow down the drying process and prevent uneven moisture loss.

The clay will turn from a dark, wet gray to a light, dry color when it is fully dried and ready for firing. If you are unsure if the tray is completely dry, lightly tap on it with your finger. If it sounds hollow, it’s ready for firing.
Step 7: Bisque Firing
Once your tray is completely dry, it’s time to fire it in a kiln. Place the tray on a clean shelf or stilts in the kiln and follow your specific kiln’s instructions for proper firing techniques and times.
Bisque firing refers to firing clay at lower temperatures (around 1800°F) to remove any remaining moisture and strengthen the structure of the clay. This step is crucial before glazing and final firing, as it prevents the tray from exploding or cracking during high-temperature firings.
Step 8: Glaze and Final Firing
After bisque firing, you can now add a glaze to your tray for a glossy finish and added durability. There are many types of glazes available, including clear, colored, or textured options.
Using a brush or dipping technique, apply a thin coat of glaze to your tray according to the manufacturer’s instructions. Once glazed, fire the tray again at higher temperatures (around 2200°F) for a final firing that will fuse the glaze to the clay and create a strong, waterproof finish.
Step 9: Enjoy Your Handmade Tray!
Congratulations, you have successfully created a handmade clay tray! Once cooled, your tray is now ready to be used for serving food, displaying decor or organizing items. With this simple and versatile craft, you can easily create personalized trays for yourself or as gifts for family and friends. Remember to always handle your tray with care and avoid exposing it to extreme temperatures or excessive weight to prevent damage.
Following these steps on how to make ceramic trays, you can also experiment with different shapes, designs, and glazes to create unique and functional trays that reflect your personal style. Have fun with the process and enjoy using your handmade tray in your daily life!
Additional Tips
- If you want a smoother surface on your tray, consider sanding it lightly after the bisque firing before adding glaze.
- Experiment with different techniques and designs for unique results.
- For added strength and durability, consider using stoneware or porcelain clay instead of earthenware.
- Always follow safety guidelines when working with clay and kilns.
- If you don’t have access to a kiln, air-dry clays that do not require firing are available.
Now that you have successfully created your own handmade tray, why stop there? You can apply these steps to create various ceramic objects such as plates, bowls, vases and more. With practice and experimentation, you can continue honing your skills and creating beautiful pieces of functional art. Happy crafting!
Frequently Asked Questions
Q: Can I Use Regular Clay From a Craft Store for This Project?
A: Yes, you can use any type of clay that is suitable for firing in a kiln. However, the finished result may vary depending on the type and quality of clay used. Consider experimenting with different clays to find your preferred type.
Q: What Kind of Glaze Should I Use?
A: There are many types of glazes available, including clear, colored, or textured options. It is best to use a glaze specifically designed for ceramic projects and follow the manufacturer’s instructions for proper application.
Q: Can I Make Smaller or Larger Trays Using This Method?
A: Yes, you can adjust the size of your tray by cutting your slab of clay to your desired dimensions before shaping it into a tray. Keep in mind that larger trays may require additional support during drying and firing to prevent warping.
Q: How Do I Care for My Ceramic Tray?
A: To keep your tray in good condition, avoid exposing it to extreme temperatures or excessive weight. Handwashing with mild soap and water is recommended for cleaning, and avoid using abrasive materials that could scratch the surface of the glaze. With proper care, your tray can last for many years to come.
Conclusion
Creating your own handmade ceramic tray is a rewarding and creative experience that allows you to blend functionality with personal artistry. By following the steps on how to make ceramic trays provided, from shaping and drying the clay to firing and glazing, you can craft a piece that is both beautiful and practical.
Whether you use your tray to serve guests, organize items, or simply as a decorative element in your home, the satisfaction of having made it yourself adds a unique value that store-bought items cannot match. With practice and experimentation, the possibilities are endless—this craft opens the door to a world of ceramic projects limited only by your imagination. Enjoy the process and take pride in the craftsmanship of your handmade creation!
Specialization:
- Master of wheel-throwing, hand-building, and advanced glazing techniques
- Focus on creating both functional pottery and decorative art pieces
Recognition:
- Celebrated by collectors and art enthusiasts for creating one-of-a-kind pieces that blend artistry with functionality
- Participates in local and national exhibitions, earning accolades for his innovative designs and craftsmanship
Passion:
- Deeply committed to exploring and pushing the boundaries of ceramic artistry
- Continuously experiments with new materials, firing techniques, and artistic concepts to evolve his craft
Personal Philosophy:
- Believes in the transformative power of art, aiming to evoke emotions and connections through his ceramic creations
- Advocates for sustainability in ceramics, using eco-friendly materials and practices whenever possible