


Ceramic carving is a captivating decorative technique that allows artisans and enthusiasts to add intricate patterns or textures to their clay or ceramic creations. Whether embellishing a bowl, a mug, or a decorative tile, this method enhances the aesthetic appeal of everyday items, transforming them into personalized works of art.
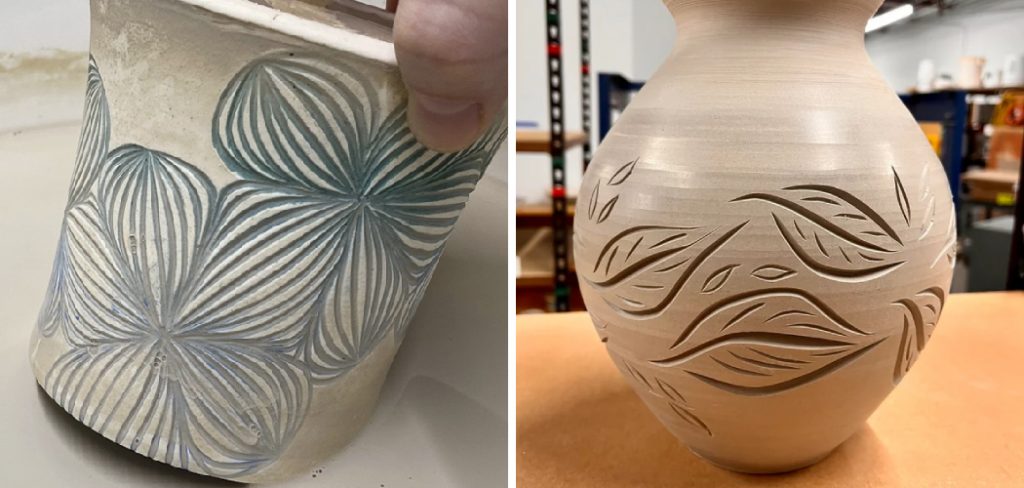
Popular in both professional pottery and DIY home crafts, ceramic carving offers endless possibilities for creativity. The purpose of this article is to provide a comprehensive guide for beginners on how to carve designs into ceramic surfaces. From essential tools to methodical techniques, this article will focus on the best practices for carving while the clay is leather-hard, ensuring precision and durability in your designs. Whether you’re looking to refine your skills or experiment with a new hobby, this step-by-step guide will help you bring your creative visions to life.
Understanding the Right Stage of Clay
The Leather-Hard Stage
The leather-hard stage is the ideal time to carve designs into clay. At this stage, the clay is firm yet retains a slight amount of moisture, making it pliable enough to carve clean, precise lines without the risk of collapsing or deforming. This stage strikes the perfect balance between softness and stability, ensuring your designs are well-defined and durable.
Importance of Timing
Timing is crucial when carving clay, as working at the wrong stage can lead to undesirable outcomes. If the clay is too wet, it tends to smear or collapse under the pressure of your carving tools, causing sloppy and inconsistent designs. On the other hand, if the clay has dried too much, it becomes brittle, making it difficult to carve and prone to cracking or chipping. Achieving the right balance is essential for aesthetic and structural success.
To test whether the clay is leather-hard, gently press your fingernail into its surface. If it leaves a slight mark without sinking in too deeply, the clay is at the correct stage. Paying close attention to the moisture and firmness of your clay will elevate the quality and precision of your designs.
Tools and Materials You’ll Need
When working with clay, having the right tools and materials is essential for achieving precise and detailed results. Below is a breakdown of the basic and optional tools, along with other supplies to enhance your workflow.
Basic Tools
- Loop Tools, Ribbon Tools, and Needle Tools: These are crucial for removing excess clay and refining your shapes with ease.
- Stylus and Carving Knives: Perfect for creating intricate patterns and clean cuts.
- Wooden Modeling Tools: These assist in shaping and smoothing edges, ensuring a polished finish.
Optional Tools
- X-Acto Knife or Linoleum Cutter: These tools enable fine details and intricate designs, ideal for advanced projects.
- Pottery Wheel: If you’re focusing on round forms, a pottery wheel provides the consistency and symmetry you need.
Other Supplies
- Sponge and Water: Essential for keeping the clay moist and workable during the carving or modeling stages.
- Sketchbook: Use this to plan out your designs, ensuring clarity and direction before you begin working on the clay.
- Apron and Towel: For keeping yourself and your workspace clean during the creative process.
Having these tools and materials on hand will prepare you for a productive and enjoyable clay-working experience.
Planning and Sketching Your Design
Start with a Clear Vision
Before beginning your project, take time to establish a clear vision for your design. Decide whether you want it to be abstract, floral, geometric, or linked to a specific theme. Having a defined direction will not only make the process smoother but also ensure the design aligns with your artistic intentions.
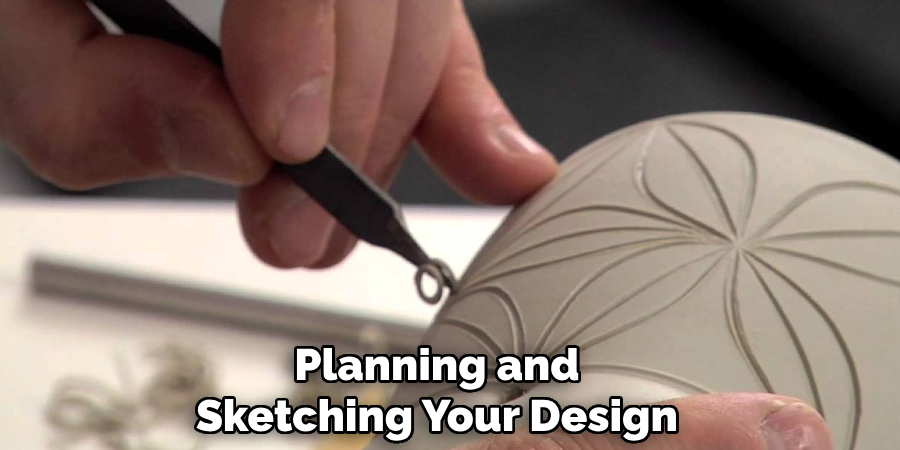
Sketch on Paper First
Preliminary sketches on paper are essential to help you visualize the composition, spacing, and flow of your design. This step allows you to refine details and make adjustments before committing to clay. Don’t hesitate to create multiple variations in your sketchbook to find the best version of your idea.
Transfer Design to Clay
Once satisfied with your design, lightly mark it onto the clay using a stylus or pencil if the clay surface is dry. For damp or pliable clay, use gentle indents to avoid distortion. For more precise and detailed designs, consider creating a stencil or utilizing carbon paper to transfer your sketches onto the clay. This ensures accuracy and consistency, making the carving or modeling process more manageable and professional-looking. Taking this methodical approach will lay the foundation for a polished and well-executed final piece.
How to Carve Designs Into Ceramic: Basic Carving Techniques
Incising
Incising involves cutting shallow lines into the clay’s surface to create outlines and intricate details. This technique is ideal for defining patterns, textures, or fine elements of a design. Using pointed or sharp tools, you can precisely draw or etch the desired lines without removing significant material. Incising is particularly effective for borders, decorative motifs, or subtle surface embellishments.
Relief Carving
Relief carving involves removing the background clay around a design to create a raised relief. This method gives depth and dimensionality to your work, turning flat designs into three-dimensional forms. Depending on the desired effect, you can create low relief with shallow carving or high relief by removing more clay. Relief carving adds a dramatic and striking visual element to clay projects.
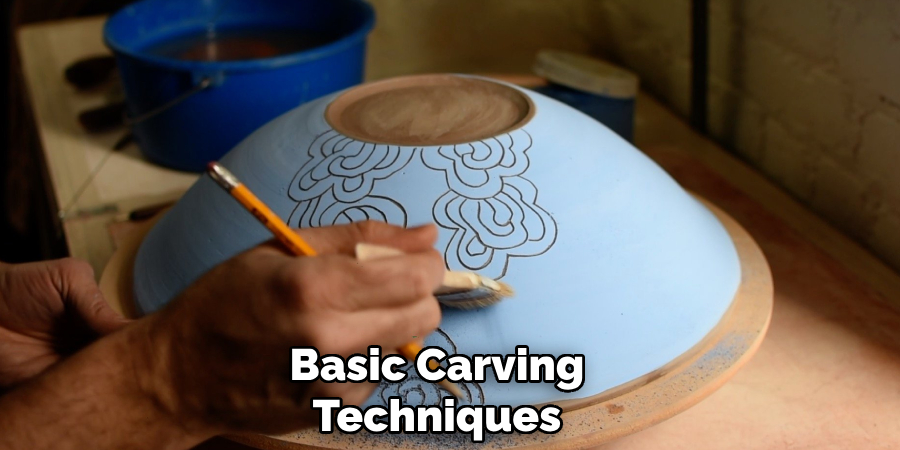
Piercing
Piercing involves carving completely through the clay’s surface to create patterns or holes. This technique transforms the clay into intricate designs that allow light to pass through, adding a dynamic element. Piercing is often used for lanterns, luminaries, or decorative panels where light and shadow interplay can enhance the piece’s aesthetics.
Sgraffito Technique
The sgraffito technique combines color and texture by applying slip or underglaze to the clay surface and then scratching through it to reveal the clay beneath. This contrast creates vivid and visually interesting designs. Sgraffito is excellent for intricate or bold patterns that stand out against a colored background.
Tips for Success
- Start with light pressure and gradually increase to avoid mistakes.
- Clean your tools regularly to ensure smooth and precise lines.
- Keep the clay evenly moist to minimize cracking and ensure clean carving results.
Carving on Bisque-Fired vs. Greenware
Greenware (Unfired Clay)
Greenware refers to clay that has not yet been fired. It is easier to carve because it is soft and malleable, making it ideal for creating intricate designs with minimal effort. However, greenware is also more fragile and prone to breakage, requiring gentle handling and even support during the carving process. It’s essential to maintain proper moisture levels in the clay to avoid cracking and to ensure clean carvings.
Bisque-Fired Clay
Bisque-fired clay, on the other hand, is clay that has been through its first firing and is in a hardened state. While it is more resistant and durable than greenware, it requires different tools, such as diamond burrs or rotary tools, for carving.
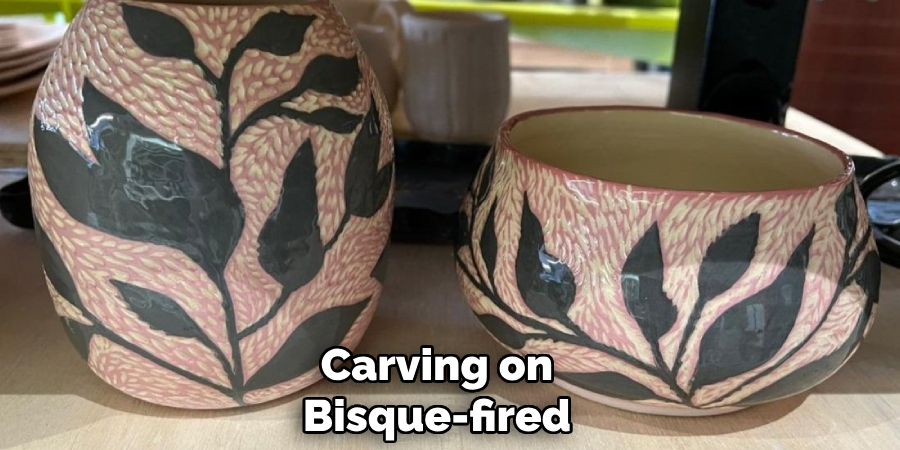
The process can be more challenging due to the material’s hardness, and it generates fine dust particles, so wearing a mask and ensuring good ventilation are necessary for safety. Although it is more challenging to carve, bisque-fired clay enables the creation of delicate textures and details that can enhance the final design during glazing.
Choosing Between the Two
Beginners are often encouraged to start with greenware because it offers more control and flexibility. For more experienced artists looking to add fine textures or details before glazing, bisque carving is an excellent choice. The right material will depend on the desired outcome and the artist’s level of skill.
Cleaning and Finishing the Surface
Proper cleaning and finishing of a ceramic piece are crucial to achieving a polished final product.
Cleaning Up Edges
To refine the edges of your piece, use a damp sponge or a soft brush to smooth and clean the lines gently. This process removes inconsistencies and creates a cleaner, more defined edge for carving or glazing.
Removing Burrs or Excess Clay
Excess clay or burrs left from carving can detract from the final appearance. On bisque-fired pieces, fine sanding pads work well for smoothing surfaces. For leather-hard clay, a dry brush is effective in clearing away debris without damaging the design.
Drying and Firing
Before firing, allow your piece to dry gradually and evenly to avoid cracks caused by uneven moisture levels. Once fully dried, bisque firing locks the design into the ceramic body, preparing it for glazing. This step ensures that the structure is stable while also preserving the detailed carving.

Glazing Options
When glazing, consider options that enhance the textures of your design. Transparent glazes are particularly effective for showcasing intricate details, adding depth and interest to your work. Experimenting with various colors and finishes can bring your artistic vision to life.
Conclusion
Carving designs into ceramic is a rewarding and creative way to personalize your pottery. By understanding the clay’s stage, using appropriate tools, and honing your skills on test pieces, you can achieve intricate and expressive results.
The process of how to carve designs into ceramic requires patience, detailed planning, and a willingness to experiment with textures and techniques. Remember to take your time and allow the clay to lead you in the creative process. Whether paired with transparent glazes or bold finishes, your carved ceramic pieces will beautifully reflect your unique artistic style.
Specialization:
- Master of wheel-throwing, hand-building, and advanced glazing techniques
- Focus on creating both functional pottery and decorative art pieces
Recognition:
- Celebrated by collectors and art enthusiasts for creating one-of-a-kind pieces that blend artistry with functionality
- Participates in local and national exhibitions, earning accolades for his innovative designs and craftsmanship
Passion:
- Deeply committed to exploring and pushing the boundaries of ceramic artistry
- Continuously experiments with new materials, firing techniques, and artistic concepts to evolve his craft
Personal Philosophy:
- Believes in the transformative power of art, aiming to evoke emotions and connections through his ceramic creations
- Advocates for sustainability in ceramics, using eco-friendly materials and practices whenever possible