


Are you looking for a new kitchen tool to add to your collection? Look no further than ceramic spurtles!
How to create ceramic spurtles can be a rewarding and artistic process that combines functionality with craftsmanship. Spurtles, traditionally used as stirring utensils, can be crafted from ceramics to offer a unique and stylish alternative to wooden versions. By molding clay into the desired shape and applying creative designs, you can produce practical and visually appealing spurtles.
This guide will take you through the steps required to design, shape, and finish your ceramic spurtles, ensuring a durable and personalized final product. Whether you’re a seasoned ceramic artist or a beginner, making ceramic spurtles is a great way to hone your skills and create something unique.
What Are the Benefits of Making Ceramic Spurtles?
Before diving into creating ceramic spurtles, let’s explore why it’s a worthwhile endeavor. First and foremost, making your spurtles allows you to customize them to fit your specific needs and preferences. You can choose your spurtle’s size, shape, and design to match your cooking style and kitchen aesthetic perfectly. Additionally, using ceramic material offers several advantages over wooden or plastic utensils.
- Durability: Ceramic is a durable material that can withstand high heat and won’t warp or crack like wood.
- Versatility: Ceramic spurtles are versatile tools that can be used for stirring, flipping, scraping, and more.
- Non-reactive: Unlike metal or plastic utensils, ceramic spurtles won’t react with acidic foods or alter their taste.
- Easy to Clean: Ceramic is non-porous, making it easy to clean and resistant to bacteria growth.
- Eco-Friendly: By creating your ceramic spurtles, you reduce the need for disposable utensils and promote sustainable practices.
Now that we’ve established the benefits of making ceramic spurtles let’s jump into the process!
What Will You Need?
To successfully create your ceramic spurtles, you’ll need the following materials:
- Clay: Choose a high-quality clay that is suitable for pottery and can withstand high temperatures.
- Pottery Tools: These can include a wire cutter, wooden or metal ribs, modeling tools, and a sponge.
- Kiln: A kiln is necessary for firing and hardening the clay.
- Glazes: Glazes add color and texture to your spurtles and provide a protective layer against food stains. Choose lead-free glazes that are safe for food use.
- Paintbrushes: Use small paintbrushes to apply designs and details to your spurtles.
- Protective Gear: Working with clay and glazes can be messy, so wearing a protective apron or clothes you don’t mind getting dirty is essential. Wearing gloves and a face mask when handling the clay and glazes is also recommended.
Once you have all the necessary materials, let’s move on to creating your own ceramic spurtles!
8 Easy Steps on How to Create Ceramic Spurtles
Step 1: Prepare Your Workspace
Before you start working on your ceramic spurtles, creating a clean, organized, and well-equipped workspace is essential. Begin by selecting a flat, sturdy surface like a workbench or table, and cover it with a protective layer such as a canvas or plastic sheet to prevent damage from clay, glazes, or water. Ensure easy access to all your materials, tools, and water for smooth workflow and convenience.
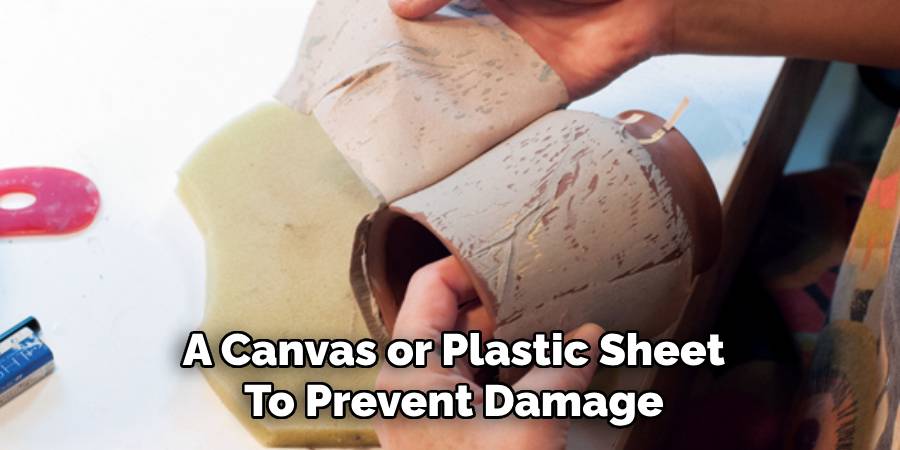
Proper lighting is essential to see the details of your work clearly, so if natural light isn’t sufficient, consider adding a desk lamp or overhead light. Lastly, make sure your workspace is well-ventilated, especially for working with glazes, as some may release fumes during application. Preparing your workspace correctly will set the tone for a productive and enjoyable pottery experience!
Step 2: Gather Your Materials and Tools
To create ceramic spurtles effectively, you must assemble all the necessary materials and tools beforehand. Start with clay suitable for ceramics—stoneware or porcelain are excellent choices due to their durability and workability. You’ll also need essential tools such as a rolling pin, cutting wire, sponges, rib tools, sculpting tools, and a needle tool for fine detailing.
Keep a bowl of water nearby to smooth the clay and a ruler or measuring tool for consistent dimensions. If you plan to add decorative elements, prepare underglazes, paints, or carving tools to customize your spurtles. Having everything organized and easily accessible will streamline your process and ensure you focus fully on your creativity.
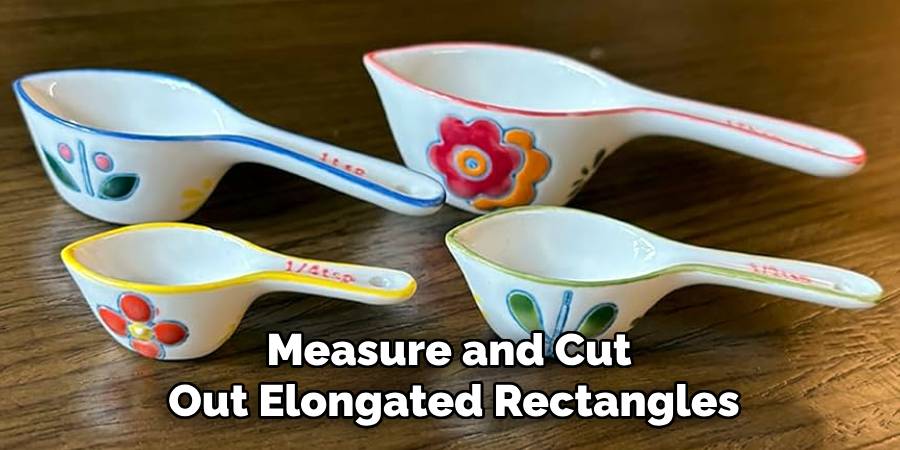
Step 3: Shape the Spurtles
Begin shaping your spurtles by rolling out the clay into a flat, even slab, using a rolling pin. Aim for a thickness of about 1/4 inch to ensure durability without making the spurtles too heavy. Once the slab is ready, use a ruler and cutting wire or a knife to measure and cut out elongated rectangles, typically around 10-12 inches in length and 1-2 inches in width, depending on your desired spurtle size.
Step 4: Shape and Refine the Edges
After cutting the rectangles, gently round off the edges of each piece to create a smooth, comfortable grip for your spurtles; use a damp sponge or your fingers dipped in water to smooth the edges and remove any roughness or sharp corners. This step is crucial for ensuring your spurtles’ functionality and aesthetic appeal. Be patient and thorough; well-crafted edges will greatly enhance the final product. If desired, you can slightly taper one end of the spurtle to make it easier to use for stirring or scraping.
Step 5: Dry and Prepare for Firing
Once the spurtles have been shaped and refined, allow them to dry completely before proceeding to the firing stage. Place the spurtles on a flat, non-stick surface, such as a wooden board or parchment paper, in a cool, well-ventilated area. Depending on the humidity and thickness of the clay, this drying process may take anywhere from a few days to a week. Ensure the spurtles are fully dry to the touch and free of any dampness, as firing wet clay can result in cracks or explosions in the kiln. Rotate them occasionally during drying to promote even moisture evaporation and prevent warping.
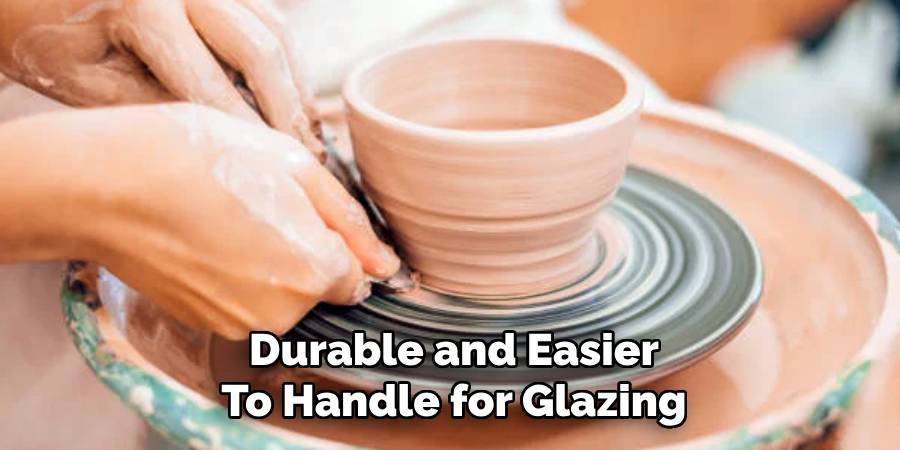
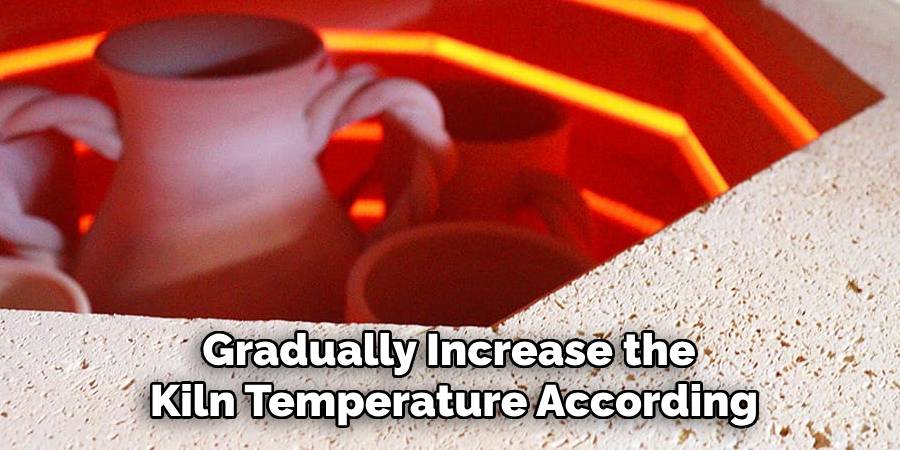
Step 6: Bisque Firing
Once the spurtles are completely dry, they are ready for the first firing, known as bisque firing. This process hardens the clay, making it durable and easier to handle for glazing. Place the spurtles carefully in the kiln, ensuring they do not touch each other to avoid sticking during firing. Gradually increase the kiln temperature according to the specifications of your clay, typically reaching around 1,800°F (982°C). Allow the kiln to cool completely before removing the spurtles, as sudden temperature changes can cause cracks. After this step, your spurtles will have a porous but sturdy finish, ideal for applying glaze.
Step 7: Glazing
After the bisque firing, it’s time to apply glaze to your spurtles. Glazing adds a smooth, non-porous finish and enhances the aesthetic appeal. Choose a food-safe glaze if the spurtles will be used for cooking. Dip, brush, or spray the glaze onto each spurtle, ensuring even coverage. Avoid glazing the base or any part that will touch the kiln shelf during firing, as the glaze can melt and cause the spurtle to stick to the shelf. Allow the glaze to dry completely before the final firing process.
Step 8: Final Firing
The final firing, often referred to as the glaze firing, will fuse the glaze and give the spurtles their finished appearance. Place the glazed spurtles back into the kiln, ensuring they are spaced adequately to avoid sticking or accidental contact. Gradually increase the kiln temperature according to the specifications of the glaze, typically between 1,820°F and 2,200°F (993°C to 1,204°C). Maintain a controlled heating schedule to prevent cracking or glaze defects. Once the firing is complete, allow the kiln to cool fully before opening it. Remove the spurtles carefully, and admire their polished, durable finish. At this stage, your handmade spurtles are ready for use or display!
By following these simple steps, you can create beautiful and functional ceramic spurtles that are sure to impress.
5 Things You Should Avoid
- Using Low-Quality Clay: Starting with low-quality or unsuitable clay can lead to fragile spurtles that might break easily or fail to maintain their shape during the firing process.
- Skipping Proper Drying Time: Rushing the drying process can result in cracks or uneven surfaces. Always ensure the clay dries completely before firing.
- Misusing Glaze: Uneven or excessive glaze application can cause dripping or imperfections, affecting the spurtle’s functionality and appearance.
- Neglecting Temperature Precision: Firing the ceramics at the wrong temperature may cause warping, brittleness, or even complete failure of the piece.
- Overlooking Ergonomic Design: Ignoring the practical design of the spurtle can make it uncomfortable to use. Focus on smooth handles and proportions that enhance usability.
Conclusion
How to create ceramic Spurtles is a rewarding process that requires attention to detail and patience.
You can craft a durable and practical kitchen tool by carefully selecting high-quality materials, dedicating adequate time to each step, and focusing on both functionality and aesthetics. Avoiding common mistakes, such as rushing the drying process or neglecting ergonomic design, ensures that your spurtles are visually appealing and perfectly suited for everyday use.
With practice and care, you can master this art and produce ceramic spurtles that are both beautiful and functional.
Specialization:
- Master of wheel-throwing, hand-building, and advanced glazing techniques
- Focus on creating both functional pottery and decorative art pieces
Recognition:
- Celebrated by collectors and art enthusiasts for creating one-of-a-kind pieces that blend artistry with functionality
- Participates in local and national exhibitions, earning accolades for his innovative designs and craftsmanship
Passion:
- Deeply committed to exploring and pushing the boundaries of ceramic artistry
- Continuously experiments with new materials, firing techniques, and artistic concepts to evolve his craft
Personal Philosophy:
- Believes in the transformative power of art, aiming to evoke emotions and connections through his ceramic creations
- Advocates for sustainability in ceramics, using eco-friendly materials and practices whenever possible