


Creating a ceramic bowl is a rewarding and creative process that allows you to shape a functional piece of art with your own hands. Whether you are a beginner or an experienced artist, this craft involves a combination of techniques, precision, and patience.
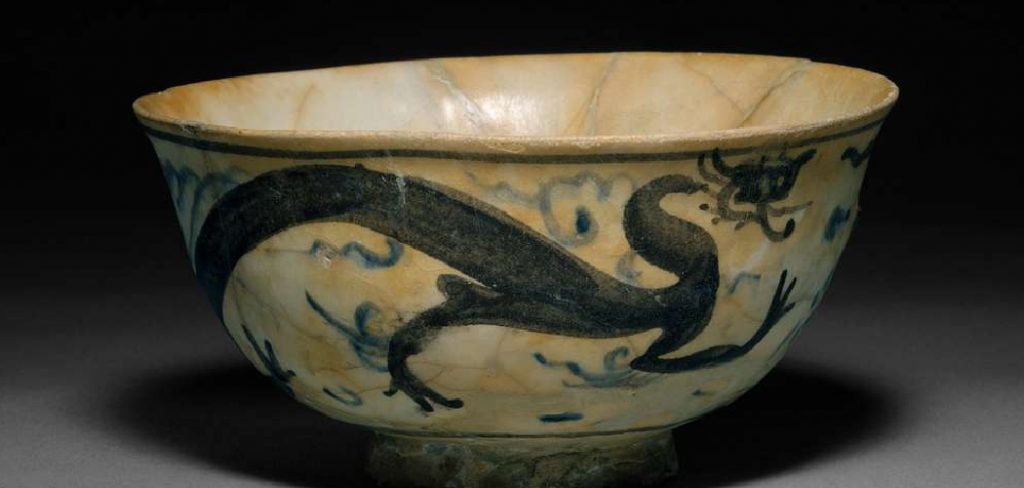
By following a few simple steps, you can transform a lump of clay into a beautiful, handmade bowl that reflects your personal style and creativity. This guide will walk you through the essential steps of how to make a ceramic bowl.
Benefits of Learning This Craft
Learning to create ceramic bowls offers a range of benefits that go beyond simply making functional objects. First, it allows you to express your creativity and individuality, as each piece you craft will carry your unique touch and style. It’s also a therapeutic activity that promotes mindfulness and reduces stress, as working with clay requires focus and a hands-on connection to the materials.
Additionally, this craft hones valuable skills such as patience, problem-solving, and attention to detail. On a practical level, making your own ceramic bowls can be both cost-effective and rewarding, allowing you to create personalized, one-of-a-kind pieces for your home or as thoughtful gifts for others. Overall, this art form combines creativity, relaxation, and utility into a fulfilling and enriching experience.
Materials and Tools You’ll Need
To get started with creating your own ceramic bowls, you’ll need a few essential materials and tools. Here’s a list to help you prepare:
- Clay: Choose a type of clay that suits your project, such as earthenware, stoneware, or porcelain. Each variety has unique properties and firing requirements.
- Pottery Wheel (optional): If you want to create symmetrical bowls using the technique of throwing, a pottery wheel will be essential.
- Basic Tools:
- Wire cutter for slicing clay blocks.
- Rib and scraper tools for shaping and smoothing surfaces.
- Modeling tools for adding details or textures.
- Sponge for keeping your clay moist and manageable.
- Slip or Water: This acts as a bonding agent when joining pieces of clay.
- Work Surface: A sturdy, non-porous surface or a canvas-covered board to prevent sticking.
- Kiln: For firing your completed bowl, a kiln is necessary to harden the clay. If you don’t own one, you can explore firing options at local pottery studios.
- Glazes: For finishing your bowl, select glazes in colors and finishes of your choice to ensure both durability and a personal touch.
By gathering these materials and tools, you’ll be well-equipped to begin your pottery-making adventure!
10 Methods How to Make a Ceramic Bowl
1. Choose the Right Clay for Bowl Making
Before shaping any form, selecting the appropriate clay is essential. Bowls can be made from various types of clay—stoneware, earthenware, porcelain—each with distinct properties. For beginners, stoneware offers a forgiving plasticity and durability. Porcelain, while beautiful, is more delicate and demanding to work with.

Ensure the clay is properly wedged to remove air bubbles and create a uniform consistency, which is critical for preventing cracks or warping during drying and firing. Consider the intended use of your bowl: will it be functional, decorative, or food-safe? The clay type and firing temperature must support that goal.
2. Use the Pinch Pot Method for Simple Hand-Building
One of the oldest and simplest ways to make a ceramic bowl is the pinch pot technique. Start by rolling a ball of clay in your hands—about the size of an orange. Press your thumb into the center, then begin pinching the walls outward evenly using your thumb and fingers. Rotate the clay as you work to maintain symmetry.
This method is ideal for small, intimate bowls with a handmade feel. You can shape the form as shallow or deep as you like. Use a sponge to smooth the surface, and a rib tool to refine the shape before allowing it to dry.
3. Try Coil Building for Larger or Sculptural Bowls
Coil building allows you to create larger or more complex bowl shapes without a wheel. Start with a flat base, then roll clay into long, even coils. Stack the coils on top of one another in a spiral, smoothing them together on the inside and outside with fingers or a rib tool.
This technique is great for exploring height, curves, or even decorative textures along the bowl’s walls. Coil-built bowls can be thick and sturdy or thin and elegant, depending on how you compress and smooth the coils. It’s a method that combines patience with structural creativity.
4. Use a Slab and Mold for Consistent Shapes
For uniformity in bowl shapes, the slab and mold technique is incredibly useful. Roll a slab of clay evenly using a rolling pin and canvas or guide sticks. Drape the slab over or into a bowl-shaped plaster mold, gently pressing it to conform to the contours. Trim the edges with a needle tool or knife.
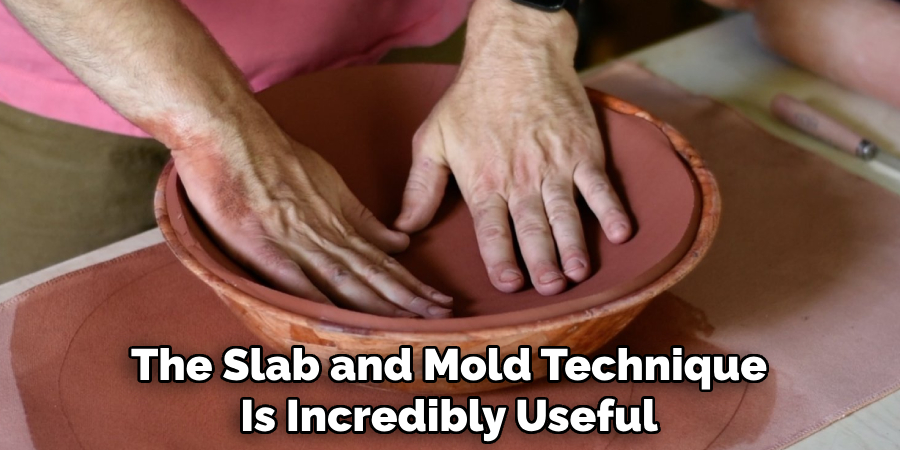
This approach is excellent for producing repeatable forms and is often used in studio production. Once the clay stiffens to leather-hard, you can remove it from the mold and add foot rings, textures, or decoration before firing.
5. Throw a Bowl on the Pottery Wheel
Wheel throwing is a traditional and highly efficient way to make ceramic bowls. Begin by centering a ball of clay on the wheel head, using water and firm pressure. Once centered, open the clay by pressing your thumbs into the middle, then pull the walls outward while supporting them with your fingers.
Maintain a consistent speed and hand position to achieve symmetrical curves. Refine the lip, compress the base, and shape the profile using ribs or sponges. Throwing takes practice, but once mastered, it allows for elegant, balanced bowls with smooth interior and exterior surfaces.
6. Trim the Bowl for a Professional Finish
Trimming is a crucial step in wheel-thrown bowls. Once the bowl reaches a leather-hard stage—firm yet workable—place it upside-down on the wheel and center it. Secure it with clay lugs or a chuck. Using loop tools, trim the excess clay from the bottom to define the foot ring and reduce weight.
Trimming refines the bowl’s profile, balances its weight, and adds an elevated base for better aesthetics and function. For hand-built bowls, you can carve or shape a foot by hand, ensuring the base is stable and pleasing to the eye.
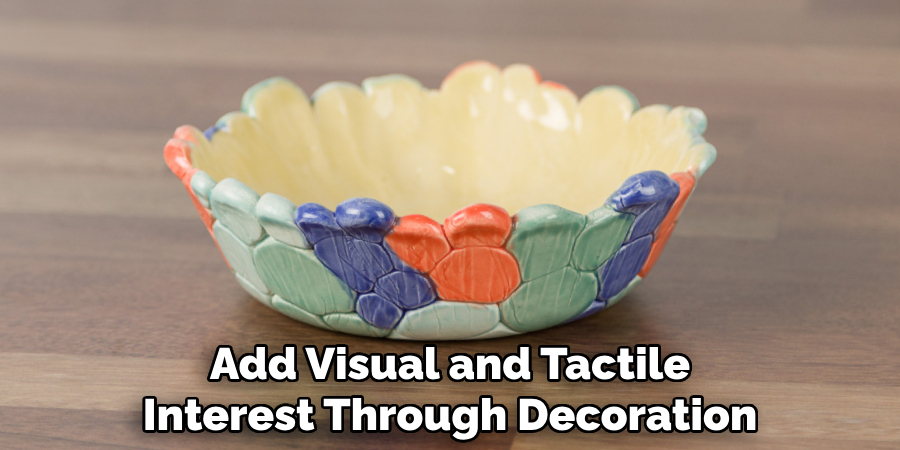
7. Decorate the Surface with Texture and Design
Before the bowl dries completely, you can add visual and tactile interest through decoration. Carving, stamping, or impressing objects into the clay creates unique patterns. Slip trailing adds raised designs, while sgraffito allows you to scratch through colored slip to reveal the base clay.
You can also burnish the surface for a soft sheen or leave it raw for a rustic look. Decoration adds character and narrative to a bowl, transforming it from a functional object into a work of art. Always consider how glaze will interact with the texture to enhance or soften the details.
8. Bisque Fire to Prepare for Glazing
Once your bowl is bone dry—completely moisture-free—it’s ready for bisque firing. This first firing hardens the clay, making it durable and porous enough to accept glaze. Place the bowl in the kiln with enough space to allow for expansion. Fire it slowly, especially if the walls are thick or the climate is humid, to avoid cracking.
Most bisque firings reach Cone 04 (around 1060°C or 1940°F). After cooling, inspect the bowl for imperfections. You can sand rough spots or clean the surface with a damp sponge before applying glaze.
9. Glaze the Bowl for Beauty and Functionality
Glazing enhances both the appearance and utility of a ceramic bowl. Choose a glaze that suits your design—glossy for shine, matte for softness, or translucent to highlight texture. Apply glaze by brushing, dipping, or spraying, ensuring an even coat.
Avoid over-glazing the foot or interior if it might pool. Consider layering glazes for complex effects or using wax resist to preserve certain areas. Let the glaze dry thoroughly before loading it into the kiln for glaze firing. Proper glaze application can bring out vibrant color, contrast, and depth in your finished bowl.
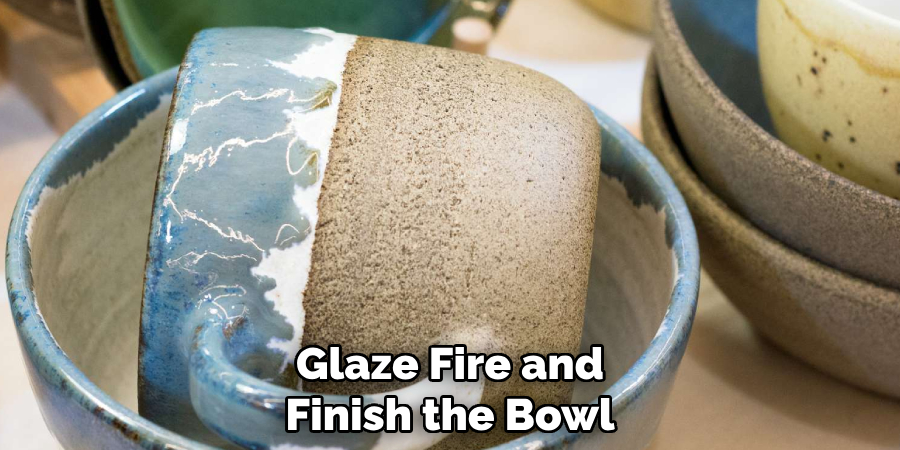
10. Glaze Fire and Finish the Bowl
The final step is the glaze firing, which vitrifies the clay and melts the glaze into a glassy surface. Load the kiln carefully to avoid contact between glazed surfaces and kiln shelves. Fire to the glaze’s target cone—often Cone 5 or 6 for mid-range glazes.
After cooling, inspect the bowl for smooth glaze coverage and any kiln-related issues like pinholes or crawling. If desired, polish the foot with sandpaper to prevent scratching surfaces. The result is a finished ceramic bowl that’s not only beautiful but also functional, ready to be used or admired.
Conclusion
Making a ceramic bowl is a deeply satisfying experience that combines form, function, and creativity. Whether hand-built with pinch or coil techniques, shaped in a mold, or thrown on the wheel, each method offers a unique approach and aesthetic.
From the clay selection to the final glaze firing, every step plays a crucial role in shaping the character of the bowl. Thanks for reading, and we hope this has given you some inspiration on how to make a ceramic bowl!
Specialization:
- Master of wheel-throwing, hand-building, and advanced glazing techniques
- Focus on creating both functional pottery and decorative art pieces
Recognition:
- Celebrated by collectors and art enthusiasts for creating one-of-a-kind pieces that blend artistry with functionality
- Participates in local and national exhibitions, earning accolades for his innovative designs and craftsmanship
Passion:
- Deeply committed to exploring and pushing the boundaries of ceramic artistry
- Continuously experiments with new materials, firing techniques, and artistic concepts to evolve his craft
Personal Philosophy:
- Believes in the transformative power of art, aiming to evoke emotions and connections through his ceramic creations
- Advocates for sustainability in ceramics, using eco-friendly materials and practices whenever possible