


Creating a ceramic decorative jar is a rewarding and artistic project that allows you to express your creativity while crafting a functional piece of art.

Whether you are a beginner or have experience with ceramics, this guide will walk you through the fundamentals of how to make a Ceramic Decorative Jar. With the right tools, materials, and techniques, you can produce a unique decorative item that adds charm to any space.
Why Ceramic Decorative Jars Are Popular
Ceramic decorative jars have gained enduring popularity due to their versatility, aesthetic appeal, and practicality. These jars come in a wide range of shapes, sizes, and designs, making them suitable for various styles of interiors, from modern minimalist to rustic or traditional decor.
The craftsmanship involved in creating ceramic jars often results in one-of-a-kind pieces, which add a personal and artistic touch to any space. Additionally, ceramics are highly durable and can withstand the test of time, making them both a functional and timeless choice. Beyond their practical use for storage, ceramic jars are also admired as statement pieces that can enhance the ambiance of a room.
Tools and Materials Needed
Creating ceramic jars involves a combination of essential tools and materials to ensure the process is both efficient and successful. Here are the key items you’ll need:
- Clay: The foundational material, available in various types like earthenware, stoneware, or porcelain, depending on the desired finish and durability.
- Pottery Wheel (optional): Useful for shaping symmetrical pieces if you’re working on wheel-thrown ceramics.
- Hand Tools: Includes sculpting tools, wire cutters, sponges, and carving tools for shaping and detailing.
- Slip and Glazes: For decorative finishes and to create a smooth, sealed surface after firing.
- Kiln: Necessary for firing the shaped and glazed clay, hardening it into durable ceramic.
- Ruler and Calipers: For precise measurements to maintain uniformity in design.
- Plastic Sheets or Towels: To keep the clay moist during the building process.
With these tools and materials on hand, you’ll have everything needed to start crafting beautiful and functional ceramic jars.
10 Methods How to Make a Ceramic Decorative Jar
1. Choose the Right Type of Clay for Your Project
The foundation of a successful ceramic decorative jar lies in selecting the appropriate clay. Earthenware, stoneware, and porcelain are the most common types. For decorative jars, stoneware is often preferred because of its strength and mid-range firing temperature.

If you seek a more delicate or translucent appearance, porcelain is ideal but requires careful handling. Make sure the clay you choose is compatible with your kiln and glaze. Additionally, wedge the clay properly before use to eliminate air bubbles and ensure a uniform texture, which will prevent cracking or warping during firing.
2. Form the Jar Using the Coil or Wheel Method
There are multiple ways to form the jar, but the two most common are the coil-building technique and wheel-throwing. In coil-building, long, snake-like rolls of clay are stacked and smoothed to build up the walls, ideal for artists who prefer hand-building or don’t have access to a pottery wheel. On the other hand, wheel-throwing offers a more symmetrical and polished result. Center a lump of clay on the wheel, open the middle, and pull up the walls gradually, forming the desired shape. Use a rib tool to smooth the surface and maintain even thickness throughout.
3. Sculpt or Design the Lid for Function and Style
A decorative jar often includes a fitted lid, adding both function and elegance. If using the wheel, you can throw the lid separately, ensuring it matches the jar’s opening by measuring the rim precisely. For hand-building, use a slab or pinch method to shape the lid. Add a knob, handle, or decorative element to the top for both utility and visual interest. Test the fit repeatedly while the clay is still leather-hard to ensure the lid will sit correctly after shrinkage during firing.
4. Refine the Leather-Hard Surface Before Decorating
Once the jar and lid reach the leather-hard stage—firm but still slightly pliable—it’s time to refine their surfaces. Use metal or rubber ribs to smooth out any ridges, and trim excess clay from the base or rim using carving tools. If you plan to add decorative features like carvings or texture, this is the perfect stage.
Impress patterns with stamps or tools, carve intricate designs with loop tools, or press in natural elements like leaves for a unique texture. This step is critical in preparing a clean and cohesive canvas for future decoration.

5. Add Handles, Sculptural Elements, or Relief Designs
To give your decorative jar more personality, consider adding handles or sculptural embellishments. Use scoring and slipping techniques—scratching both surfaces and applying a slurry of clay and water—to attach pieces securely. Common additions include braided handles, floral appliqués, or geometric designs. Sculptural elements should match the scale and balance of the jar, ensuring they complement rather than overwhelm the overall form. Be careful to blend edges and remove excess slip to avoid visible seams after firing.
6. Allow the Jar to Dry Slowly and Evenly
Proper drying is crucial to avoid cracks or warping. Once the jar is shaped and decorated, cover it loosely with plastic and let it dry slowly at room temperature. Sudden exposure to air can cause the outer layers to dry too quickly, leading to tension and cracks. Rotate the jar occasionally and uncover it gradually over several days to allow moisture to escape evenly. Avoid placing it near heat sources or in direct sunlight. When the jar is completely bone-dry—cool to the touch and uniform in color—it’s ready for the first firing.
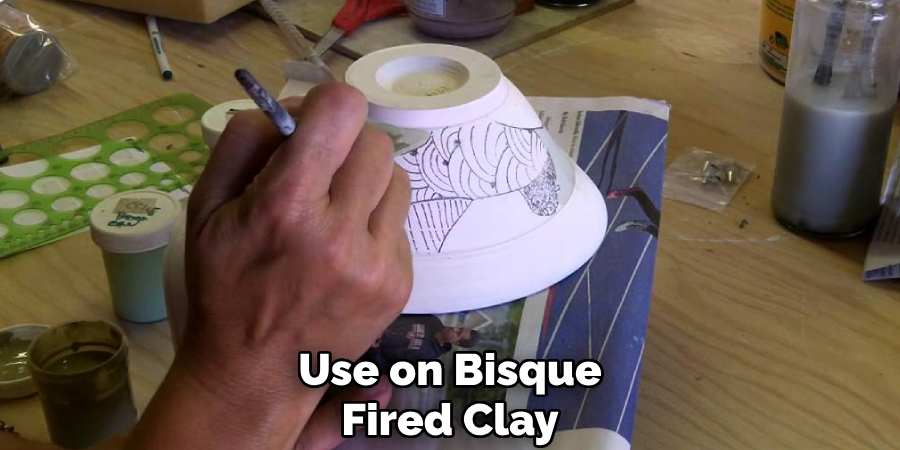
7. Bisque Fire to Harden the Clay and Prepare for Glazing
The first firing, known as the bisque fire, transforms the fragile, dry clay into a ceramic material that can accept glaze. Place the jar and lid in the kiln, ensuring they are not touching any other pieces. Fire according to the clay’s specifications—typically cone 04 to cone 06 for bisque. This stage strengthens the piece while leaving it porous enough to absorb glaze. Allow the kiln to cool completely before opening. After bisque firing, inspect the jar for any defects or cracks and gently sand any rough areas if necessary.
8. Glaze with Your Desired Color and Finish
Glazing is where the jar truly becomes decorative. Choose a glaze that suits the function—glossy for shine, matte for a softer look, or transparent to show texture beneath. Apply glaze using brushing, dipping, or spraying methods, depending on your design preference. You can layer glazes for special effects, add wax resist to create patterns, or use underglaze for detailed painting. Be mindful not to glaze the bottom of the jar or the part of the lid that touches the rim, as this can cause sticking during the glaze firing.
9. Glaze Fire for a Durable, Finished Surface
Place the glazed jar back into the kiln for the glaze firing. This firing is typically hotter than the bisque firing, depending on the glaze and clay type—often cone 5 or cone 6 for stoneware. Use stilts or kiln furniture to support the jar, ensuring stability and even heating. Monitor the firing schedule closely and allow the kiln to cool thoroughly before removing your piece. The glaze should be smooth, even, and fully matured. Any irregularities at this stage become permanent, so precision in earlier steps pays off here.
10. Display, Gift, or Use the Decorative Jar with Care
After firing, your ceramic decorative jar is ready for display or use. If you made it for storage, test the lid for fit and smooth any rough spots with a bit of fine sandpaper. If intended purely for decoration, choose a prominent shelf or table to showcase your work. A well-crafted jar can also serve as a handmade gift, offering both beauty and sentiment. Treat the jar with care, and avoid harsh impacts or extreme temperature changes. While most glazed ceramics are durable, handwashing is best to preserve intricate decorations.
Maintenance and Upkeep
Proper care ensures that your ceramic jar remains in excellent condition for years to come. Always handle it with care, especially if it features delicate designs or intricate details. When cleaning, use a soft cloth or sponge with mild dish soap and lukewarm water.

Avoid abrasive scrubbers or harsh chemicals, as these can damage the finish or glaze. If your jar has a lid, periodically check its fit and adjust gently if necessary. For jars used to store food items, ensure they are thoroughly dried after washing to prevent moisture buildup. With regular care and mindful handling, your ceramic jar can remain a cherished item for both function and decoration.
Conclusion
Making a ceramic decorative jar is both a creative endeavor and a meditative craft, combining design, technique, and patience. From choosing the clay to refining the glaze, each method plays an essential role in producing a piece that’s both beautiful and meaningful.
Whether you are a novice exploring hand-building or a skilled potter refining wheel techniques, the journey of making a ceramic jar is as fulfilling as the finished result. With attention to detail and respect for the process, your ceramic jar will be a unique work of art, cherished for years to come. Thanks for reading our blog post on how to make a Ceramic Decorative Jar! We hope you found it helpful and informative.
Specialization:
- Master of wheel-throwing, hand-building, and advanced glazing techniques
- Focus on creating both functional pottery and decorative art pieces
Recognition:
- Celebrated by collectors and art enthusiasts for creating one-of-a-kind pieces that blend artistry with functionality
- Participates in local and national exhibitions, earning accolades for his innovative designs and craftsmanship
Passion:
- Deeply committed to exploring and pushing the boundaries of ceramic artistry
- Continuously experiments with new materials, firing techniques, and artistic concepts to evolve his craft
Personal Philosophy:
- Believes in the transformative power of art, aiming to evoke emotions and connections through his ceramic creations
- Advocates for sustainability in ceramics, using eco-friendly materials and practices whenever possible