


Creating blue ceramic pieces involves a careful selection of materials and techniques that produce stunning results, prized for their vibrant hues and artistic beauty.
This guide on how to make blue ceramic will take you through the essential steps required to achieve the perfect shade of blue in your ceramic projects. Whether you’re a novice or an experienced ceramicist, understanding the properties of different clay bodies, glazes, and firing temperatures is crucial.
By exploring traditional methods and modern innovations, you’ll be equipped to craft exquisite blue ceramics that captivate and inspire.
Why Blue?
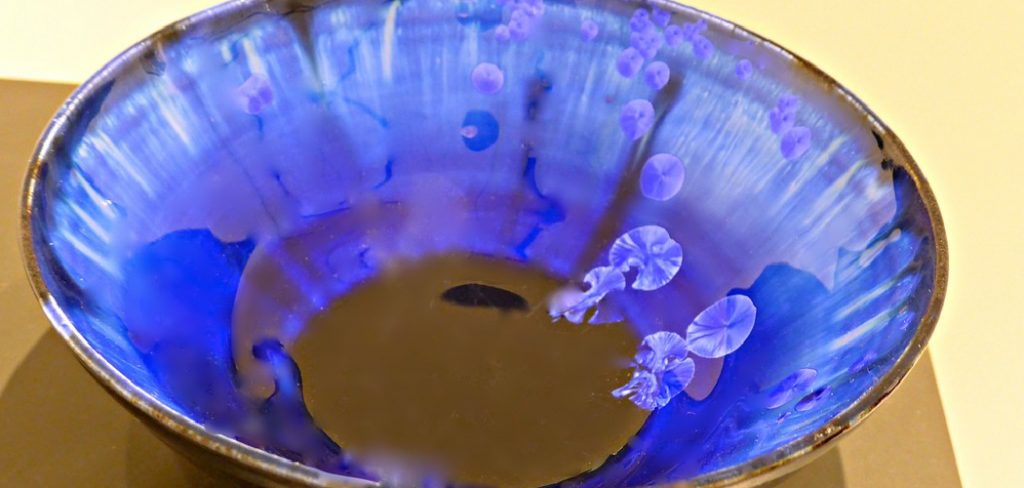
Blue is a color that has captivated artists and designers for centuries. It symbolizes trust, tranquility, and creativity, making it a popular choice in the world of ceramics.
In ancient times, blue pigments were rare and highly prized, often reserved for royalty and used to decorate sacred objects. The history of blue ceramics can be traced back to the Middle East and Asia, where cobalt oxide was first used as a coloring agent in glazes. Today, there are various ways to achieve shades of blue in ceramic pieces, from traditional methods to more modern techniques using synthetic dyes.
Materials You Will Need
To make blue ceramic pieces, you will need materials such as:
Clay Body:
This is the base material for your ceramic piece. The type of clay you use will affect the final result, so it’s essential to choose one that works well with your glazes and firing techniques. Some popular choices for blue ceramics are porcelains, stoneware, and earthenware clays. Each has its distinct properties and can produce different shades of blue when paired with specific glazes.
Glaze:
To achieve a vibrant blue color on your ceramic piece, you will need a suitable glaze. There are various types of glazes, including matte, glossy, transparent, and opaque. Some popular choices for creating blue ceramics are cobalt oxide, copper carbonate, and iron oxide. It’s essential to experiment with different glaze combinations to find the perfect shade of blue that suits your aesthetic.
Firing Tools:
Firing is a crucial step in the ceramic-making process as it transforms clay into a durable and waterproof material. To fire your ceramic pieces successfully, you will need tools such as a kiln, firing cones, and pyrometers. These tools will help you monitor and control the temperature and atmosphere inside the kiln to achieve the desired results.
8 Step-by-step Guidelines on How to Make Blue Ceramic
Step 1: Prepare Your Clay
Begin by selecting the appropriate clay body for your ceramic project. Once you’ve chosen your clay, it’s time to prepare it for shaping. Start by wedging the clay, which involves kneading it thoroughly to eliminate air bubbles and ensure a uniform consistency.
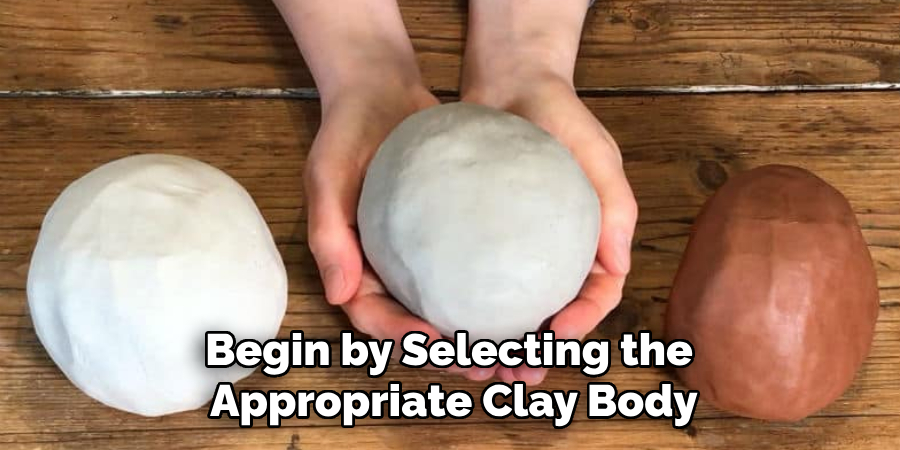
This process is crucial as it prevents cracks and weak spots in the final piece. Use a clean, smooth surface for wedging, and continue the process until the clay is pliable and ready for shaping. Properly prepared clay will provide a strong foundation for your blue ceramic piece, setting the stage for successful glazing and firing.
Step 2: Shape Your Ceramic
With your clay prepared, it’s time to shape it into your desired form. Begin by deciding on the kind of piece you want to create, whether it’s a vase, bowl, or any other ceramic object. There are various methods to shape clay, including hand-building techniques like pinching, coiling, and slab building or using a potter’s wheel for more symmetrical designs. If you’re using a potter’s wheel, position your clay in the center and gradually shape it with steady hands and even pressure to form the base structure.
Be mindful of the thickness of the walls, as uniformity is important for even drying and firing. Throughout the shaping process, keep your hands and tools damp to prevent the clay from drying out too quickly. Once satisfied with the shape, let the piece sit for a while to firm up, preparing it for the next steps of refining and glazing.
Step 3: Refine Your Piece
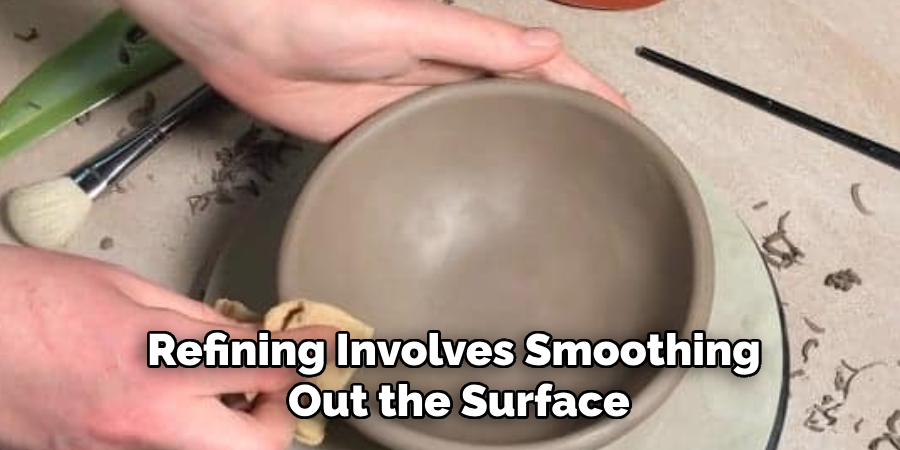
Refining involves smoothing out the surface and edges of your ceramic piece. Use a damp sponge or a rib tool to smooth any imperfections, bumps, or sharp edges. Take your time with this step as it will affect the final appearance and texture of your blue ceramic piece. Once you’ve achieved a smooth surface, let the piece dry completely before proceeding to glazing.
But don’t worry if you’re not satisfied with the shape or texture of your piece at this stage. There will be an opportunity to refine it further after the first firing.
Step 4: Apply Your Glaze
Now, it’s time to apply your chosen glaze to your ceramic piece. You can either dip, pour, or brush on the glaze depending on the desired effect. For blue ceramics, many artists prefer using a cobalt oxide glaze, which produces bold and vibrant shades of blue when properly applied and fired.
For a smoother finish, use multiple layers of glaze, with each layer drying completely before applying the next one. This will ensure a more even and consistent color. Be sure to wear protective gear when handling glazes and follow the manufacturer’s instructions for best results.
Step 5: Load Your Kiln
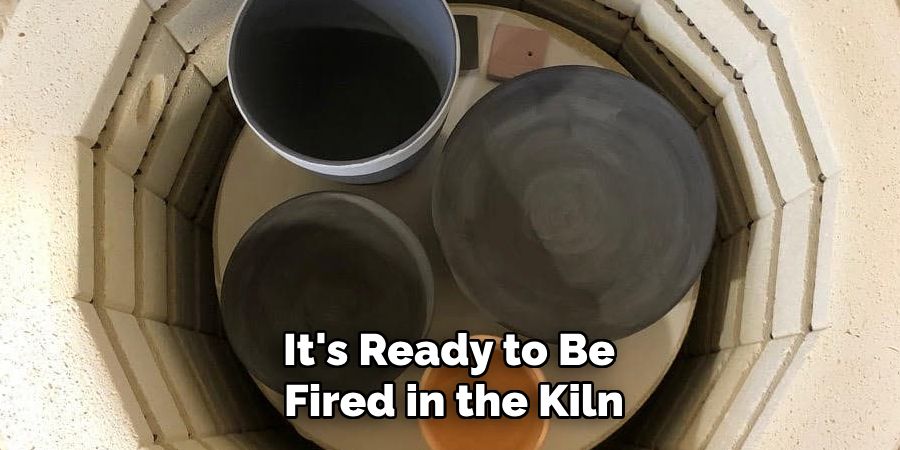
Once your piece is glazed, it’s ready to be fired in the kiln. Loading the kiln correctly is essential to ensure even heating and prevent warping or cracking of your ceramic piece. Place your piece on a shelf, making sure there is enough space around it for air circulation. Use firing cones to monitor the temperature inside the kiln and adjust accordingly.
You can also experiment with different firing techniques, such as high or low firing, to achieve different shades of blue. Remember to refer to your chosen glaze’s instructions for recommended firing temperatures and times.
Step 6: Fire Your Ceramic Piece
With the kiln loaded and everything set, it’s time to fire your ceramic piece. This process can take several hours or even days depending on the size and thickness of your piece. It’s essential to monitor the temperature inside the kiln throughout the firing process using a pyrometer and make any necessary adjustments.
Once the cone reaches its desired melting point, turn off the kiln and let it cool down completely before removing your finished blue ceramic piece.
Step 7: Refine and Touch Up
Once your ceramic piece has been fired and cooled, it’s time for the final refinements. Carefully inspect the piece for any imperfections that may have emerged during the firing process, such as glaze drips or rough spots. Use fine sandpaper or a diamond sanding pad to gently smooth out any rough areas, taking care not to damage the glaze. If you notice any small flaws in the glaze, consider touching them up with a fine brush and a matching glaze color, followed by a light re-firing if necessary.
These meticulous finishing touches not only enhance the aesthetic appeal of your blue ceramic piece but also ensure its surface is smooth and pleasant to handle. Once satisfied with the refinement and touch-ups, your finished piece will be ready for display or practical use.
Step 8: Enjoy Your Blue Ceramic Masterpiece
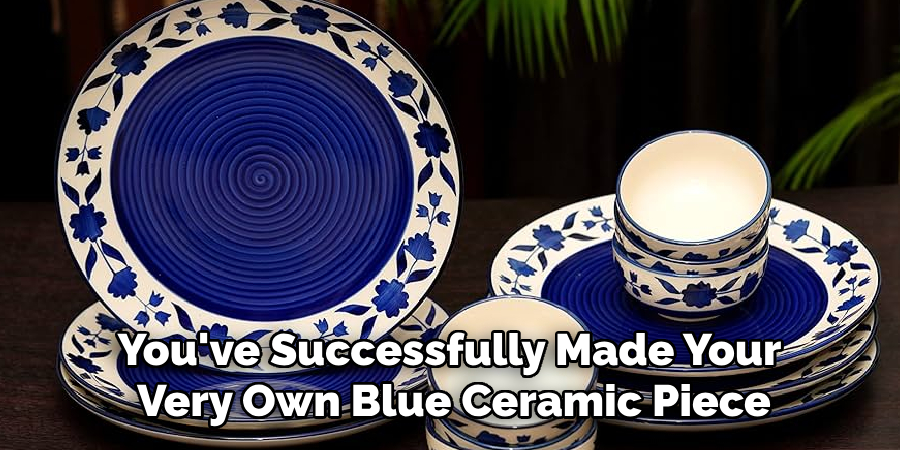
Congratulations, you’ve successfully made your very own blue ceramic piece! Display it with pride or use it for serving food or drinks. With practice and experimentation, you can continue to perfect this beautiful and versatile art form. Remember to keep practicing and trying new techniques to create even more stunning blue ceramics in the future.
Following these steps and tips on how to make blue ceramic will help you create a strong foundation and guide you toward success in your ceramic journey. Have fun, be creative, and enjoy the process! So, keep practicing and exploring new techniques to continue creating beautiful blue ceramics in the future.
Frequently Asked Questions
Q: Can I Use Any Type of Clay for Making Blue Ceramics?
A: Yes, you can use various types of clay for ceramic making, including earthenware, stoneware, and porcelain. However, the quality and characteristics of the clay will affect the outcome of your piece. For blue ceramics, porcelain is often preferred for its smooth texture and ability to hold vibrant colors.
Q: Is Firing Blue Ceramics Different from Other Colors?
A: The firing process for blue ceramics is generally the same as other colors. However, certain glazes may require specific firing temperatures and techniques to achieve the desired color. It’s essential to refer to the manufacturer’s instructions for best results.
Q: Can I Mix My Own Glaze Colors?
A: Yes, you can mix your own glaze colors using various oxides and chemicals. However, knowledge of ceramic chemistry and safety precautions should be taken when handling these materials is required. Alternatively, you can also experiment with different layers and techniques to achieve unique shades of blue.
Conclusion
Creating blue ceramics is a rewarding and enjoyable process that requires patience, skill, and attention to detail. By following these step-by-step guidelines on how to make blue ceramic, you can confidently make your own blue ceramic pieces at home.
Remember to experiment with different shapes, glazes, and firing techniques to unleash your creativity and create unique and stunning works of art. Keep practicing, refining, and enjoying the process to become a master in the art of blue ceramics. Happy creating!
Specialization:
- Master of wheel-throwing, hand-building, and advanced glazing techniques
- Focus on creating both functional pottery and decorative art pieces
Recognition:
- Celebrated by collectors and art enthusiasts for creating one-of-a-kind pieces that blend artistry with functionality
- Participates in local and national exhibitions, earning accolades for his innovative designs and craftsmanship
Passion:
- Deeply committed to exploring and pushing the boundaries of ceramic artistry
- Continuously experiments with new materials, firing techniques, and artistic concepts to evolve his craft
Personal Philosophy:
- Believes in the transformative power of art, aiming to evoke emotions and connections through his ceramic creations
- Advocates for sustainability in ceramics, using eco-friendly materials and practices whenever possible