


Ceramic dome lights are a beautiful and functional addition to any space, offering a warm and inviting glow while showcasing the elegance of handcrafted design. Creating your own ceramic dome light not only allows you to express your creativity but also results in a unique piece that reflects your personal style.
This guide on how to make ceramic dome Light will walk you through the steps to craft a ceramic dome light, from shaping the clay to assembling the finished product. Whether you’re a seasoned potter or a beginner, this project is an inspiring way to explore the art of ceramics.
Why Choose Ceramic for Dome Lights?
When it comes to creating a dome light, ceramic is an ideal material due to its durability and versatility. Not only does ceramic have the strength to hold up against heat and light, but it also allows for endless possibilities in terms of design and glazing techniques.
In addition, the natural, earthy tones of ceramic lend themselves well to creating a warm and inviting ambiance when lit up. With proper care, ceramic dome lights can last for years, making them a worthwhile investment in both aesthetic and practical benefits.
Materials You Will Need
To make your own ceramic dome light, you will need the following materials:
Ceramic Clay:
Choose a high-quality clay that is suitable for your desired firing method (kiln or air-dry). White or light-colored clay works well for creating a neutral base to glaze on, but you can also experiment with different colored clays for unique effects.
Pottery Tools:
A variety of pottery tools such as a rolling pin, wire cutter, and carving tools, will be needed to shape and sculpt the clay.
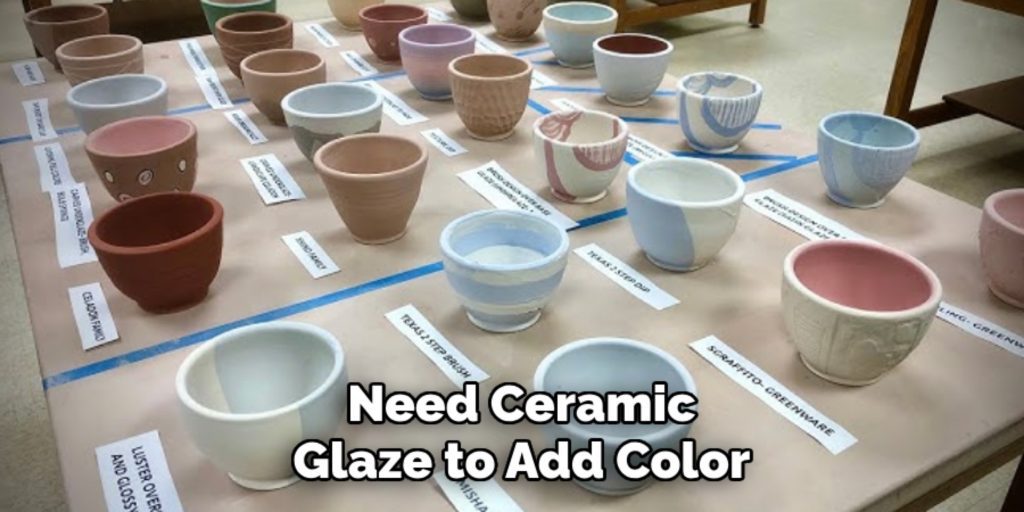
Glaze:
If you plan on firing your dome light in a kiln, you will need ceramic glaze to add color and finish to your piece. There are several types of glazes available, including glossy, matte, and textured.
Kiln (Optional):
If you choose to fire your own ceramic dome light, you will need access to a kiln. Alternatively, air-dry clay can also be used but may require longer drying times and different finishing techniques.
Light Kit:
A basic light kit with an LED bulb is needed for the assembly of the finished ceramic dome light.
10 Simple Methods on How to Make Ceramic Dome Light
Method 1: Preparing the Clay
- Knead the clay to make it pliable and remove any air bubbles.
- Roll out the clay into a flat sheet using a rolling pin.
- Cut out two circles from the clay sheet using a wire cutter. The size of the circles should be slightly larger than the desired size of your dome light.
Method 2: Shaping the Dome
- Place one of the clay circles on a flat surface and use your fingers to gently press down on the center, creating a slight indentation. This will form the base of your dome light.
- Carefully lift and place the other clay circle on top, aligning it with the base.
- Use your fingers to smooth out any visible seams between the two clay circles.
- Gently press down around the edges of the top circle to create a curved shape resembling a dome.
Method 3: Adding Texture (Optional)
- If desired, you can use various pottery tools to add texture and designs to the surface of the dome light.
- Make sure to only press lightly on the clay to avoid creating holes or damaging the shape.
- Experiment with different tools and techniques to create unique patterns and textures.
Method 4: Cutting the Opening
- Using a sharp knife or carving tool, carefully cut out a small opening at the top of the dome light. This will serve as the opening for the light bulb.
- Make sure to create an opening slightly smaller than the size of your light kit.
- Smooth out any rough edges around the opening.

Method 5: Adding Holes for Ventilation
- Use a needle tool or small pottery drill to create several small holes on the sides of the dome light for ventilation.
- This will ensure that heat can escape and prevent the dome light from becoming too hot when lit.
- Make sure to space out the holes evenly and avoid placing them too close to the top opening.
Method 6: Drying and Firing (Optional)
- If using air-dry clay, allow the dome light to dry completely before moving on to glazing and assembly.
- If using kiln-fired clay, follow the instructions provided with your chosen glaze and fire the dome light in a kiln as directed.
- Once fired, allow the dome light to cool completely before handling.
Method 7: Glazing
- Once the clay is completely dry or has been fired, use a soft brush to apply your desired glaze over the entire surface of the dome light.
- Make sure to cover all areas evenly and wipe away any excess glaze with a damp cloth.
- If using multiple coats of glaze, make sure to allow each coat to dry completely before applying the next one.
Method 8: Assembly
- Once the glazed dome light is completely dry, carefully insert the LED light bulb through the top opening.
- Secure the light kit in place by attaching the base and tightening the screws.
- Make sure to follow the instructions provided with your light kit for proper assembly.
Method 9: Finishing Touches
- Use a damp cloth to wipe away any excess glaze or fingerprints from the surface of the dome light.
- If desired, you can add decorative elements such as crystals or beads by attaching them using strong adhesive glue.
- Allow the glue to dry completely before handling the finished dome light.
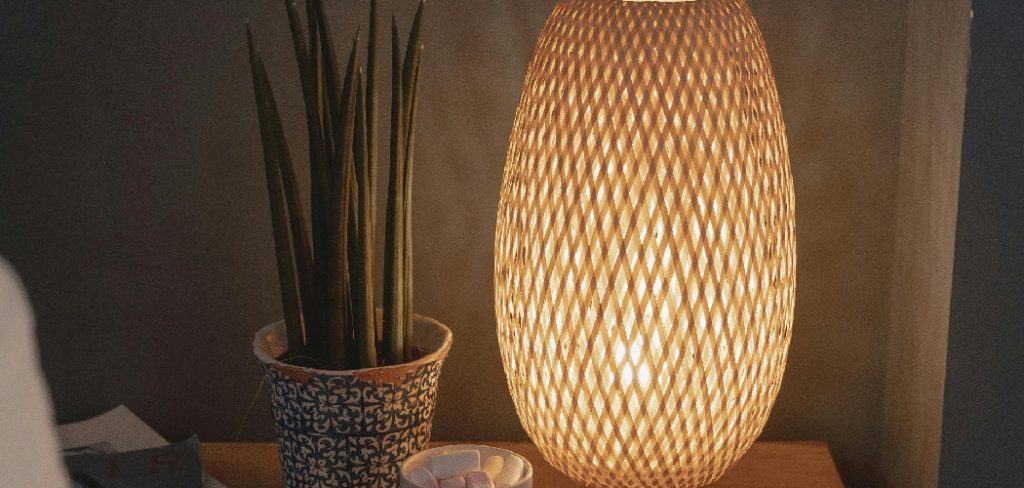
Method 10: Displaying and Enjoying Your Finished Ceramic Dome Light
- Find a suitable spot to display your ceramic dome light, such as an aside table or bookshelf.
- Plug in the light and enjoy the warm and inviting glow it creates.
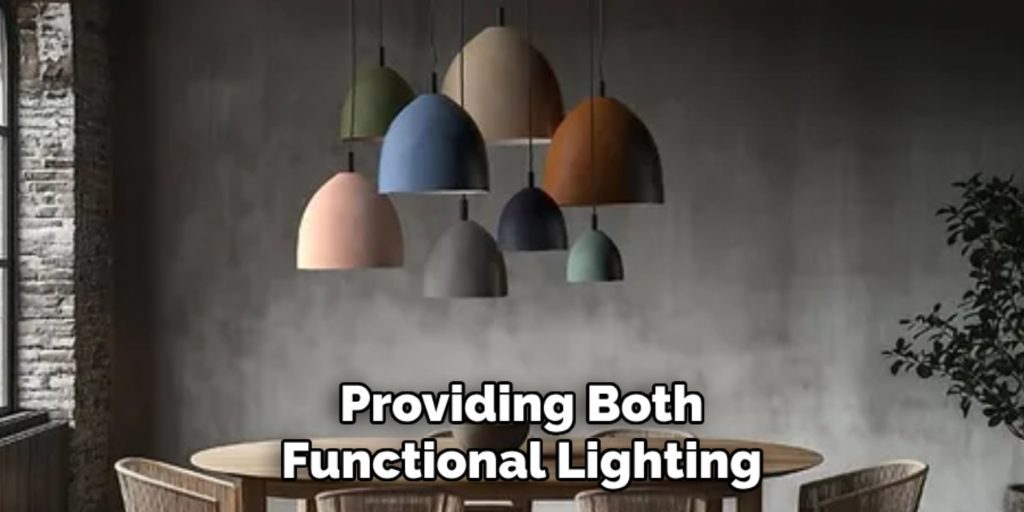
- With proper care, your ceramic dome light will last for years to come, providing both functional lighting and aesthetic beauty to any room.
Following these 10 simple methods on how to make ceramic dome Light, you can easily make your own ceramic dome light and add a touch of handmade beauty to your home decor. Get creative with different shapes, designs, and glazing techniques to create unique and personalized dome lights that reflect your style and personality.
Additional Tips
- Experiment with different types of clay to achieve different textures and finishes. For example, porcelain clay creates a smooth and glossy finish, while stoneware clay has a more textured appearance.
- Before glazing, consider using underglaze to create colorful designs or patterns on the surface of your dome light.
- Don’t be afraid to mix and match different glazes for a multi-colored effect.
- To add a personal touch, try incorporating imprints of leaves, flowers, or other objects into the surface of the clay before firing. This will create unique and organic patterns on your finished dome light.
- Keep in mind that while air-dry clay is more convenient for at-home use, kiln-fired clay will result in a more durable and long-lasting dome light. Overall, the key to creating a beautiful ceramic dome light is to have fun, experiment, and let your creativity shine! Happy crafting! Happy lighting!
Frequently Asked Questions
Q: Can I Use Regular Light Bulbs Instead of LED bulbs for My Ceramic Dome Light?
A: LED bulbs are recommended as they produce less heat and are more energy-efficient, making them safer for use in ceramic dome lights. You can also use regular bulbs, but make sure to monitor the heat output and avoid using high-wattage bulbs that may cause the clay to crack or melt.
Q: How Can I Make My Ceramic Dome Light Waterproof?
A: To make your ceramic dome light waterproof, you can use a waterproof sealant or glaze on the surface of the clay. This will help protect it from moisture and prevent any potential damage. However, keep in mind that even with a waterproof sealant, it is still recommended to keep your dome light away from direct contact with water.
Q: Can I Customize the Size of My Ceramic Dome Light?
A: Yes, you can customize the size of your ceramic dome light by simply using larger or smaller circles of clay during the shaping process. Just make sure to adjust the size of the top opening accordingly to fit your desired light kit. So, go ahead and get creative with different sizes and shapes! There are no limits to what you can create with ceramic dome lights.
Q: Can I Make a Ceramic Dome Light Without a Pottery Wheel?
A: Yes, you can make a ceramic dome light without a pottery wheel by hand-building the clay using coil or slab techniques. This may require more time and effort, but it is still achievable and can result in a unique and personalized dome light. Just make sure to allow enough time for the clay to dry before moving on to glazing and assembly.

Conclusion
Creating your own ceramic dome light is a fun and rewarding DIY project that allows for personalization and creativity. With just a few materials and some simple techniques on how to make ceramic dome Light, you can create a beautiful and durable piece of functional art that will add warmth and character to any space.
Whether using air-dry or kiln-fired clay, experimenting with different glazes, or adding unique textures, let your imagination run wild and create a one-of-a-kind ceramic dome light that will brighten up your home. So why wait? Grab some clay and get started on your very own ceramic dome light today! Happy creating!
Specialization:
- Master of wheel-throwing, hand-building, and advanced glazing techniques
- Focus on creating both functional pottery and decorative art pieces
Recognition:
- Celebrated by collectors and art enthusiasts for creating one-of-a-kind pieces that blend artistry with functionality
- Participates in local and national exhibitions, earning accolades for his innovative designs and craftsmanship
Passion:
- Deeply committed to exploring and pushing the boundaries of ceramic artistry
- Continuously experiments with new materials, firing techniques, and artistic concepts to evolve his craft
Personal Philosophy:
- Believes in the transformative power of art, aiming to evoke emotions and connections through his ceramic creations
- Advocates for sustainability in ceramics, using eco-friendly materials and practices whenever possible