


Creating a ceramic fairy nook is a delightful way to blend creativity with imagination. These whimsical pieces can serve as charming decorations, unique garden accents, or thoughtful gifts.
Whether you’re an experienced ceramicist or a beginner looking to explore a new hobby, crafting a fairy nook allows for endless customization and personal expression. This guide will walk you through the basic of how to make ceramic Fairy Nook.
What is a Ceramic Fairy Nook?
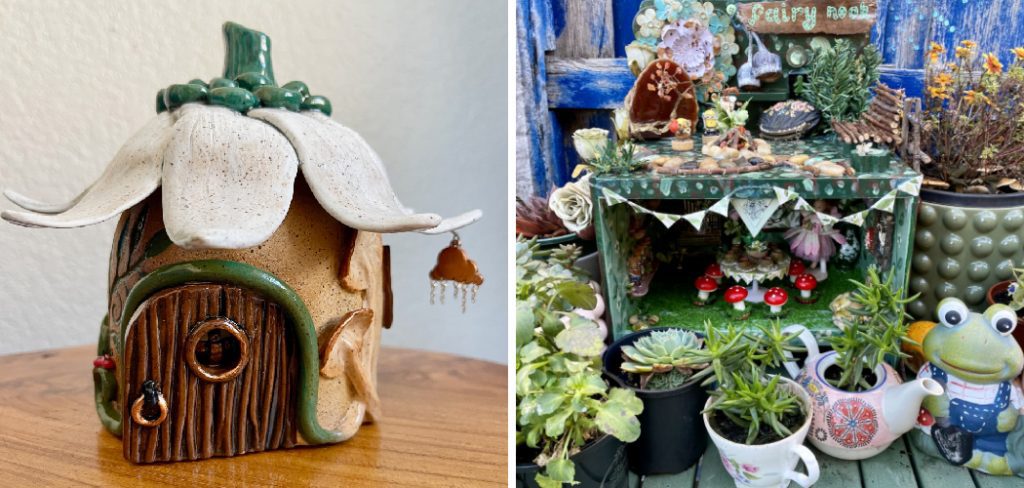
A ceramic fairy nook is a small, enchanting structure crafted from clay, designed to resemble a cozy dwelling or magical hideaway for fairies. These creations often feature intricate details such as tiny doors, windows, plants, and other embellishments that evoke a sense of whimsy and wonder. Ceramic fairy nooks can be displayed indoors as decorative pieces or incorporated into outdoor spaces like gardens, where they blend beautifully with natural surroundings. Their charm lies in their ability to bring a touch of magic to everyday life, sparking imagination and joy.
Tools and Materials Needed
To create a ceramic fairy nook, you will need a variety of tools and materials to bring your vision to life. Here is a list of essentials to get started:
- Clay: Choose air-dry clay or kiln-fired clay, depending on the desired durability.
- Sculpting Tools: A set of sculpting tools, including knives, shaping tools, and fine detail tools, will help you craft intricate designs.
- Rolling Pin or Slab Roller: Useful for flattening clay evenly when creating walls or base structures.
- Slip or Clay Glue: To securely join separate clay pieces together.
- Paints and Glazes: Acrylic paints or ceramic glazes to add color and finish to the nook.
- Paint Brushes: Use a variety of sizes for detailing and larger coverage.
- Texturing Tools: Items like sponges, stamps, or household objects for adding unique patterns to the clay.
- Sealer (if using air-dry clay): Protects the finished piece and makes it more durable if placed outdoors.
These tools and materials ensure you have everything you need to craft a beautiful and magical ceramic fairy nook.
Planning Your Fairy Nook Design
Before starting your fairy nook, take some time to plan out your design. Begin by imagining the overall theme or story you want your nook to convey. Will it be a whimsical woodland retreat, a quaint village scene, or perhaps a magical garden hideaway? Sketch your ideas on paper to visualize the layout, including key elements like pathways, doors, windows, and any other decorative features.
Consider the scale of your project in relation to where it will be displayed. This helps ensure that all components fit together harmoniously. Additionally, think about the colors and textures you’ll incorporate, as these will bring your fairy nook to life. By planning ahead, you’ll have a clearer path to creating a charming and cohesive piece.
10 Methods How to Make Ceramic Fairy Nook
1. Design Your Fairy Nook Concept with Inspiration and Sketches
The first and most important step in crafting a ceramic fairy nook is to visualize the story behind it. Will it be a mushroom cottage, a hollow tree home, or a flower-top retreat? Spend time gathering inspiration from nature, storybooks, or fairy lore. Sketch out the scene from multiple angles.

Include details like tiny ladders, lanterns, windows, or flower pots. Think about scale—most fairy nooks fit in the palm of your hand or a shallow bowl, but they should appear grand and magical despite their size. A good design ensures clarity of purpose and guides your sculpting process with consistency and charm.
2. Choose the Right Clay for Delicate Sculpting
Since fairy nooks are intricate and miniature, select a clay that offers fine detail retention. Porcelain or white stoneware is ideal due to their smooth textures and strength after firing. Clay should be well-kneaded to eliminate air bubbles, which can cause cracking. Keep the clay moist but not soggy while working. If you plan to place the fairy nook outdoors, stoneware is preferable for weather resistance. Regardless of the clay body you choose, make sure it matches the firing and glazing methods you intend to use later on to prevent issues during the kiln process.
3. Create the Base and Structure with Stability in Mind
Begin your sculpture by shaping the main structure of the nook. This could be the base of a tree, the curve of a mushroom, or the walls of a small burrow. Build this first using pinch, slab, or coil methods. Ensure the structure is stable enough to support added decorative features. For instance, a fairy door within a gnarled tree trunk might be crafted from a slab gently curved and joined at the edges. Use scoring and slip to firmly attach pieces. Work slowly, refining the shape as you go. Consider placing the entire structure inside a shallow ceramic dish or bowl as a portable base.
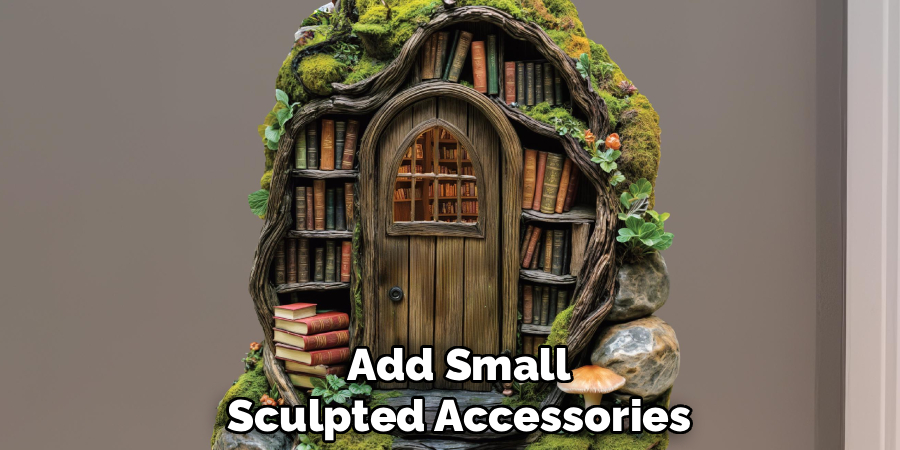
4. Add Enchanting Details with Texture and Accessories
The magic of a fairy nook lies in its charming details. Use fine tools, such as needle tools, toothpicks, or loop tools, to carve textures into the clay. Etch in wood grain for tree trunks, pebbled pathways, or thatched roofs. Add small sculpted accessories like mushroom stools, watering cans, welcome signs, or even a ceramic butterfly perched on a window ledge. Attach these elements using scoring and slip, and ensure they’re well supported. Keep in mind that too many fragile protrusions may break, so reinforce with clay underneath if needed. These tiny details are what bring a sense of wonder to the piece.
5. Hollow Out Thick Sections to Prevent Kiln Cracks
Any section of your fairy nook thicker than 1.5 inches should be hollowed out before firing. This is essential for preventing cracks or explosions during the kiln process. Use a loop tool or wooden knife to gently carve out the back or interior of larger sections. Then, reassemble and seal the exterior seamlessly using clay slip and careful smoothing.
If your structure is tall or heavily detailed, consider building it in parts that can be fired separately and assembled after firing. Remember to leave a small pinhole if the sculpture is enclosed, allowing steam to escape during firing.
6. Dry Your Fairy Nook Slowly and Evenly
Clay that dries too quickly may crack, especially when sculpted into delicate shapes. Allow your finished fairy nook to dry on a porous surface like drywall or wood. Cover it loosely with plastic to control the moisture loss. Drying should take at least several days, depending on humidity. Check progress daily, turning the piece to ensure all parts dry at the same rate. You’ll know it’s ready for firing when the clay is bone-dry and no longer feels cool to the touch. Avoid rushing this step, especially if your piece has multiple fine attachments or intricate textures.
7. Bisque Fire with Proper Support and Spacing
Place your dried fairy nook in the kiln with care. Use kiln stilts, soft supports, or sand to protect small and delicate sections. Fire the piece according to the clay body’s specifications, typically between cone 04 and 06 for bisque firing. Avoid overcrowding the kiln, especially if you’re firing multiple miniatures. Once the bisque firing is complete and the kiln has cooled, handle the piece gently and inspect for any sharp edges or surface cracks that may need smoothing before glazing. The bisque stage also allows for better glaze adhesion in the next step.
8. Glaze with Magical Colors and Finishes
Use colorful glazes, underglazes, or oxide washes to bring the fairy nook to life. Underglazes are ideal for painting details like window frames, flower petals, or bricks. Apply them before adding a clear overglaze for shine and protection.
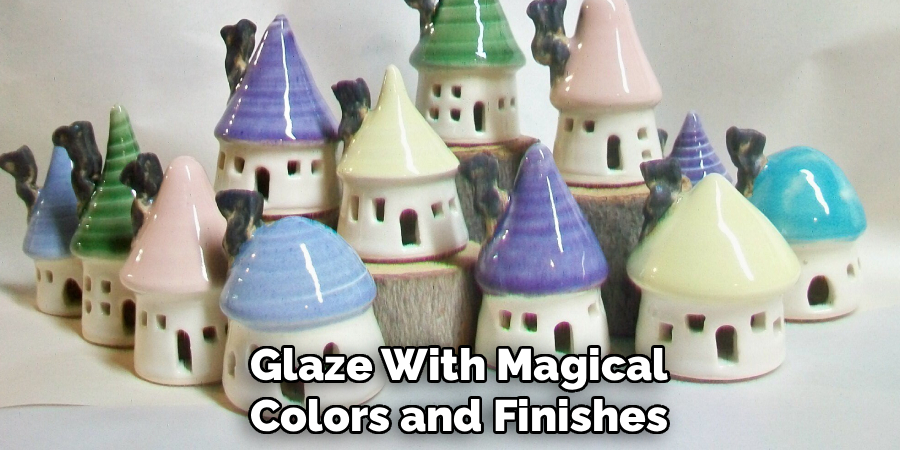
Matte glazes work well for natural textures like bark or stone, while gloss glazes make water features and windows sparkle. Brush, dip, or sponge glazes on carefully, avoiding overapplication that might obscure details. You can mix and layer glazes to achieve magical effects, such as glowing windows or fairy dust sparkles.
9. Glaze Fire and Inspect for Strength and Color
After glazing, load the piece back into the kiln for glaze firing. Follow the correct temperature range, which usually matches your glaze type (cone 06 for low fire or cone 5–6 for mid-range glazes). Protect fragile parts with kiln-safe props if needed. Once the firing is complete and the kiln has cooled, inspect the surface for glaze defects like crawling or pinholes. Minor imperfections often add to the whimsical nature of the piece, but major issues can be fixed by applying more glaze and refiring. At this point, your fairy nook should be strong, colorful, and ready for display.
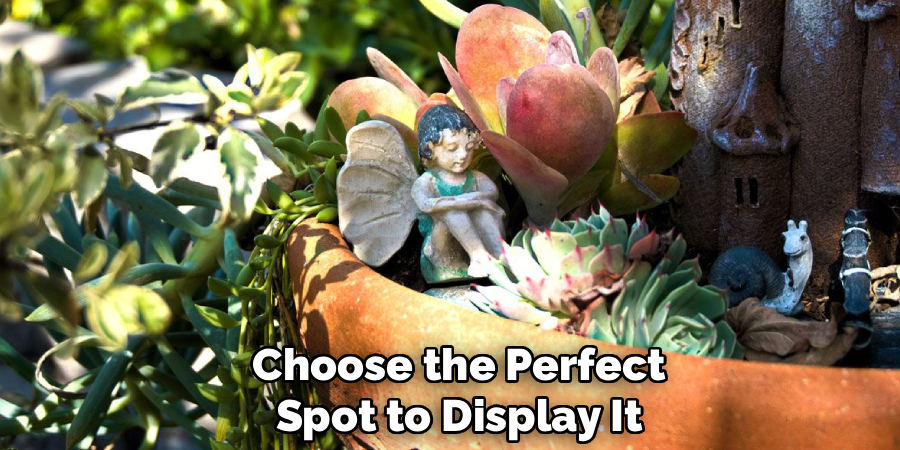
10. Display, Protect, and Enjoy Your Ceramic Fairy Nook
With your fairy nook complete, choose the perfect spot to display it. Indoors, you can place it in a bookshelf, windowsill, or on a decorative tray surrounded by moss and stones. Outdoors, tuck it into a garden bed, beneath a bush, or beside a tree.
If used outside, protect it from frost or harsh weather by sealing it with a weatherproof ceramic spray or placing it under partial cover. Add fairy lights, mini figurines, or plantings around it to complete the scene. Most importantly, share the joy—fairy nooks delight children and adults alike, turning any space into a corner of magic.
Conclusion
Making a ceramic fairy nook is a deeply satisfying creative process that blends storytelling, sculpture, and imagination into a single enchanting form. Each nook tells its own tale, and by following these ten detailed methods, you gain the techniques to bring that tale to life in durable, expressive clay.
Thanks for reading our blog post on how to make ceramic Fairy Nook! We hope you found it helpful and informative.
Specialization:
- Master of wheel-throwing, hand-building, and advanced glazing techniques
- Focus on creating both functional pottery and decorative art pieces
Recognition:
- Celebrated by collectors and art enthusiasts for creating one-of-a-kind pieces that blend artistry with functionality
- Participates in local and national exhibitions, earning accolades for his innovative designs and craftsmanship
Passion:
- Deeply committed to exploring and pushing the boundaries of ceramic artistry
- Continuously experiments with new materials, firing techniques, and artistic concepts to evolve his craft
Personal Philosophy:
- Believes in the transformative power of art, aiming to evoke emotions and connections through his ceramic creations
- Advocates for sustainability in ceramics, using eco-friendly materials and practices whenever possible