


Are you a fan of clay modeling? Do you want to learn how to make a lion with clay? Look no further!

How to make lion with clay is a fun and creative activity that allows you to bring one of nature’s most majestic animals to life in a miniature form. This project is perfect for artists of all ages and skill levels, as it encourages both imagination and attention to detail. By shaping and molding clay, you can craft a realistic or whimsical version of a lion, complete with its signature mane and strong features.
Whether you’re a beginner or an experienced sculptor, this guide will walk you through the steps to create your very own clay lion masterpiece. Let’s get started with the materials you’ll need.
What Are the Benefits of Clay Modelling?
Before we dive into the steps, let’s take a moment to appreciate the benefits of clay modeling. This activity has been used for centuries as creative expression and therapy. Some of the key benefits include:
- Stress Relief: Working with clay can be therapeutic and help reduce stress and anxiety levels.
- Fine Motor Skills Development: Manipulating small clay pieces helps improve hand-eye coordination and fine motor skills.
- Creativity Boost: Clay modeling allows you to bring your imagination to life in a 3D form, encouraging creativity and problem-solving skills.
- Patience Building: As with any art form, working with clay requires patience and attention to detail, helping build these essential skills.
What Will You Need?
To make a lion with clay, you’ll need the following materials:
- Clay: You can use any type of clay for this project, such as air-dry or oven-bake clay. If you’re a beginner, starting with a softer and more pliable clay is best.
- Sculpting Tools: These can range from professional sculpting tools to everyday items like toothpicks and plastic knives.
- Reference Image: It’s always helpful to have a reference image of a lion handy to guide your sculpting process.
Once you have all your materials ready, it’s time to get started on your clay lion creation!
9 Easy Steps on How to Make Lion With Clay
Step 1: Prepare Your Workstation
Before beginning your clay lion creation, ensure that your workstation is properly set up. Choose a clean, flat surface where you can comfortably work without distractions. Cover the surface with a protective layer, such as wax paper or a silicone mat, to prevent the clay from sticking or causing damage to the underlying surface.
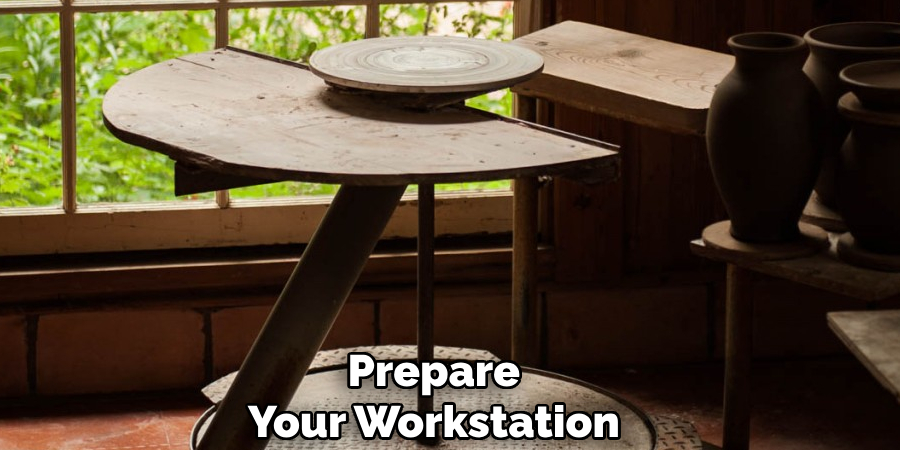
Arrange all your tools and materials within easy reach, including your sculpting tools, clay, and reference images. Good lighting is essential, so make sure your workstation is well-lit to help you see the finer details of your work. This step is crucial as it creates a comfortable and efficient environment for bringing your clay lion to life.
Step 2: Shape the Body Base
Start by taking a portion of clay and rolling it into an oval or cylindrical shape to form the base of the lion’s body. Ensure that the body’s size is proportional to your lion’s overall design and matches the reference image. Smooth out any cracks or imperfections using your fingers or sculpting tools. This step is fundamental as it provides the foundation for the rest of the lion’s features.
Step 3: Sculpt the Legs and Tail
Take four equally sized portions of clay and roll them into elongated cylindrical shapes to form the lion’s legs. Bend each piece slightly to give a natural, relaxed posture, or position them according to your reference image to depict a specific stance. Attach the legs to the body base, blending the edges seamlessly using your fingers or sculpting tools to ensure they are securely connected.
For the tail, roll a thinner, elongated piece of clay and attach it to the back of the body, curving it as desired for a more dynamic look. Use your reference image to refine the proportions and positioning, creating a realistic foundation for your sculpture.
Step 4: Add the Head and Mane
Shape a slightly more significant portion of clay into a rounded ball to create the lion’s head. Attach the head to the body, ensuring a secure connection by blending the base of the neck seamlessly with your fingers or sculpting tools. To form the mane, take small clay pieces and sculpt them into triangular or wavy shapes, layering them around the lion’s head and neck to create a textured, voluminous appearance.
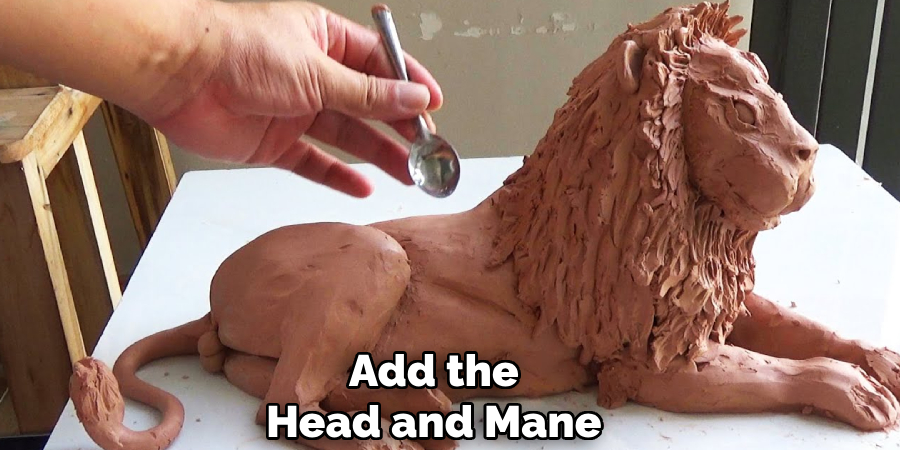
Focus on symmetry and detail, using your reference image to guide the placement and flow of the mane. This step is crucial for adding character and establishing the lion’s majestic appearance.
Step 5: Sculpt the Face Details
Begin refining the lion’s facial features by shaping the eyes, nose, and mouth. Use a sculpting tool, toothpick, or knife edge to carve out the eye sockets, then add small, evenly shaped balls of clay for the eyes, gently pressing them into place. For the nose, mold a small triangular piece of clay and attach it to the center of the face, smoothing the edges to blend seamlessly. Add detail by etching nostrils and shaping the muzzle area.
To create the mouth, carve a subtle line below the nose, extending it outward slightly for a natural look. Pay attention to symmetry and proportion, ensuring the face balances with the rest of the sculpture while capturing the lion’s distinctive expression.
Step 6: Add the Ears
Shape the lion’s ears by forming two flat, rounded clay pieces. Attach them symmetrically on either side of the head, slightly above eye level. To create a seamless connection, smooth the edges where the ears meet the head. Use a sculpting tool or your fingers to define the inner details of the ears, such as gentle curves or indentations, to enhance their realistic appearance. Take your time to ensure the size and placement of the ears complement the overall proportions of the lion’s head.
Step 7: Refine the Mane
Begin shaping the lion’s mane by adding coils or strips of clay around the head and neck area. Arrange the pieces to flow naturally outward, mimicking the texture and volume of real lion fur. Use a sculpting tool to add further details, such as strands and waves, to create a lifelike effect. Pay attention to the direction of the mane’s flow, ensuring it frames the face elegantly while maintaining balance and proportion. Continuously refine and blend the edges to achieve a cohesive and realistic result.
Step 8: Add Facial Details
Focus on refining the facial features of the lion to bring it to life. Use fine tools to define eye, nose, and mouth areas. Carve out the shape of the eyes with precision, giving them depth and expression. Sculpt the nose to resemble the lion’s distinctive structure, paying attention to the shape of the nostrils. Carefully craft the mouth, ensuring the lips and visible teeth are proportionate and realistic.
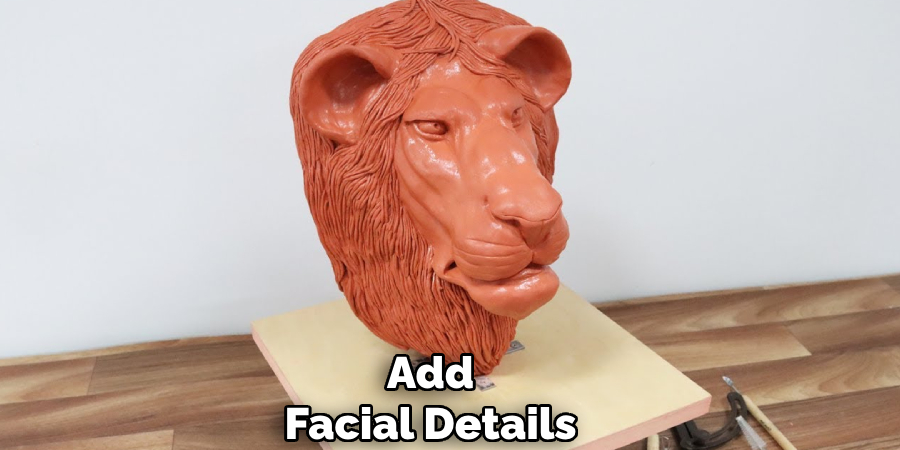
Add subtle textures to these areas to simulate fur or skin, contributing to a more dynamic and lifelike appearance. Take your time with these intricate details, as they are key to capturing the lion’s character.
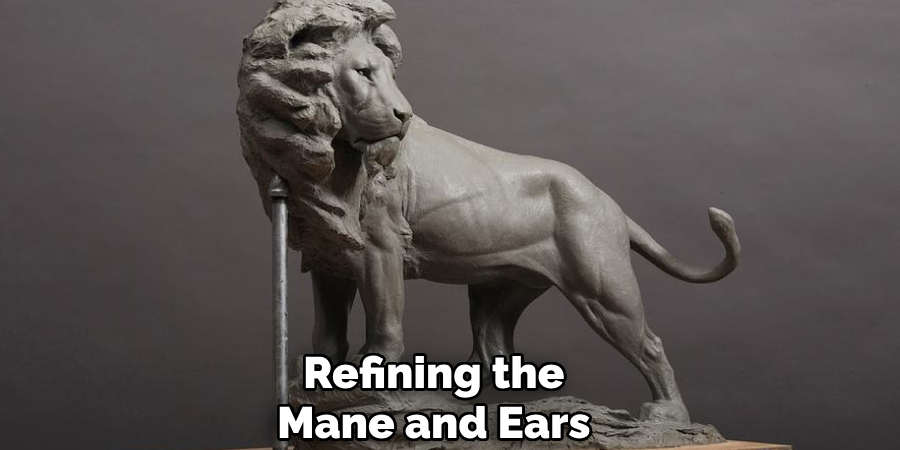
Step 9: Refining the Mane and Ears
Once the facial features are complete, focus on refining the mane and ears. Sculpt the mane with flowing, organic lines to replicate the natural movement and texture of the lion’s fur. Pay attention to the direction and layering of the strands to provide a sense of volume and realism. Shape the ears carefully, ensuring they are proportionate to the head and aligned symmetrically. Add subtle indentations and textures to mimic the fine details of the fur and inner ear structure.
By following these steps and continuously referencing your chosen image, you can create a stunning clay lion sculpture that captures the strength and majesty of this magnificent animal.
5 Things You Should Avoid
- Skipping the Armature: Avoid neglecting a sturdy base or armature, as it provides structural support and prevents the clay lion from collapsing during shaping or drying.
- Using the Wrong Type of Clay: Ensure you use clay suitable for sculpting, such as polymer or air-dry clay. Avoid clays that crack or crumble easily, as they can ruin your work.
- Overloading with Details Too Soon: Don’t start adding intricate details like the lion’s mane or facial features without forming a solid and proportional base structure.
- Neglecting Proper Tools: Avoid working with only your hands; invest in sculpting tools to create accurate textures and shapes, especially for the lion’s fur and features.
- Rushing the Drying Process: Do not expose your clay lion to extreme heat or direct sunlight to speed up drying, as this can cause uneven drying or cracks to form. Patience is key for a durable sculpture.
You can create a successful and visually pleasing lion sculpture by avoiding these common mistakes.
Conclusion
How to make lion with clay is a rewarding process that combines creativity, technique, and patience.
By selecting the appropriate clay, preparing a strong base, using the right tools, and avoiding common mistakes, you can craft a durable and visually impressive sculpture. Remember to take your time with each step—from forming the foundational structure to adding intricate details—ensuring that your lion reflects your vision.
With care and practice, this project can improve your sculpting skills and offer a sense of accomplishment and artistic expression.
Specialization:
- Master of wheel-throwing, hand-building, and advanced glazing techniques
- Focus on creating both functional pottery and decorative art pieces
Recognition:
- Celebrated by collectors and art enthusiasts for creating one-of-a-kind pieces that blend artistry with functionality
- Participates in local and national exhibitions, earning accolades for his innovative designs and craftsmanship
Passion:
- Deeply committed to exploring and pushing the boundaries of ceramic artistry
- Continuously experiments with new materials, firing techniques, and artistic concepts to evolve his craft
Personal Philosophy:
- Believes in the transformative power of art, aiming to evoke emotions and connections through his ceramic creations
- Advocates for sustainability in ceramics, using eco-friendly materials and practices whenever possible