


Painting a ceramic mushroom can be a fun and creative project for beginners and experienced artists alike. With the right tools, techniques, and a bit of imagination, you can transform a plain ceramic piece into a vibrant and unique decoration.

Whether you’re creating a whimsical addition to your garden or a charming centerpiece for your home, this guide will walk you through the steps of how to paint a ceramic mushroom.
Choosing the Right Ceramic Mushroom
Before you begin painting, it’s important to select the perfect ceramic mushroom for your project. Ceramic mushrooms come in a variety of shapes, sizes, and styles, so consider how your finished piece will be displayed. Smaller mushrooms might be ideal for tabletop decor, while larger ones can make a statement in your garden.
Additionally, inspect the surface of the ceramic to ensure it is smooth and free from cracks or imperfections that might affect your painting. Pre-fired bisque ceramic mushrooms are often the best choice, as they provide a porous surface that absorbs paint evenly and creates a durable finish. Taking the time to choose the right piece will set the foundation for a successful and satisfying painting experience.
Supplies You’ll Need
To bring your ceramic mushroom project to life, gather the following supplies:
- Paints: Acrylic paints are a popular choice due to their vibrant colors and excellent adhesion to ceramic surfaces. Consider having a variety of colors to add dimension and creativity to your design.
- Brushes: A selection of brushes in different sizes will help you achieve various details, from broad strokes to fine, intricate patterns.
- Palette or Mixing Tray: Useful for blending colors and keeping your paint organized during the process.
- Sealant: A clear acrylic sealer or varnish will protect your finished work and give it a professional, glossy look.
- Sponges or Foam Brushes: Ideal for covering larger areas quickly or creating textured effects.
- Paper Towels and Water: Essential for cleaning brushes and handling any accidental spills.
- Protective Surface: Use old newspapers, a tablecloth, or a drop cloth to protect your workspace from paint.
- Optional Decorations: Items such as glitter, gems, or stencils can add an extra touch of personality to your design.
Having these supplies on hand will ensure a smooth and enjoyable crafting experience as you customize your ceramic mushrooms.
10 Methods How to Paint a Ceramic Mushroom
1. Begin with a Clean, Dust-Free Surface
Before any paint touches your ceramic mushroom, ensure that its surface is properly cleaned and prepared. Bisque-fired ceramic often collects dust, oils, or small particles that can interfere with paint adhesion. Use a slightly damp, lint-free cloth or sponge to gently wipe the entire surface, including hard-to-reach areas under the cap or along the stem. Let it dry fully before applying paint.
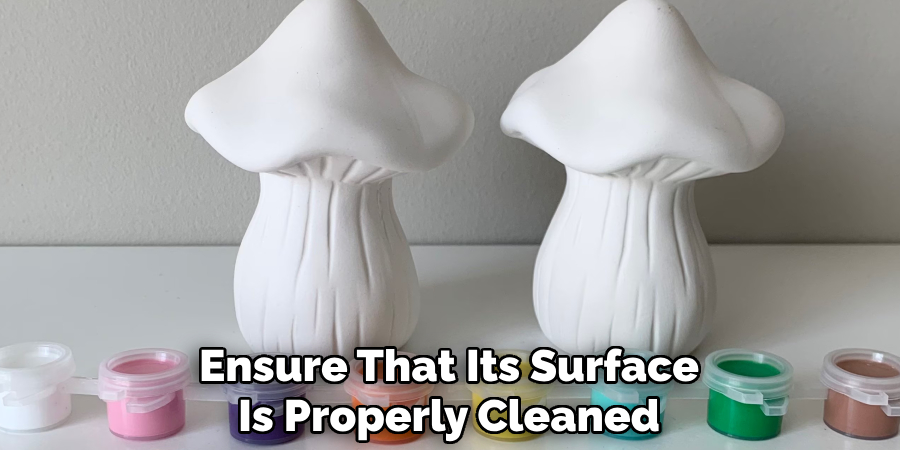
If you’re working on glazed or finished ceramic, you might consider light sanding to help the paint grip. A clean, dry, and smooth surface sets the foundation for a successful and even paint application.
2. Select the Right Paint Based on the Mushroom’s Final Use
The type of paint you choose depends heavily on whether your ceramic mushroom will be used indoors or outdoors, and whether it will be fired again. For decorative indoor mushrooms, acrylic paint is a practical and colorful option, offering quick drying times and a broad range of hues.
If your mushroom is to be placed in the garden or exposed to moisture, use ceramic glazes or outdoor-rated acrylics. For pieces that will be kiln-fired after painting, underglazes are the appropriate choice. Always consider the compatibility of the paint with the ceramic surface and sealing method.
3. Apply a Neutral Base Coat to Enhance Color Vibrancy
Using a base coat is especially helpful when working with bisque ceramic, which can absorb the first layer of paint unevenly. Applying a thin coat of white or light-colored paint provides a clean canvas that enhances the vibrancy of your top colors.
This is particularly useful for bright or pastel designs, as it prevents dullness. Let the base coat dry completely before continuing. For glazes and underglazes, a base layer of white slip or engobe may be applied prior to firing to intensify final colors after glazing.
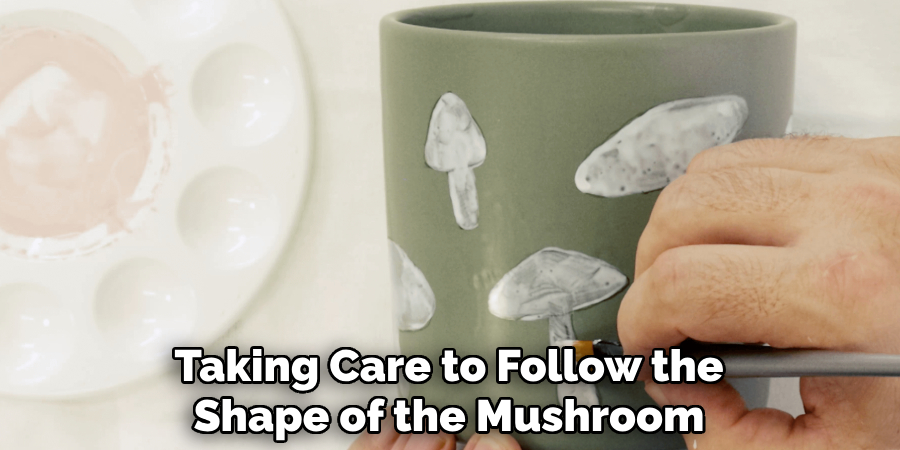
4. Block in the Main Colors to Establish the Design
Once the base coat has dried, block in your mushroom’s primary colors. Typically, this involves painting the cap in bold reds, earthy browns, or whimsical pastels, and the stem in ivory, tan, or light gray. Use a medium-sized brush for larger areas, taking care to follow the natural shape of the mushroom.
Don’t worry about fine details at this stage—this step is about creating structure and visual balance. Apply multiple thin coats rather than one thick one to prevent streaking and uneven texture. Allow each coat to dry fully before layering.
5. Use Layering and Shading to Create Depth
To add realism and dimension, incorporate multiple layers and shading techniques. Use darker tones along the base of the cap, beneath ridges, or around the stem’s root to mimic natural shadows. Apply lighter highlights where light would naturally hit, like the top of the cap or outer curves.
Dry brushing and stippling are effective methods for adding texture without overwhelming the form. For fantasy mushrooms, blend iridescent or metallic paints into layered backgrounds to create a glowing, magical effect. Layering gives your mushroom a more lifelike and visually dynamic appearance.
6. Paint Details Like Spots, Gills, and Textures
Fine details make a ceramic mushroom feel finished and lively. Use a small round brush or fine liner to add white dots to the cap for the classic toadstool look, or paint delicate gills underneath using thin, evenly spaced lines in a darker shade.
You might add freckles, mossy textures, or bark-like cracks to the stem using short brush strokes or dabbing motions. Don’t rush this stage—take your time and reference real mushrooms or illustrations for inspiration. Details elevate the piece from basic to compelling and give it a signature charm.
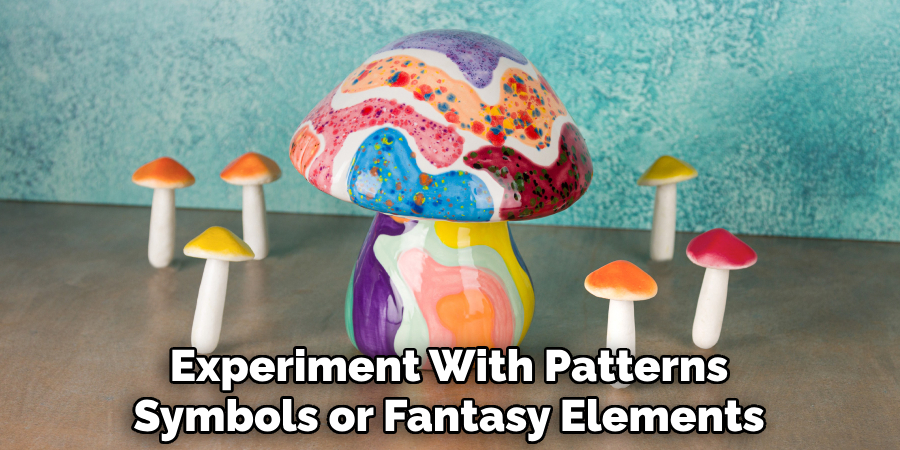
7. Experiment with Patterns, Symbols, or Fantasy Elements
While many ceramic mushrooms are painted to look realistic, you can take a more imaginative approach by incorporating fantasy patterns, mystical symbols, or playful motifs. Consider painting tiny windows and doors to create fairy house effects or using gold or silver paint pens to add rune-like etchings.
A glowing gradient effect on the cap can suggest bioluminescence. Mixing abstract patterns like polka dots, swirls, or stripes allows for unique personal expression. This method is ideal if you’re creating decorative mushrooms for children’s rooms, themed gardens, or whimsical art collections.
8. Use Glazing Techniques for Kiln-Fired Pieces
If you’re working with unfired underglaze on bisque ceramic and plan to use a kiln, glazing is the essential next step. After decorating with underglaze and allowing it to dry, apply a clear gloss glaze to seal and bring out the colors. Use a soft brush or dipping method, depending on the shape and size of your mushroom.
Apply two to three thin coats, letting each dry to the touch between applications. When fired at the proper temperature, the glaze will vitrify, producing a smooth, glassy surface that enhances the design and protects it from wear.
9. Seal the Finished Piece to Protect the Paint
For acrylic-painted mushrooms that won’t be fired, sealing is vital to protect your work from moisture, scratches, and fading. Use a clear acrylic sealant spray or brush-on varnish suited for your paint type. Choose matte, satin, or gloss finish depending on your desired look.
Ensure the mushroom is completely dry before applying, and do so in a well-ventilated area. Apply light, even coats and allow ample drying time between layers. For outdoor display, opt for a UV-resistant and waterproof sealant to extend the mushroom’s durability in the elements.
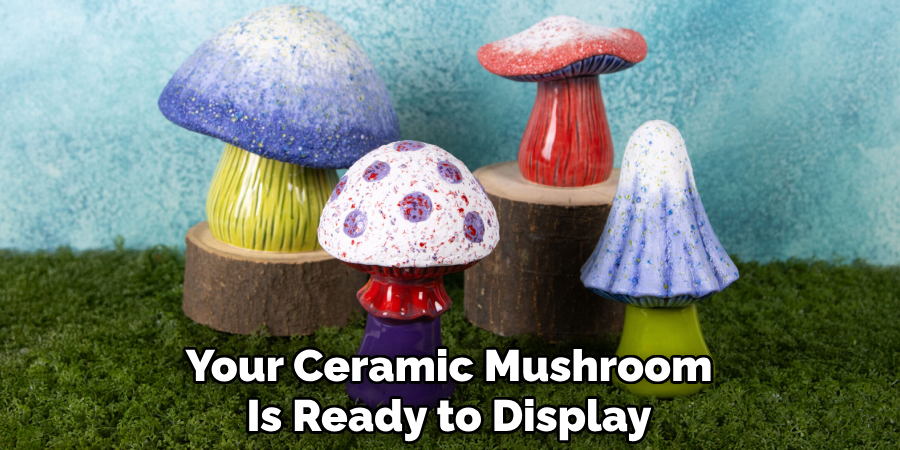
10. Maintain and Display the Mushroom with Care
Once painted and sealed, your ceramic mushroom is ready to display. Place it in a protected indoor area, like a bookshelf, windowsill, or centerpiece. If placed outdoors, monitor for weather wear over time. Occasionally dust the mushroom with a dry or damp cloth—avoid harsh cleaning products that could damage the finish.
If chips occur, touch up paint can be applied and re-sealed. With proper care, your painted ceramic mushroom can remain a joyful and decorative item for years to come, showcasing your creativity and attention to detail.
Conclusion
Painting a ceramic mushroom is a process that merges imagination with craftsmanship, transforming a simple form into an expressive, enduring piece of art. By thoughtfully preparing the surface, layering colors, and adding fine details, you bring depth and charm to your creation.
Whether you aim for natural realism or a whimsical fantasy style, these ten methods offer a complete roadmap to success. Thanks for reading, and we hope this has given you some inspiration on how to paint a ceramic mushroom!
Specialization:
- Master of wheel-throwing, hand-building, and advanced glazing techniques
- Focus on creating both functional pottery and decorative art pieces
Recognition:
- Celebrated by collectors and art enthusiasts for creating one-of-a-kind pieces that blend artistry with functionality
- Participates in local and national exhibitions, earning accolades for his innovative designs and craftsmanship
Passion:
- Deeply committed to exploring and pushing the boundaries of ceramic artistry
- Continuously experiments with new materials, firing techniques, and artistic concepts to evolve his craft
Personal Philosophy:
- Believes in the transformative power of art, aiming to evoke emotions and connections through his ceramic creations
- Advocates for sustainability in ceramics, using eco-friendly materials and practices whenever possible