


Are you tired of looking at the same old ceramic tiles in your home? Do you want to update your space without spending much money on new tiles?
How to reuse old ceramic tiles is an excellent way to give these materials a second life while reducing construction waste. Whether you’re renovating your home or looking to try DIY projects, repurposing tiles can be both sustainable and creative. From home decor to practical uses, old ceramic tiles offer countless possibilities to enhance your space without contributing to landfills.
With some imagination and simple tools, you can transform these tiles into unique and functional pieces. In the sections below, we’ll explore various ways to reuse old ceramic tiles effectively.
What Are the Benefits of Reusing Old Ceramic Tiles?
Repurposing is a sustainable practice that helps reduce waste and save resources. Besides, it comes with several benefits, including saving money and minimizing environmental impact.
- Cost-effective: One of the main advantages of reusing old ceramic tiles is that it’s a cost-effective solution for updating your space. Instead of purchasing new tiles, you can repurpose the ones you already have, significantly reducing your renovation budget.
- Eco-friendly: By reusing old ceramic tiles, you are helping to minimize the amount of construction waste that ends up in landfills. This reduces pollution and saves energy and resources necessary to produce new materials.
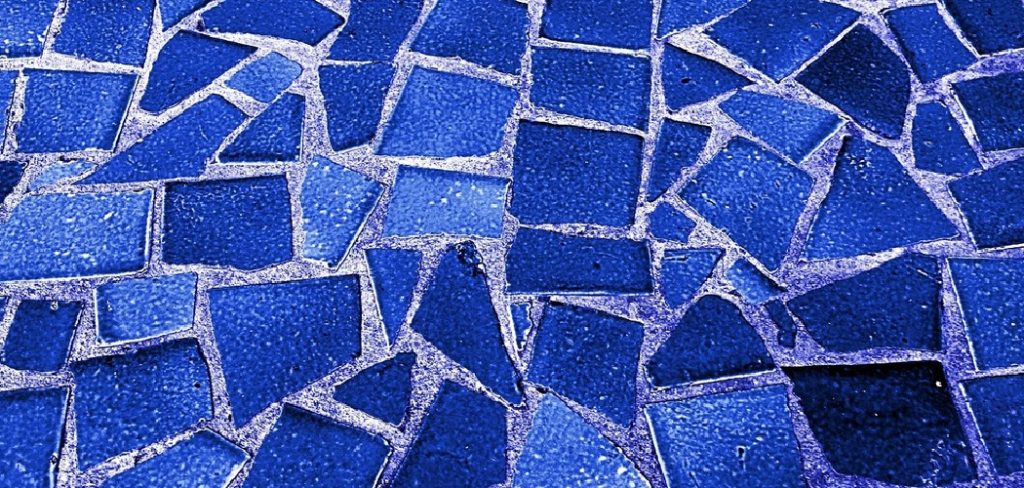
- Versatility: Old ceramic tiles come in various sizes, shapes, and colors, making them versatile materials for different projects. You can repurpose them with some creativity for both practical and decorative purposes.
- Personalization: When reusing old ceramic tiles, you have the opportunity to create unique pieces that reflect your style and taste. This allows for more personalized and meaningful home decor.
What Will You Need?
Before you start repurposing old ceramic tiles, gather the necessary tools and materials to ensure a smooth and successful project. Depending on the specific project, you may need some or all of the following items:
- Safety Gear: Always prioritize safety when working with any type of material. Wear protective equipment such as gloves, goggles, and a dust mask to protect yourself from potential hazards.
- Measuring Tape: Accurate measurements ensure that your projects turn out well. A measuring tape will help you determine the proper dimensions for cutting and fitting tiles.
- Tile Cutter or Saw: You’ll need a specialized tile cutter or saw to cut ceramic tiles into desired shapes or sizes. These tools are designed specifically for ceramic tiles and can make precise cuts.
- Adhesive: Depending on the project, you may need tile adhesive to secure the tiles. Choose a suitable adhesive based on the type of surface to which you’ll attach the tiles.
- Grout: You’ll need grout to fill the gaps between tiles and create a finished look. Choose a grout color that complements your tiles for a seamless finish.
- Paint or Sealant: If you plan to paint or seal your projects, choose products suitable for use with ceramic tiles.
Once you have all the necessary tools and materials, it’s time to get creative and start repurposing those old ceramic tiles!

9 Easy Steps on How to Reuse Old Ceramic Tiles:
Step 1: Gather Your Old Ceramic Tiles
Start by collecting all the old ceramic tiles you wish to reuse. Check for tiles in good condition, as cracks or significant damage may limit their usability.
Sort the tiles by size, shape, and color to make it easier to plan your project. Cleaning the tiles thoroughly to remove any dust, grime, or adhesive residue is essential, and you can do this with warm, soapy water and a scrub brush. Properly preparing your tiles ensures they are ready for your creative vision.
Step 2: Inspect and Clean the Tiles
Before using your old ceramic tiles, inspect each piece for cracks, chips, or damage that could affect your final project. Tiles in poor condition may still be usable for minor decorative elements, but knowing their limitations is essential. Once you’ve sorted through the tiles, thoroughly clean them to remove dirt, dust, or any adhesive residue from previous use.
Use a gentle scrub brush and soapy water to clean the tiles, and a scraper or adhesive remover might be necessary for stricter adhesive residues. Allow the tiles to fully dry before moving on to the next step. Proper cleaning ensures that the adhesive or paint in your project will bond securely.
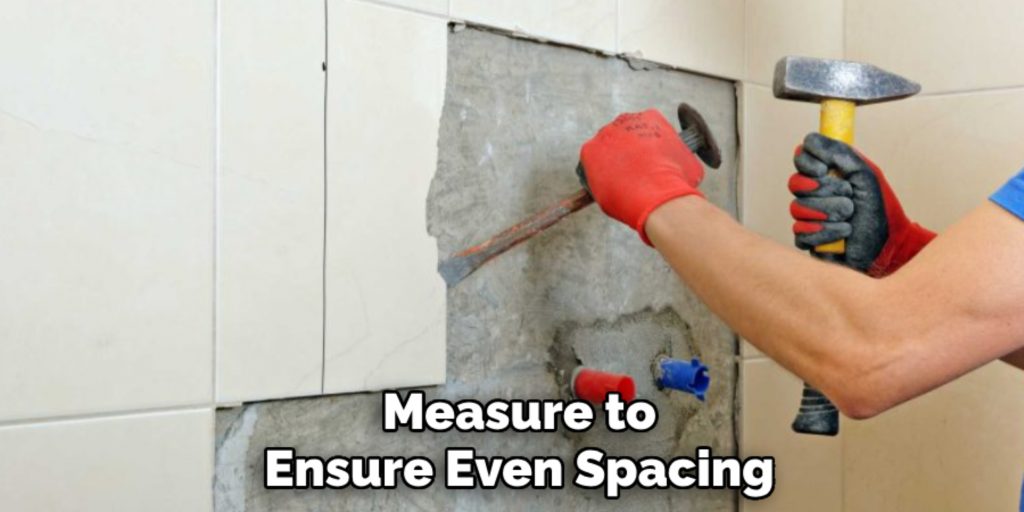
Step 3: Plan Your Layout
Before assembling your project, take time to design and plan your layout. Arrange the tiles on a flat surface to experiment with different patterns or arrangements until you achieve your desired look. Consider factors like color balance, symmetry, and the overall theme of your project.
This step is crucial for mosaics or detailed designs where precision matters. Use a ruler or tape measure to ensure even spacing and alignment, and if necessary, mark reference points or guidelines on your surface to maintain accuracy. A well-thought-out layout will save time and prevent mistakes during assembly.
Step 4: Apply the Adhesive
Once the layout is finalized, it’s time to apply the adhesive. Choose an adhesive that is suitable for your tile material and surface. Spread a thin, even adhesive layer over the working area using a trowel or spatula. Work in small sections to prevent the adhesive from drying out before placing the tiles.
If you’re working with intricate designs, apply adhesive to the back of each tile to maintain precision. Press the tiles firmly into place according to your layout, ensuring they adhere securely. Use spacers if necessary to keep consistent gaps between tiles, and wipe away any excess adhesive with a damp cloth before it dries. Allow adequate time for the adhesive to set as recommended by the manufacturer.
Step 5: Grout the Tiles
After the adhesive has been set and the tiles are securely in place, it’s time to apply the grout. Choose a grout color that complements your tile design. Using a rubber float, spread the grout over the tiles at a 45-degree angle, pressing it into the gaps between them. Work in small sections to ensure even coverage.
Once the gaps are filled, use a damp sponge to wipe away excess grout from the tile surfaces, being careful not to remove grout from the joints. Allow the grout to cure for the time specified by the manufacturer, and then polish the tiles with a clean, dry cloth to restore their shine.
Step 6: Seal the Grout
Once the grout has fully cured, applying a grout sealer is highly recommended to protect it from stains and moisture. Using a small brush or applicator bottle, carefully apply the sealer along the grout lines, ensuring thorough coverage. Wipe any excess sealer from the tiles with a clean cloth before drying.
Allow the sealer to cure as instructed by the manufacturer, and your tiled surface will be ready for long-term use. This final step helps preserve the appearance and durability of your tiling project.
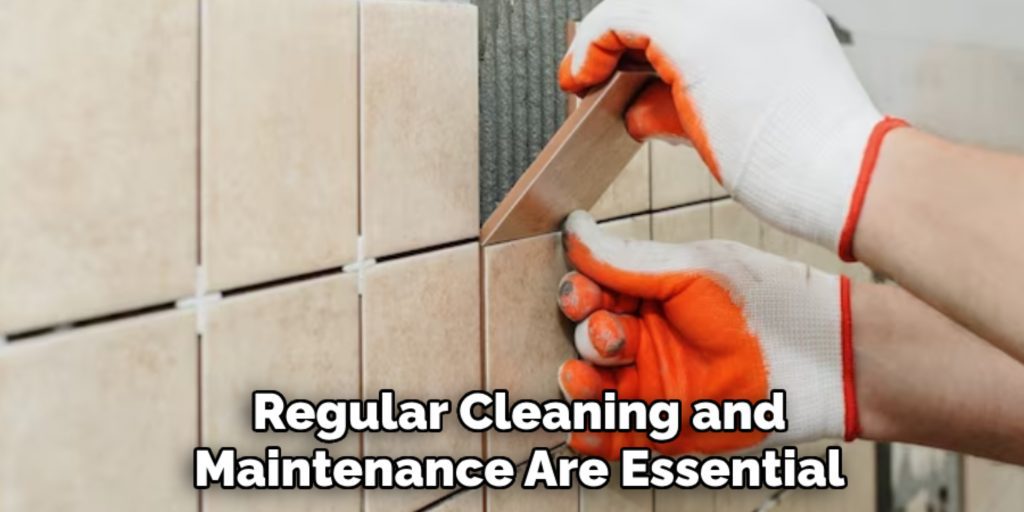
Step 7: Clean and Maintain Your Tiled Surface
Regular cleaning and maintenance are essential to ensure your tiled surface remains in pristine condition. Use a mild, non-abrasive cleaner and a soft cloth or mop to clean the tiles, avoiding harsh chemicals that might damage the grout or tile finish. Periodically inspect the grout lines for any cracks or wear, and reapply gthe rout sealer as needed to maintain its protective barrier. With proper care, your tiled surface will retain its beauty and function for years.
Step 8: Troubleshooting Common Issues
Even with proper installation and maintenance, you may encounter occasional issues with your tiled surface. Common problems include loose tiles, cracked grout, or discoloration. For loose tiles, carefully remove the affected tile, clean the underlying surface, and reapply the adhesive before resetting the tile.
Cracked grout can be repaired by removing the damaged portion and applying fresh grout, ensuring a smooth and uniform finish. For discoloration, use a tile-specific cleaner or a mixture of baking soda and water for stubborn stains. Regularly addressing these concerns will keep your tiled surface looking and performing its best.
Step 9: Final Inspection and Care
After addressing any issues and completing the installation, perform a thorough final inspection of your tiled surface. Check that all tiles are securely in place, grout lines are even and free of cracks, and the surface is clean and polished. Implement a routine cleaning schedule for long-term care using mild, non-abrasive cleaners to prevent buildup and protect the finish.
Additionally, avoid dragging heavy objects across the tiles to prevent surface damage. These steps ensure your tiled surface remains durable and visually appealing for years.
By following these steps and using proper techniques and materials, you can successfully repurpose old tiles for an affordable and unique home project.

Conclusion
How to reuse old ceramic tiles is an excellent way to reduce waste while adding a personalized touch to your home.
You can transform discarded tiles into stunning new surfaces or unique design elements with proper preparation, creativity, and attention to detail. Whether it’s for a backsplash, tabletop, or decorative project, repurposing tiles saves money and supports sustainable living.
Following the outlined steps and taking care of your finished project, you can create something unique that combines functionality, aesthetics, and environmental responsibility.
Specialization:
- Master of wheel-throwing, hand-building, and advanced glazing techniques
- Focus on creating both functional pottery and decorative art pieces
Recognition:
- Celebrated by collectors and art enthusiasts for creating one-of-a-kind pieces that blend artistry with functionality
- Participates in local and national exhibitions, earning accolades for his innovative designs and craftsmanship
Passion:
- Deeply committed to exploring and pushing the boundaries of ceramic artistry
- Continuously experiments with new materials, firing techniques, and artistic concepts to evolve his craft
Personal Philosophy:
- Believes in the transformative power of art, aiming to evoke emotions and connections through his ceramic creations
- Advocates for sustainability in ceramics, using eco-friendly materials and practices whenever possible