


Underglaze pencils are a versatile tool for adding intricate details, designs, or text to ceramic surfaces before they are glazed and fired.
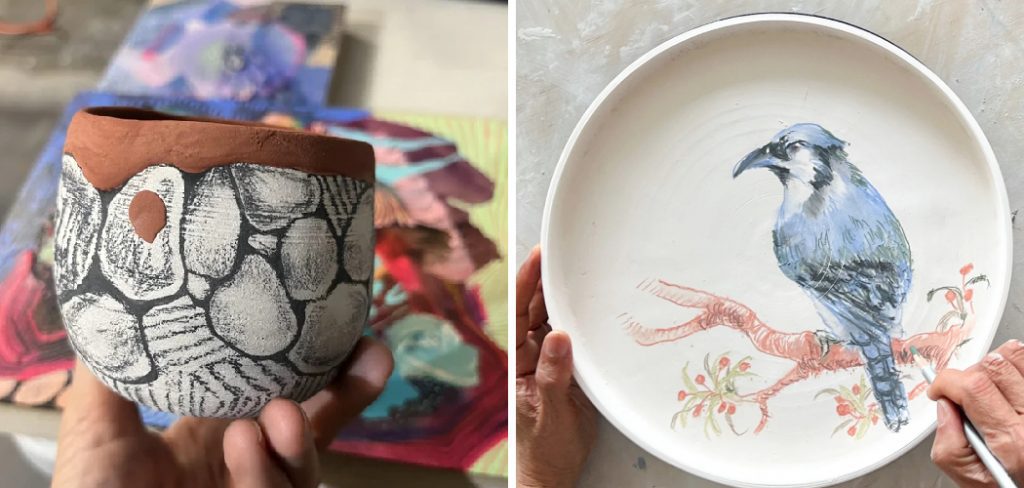
They allow for precise line work and can be used to create both decorative and functional patterns on pottery. Perfect for both beginners and experienced ceramic artists, underglaze pencils offer an easy way to personalize your creations and explore your artistic expression. This guide will walk you through how to use an underglaze pencil effectively.
What is an Underglaze Pencil?
An underglaze pencil is a specialized ceramic tool designed to apply fine, detailed lines or designs onto clay or bisque surfaces. Made from a blend of clay, pigments, and binders, these pencils function similarly to traditional graphite pencils but are formulated to withstand high kiln temperatures without burning away.
The pigments in underglaze pencils become permanent when fired, allowing artists to incorporate intricate patterns, drawings, or written text into their pieces. They are available in a variety of colors, giving creators flexibility in their artistic endeavors.
Tools and Materials You’ll Need
To work with underglaze pencils effectively, you’ll need a few essential tools and materials. Here’s a list to help you get started:
- Underglaze Pencils: Available in various colors, these are the primary tools for adding detailed designs.
- Clay or Bisque Ware: Choose a surface that is suitable for your project, whether it’s raw clay or bisque-fired ceramics.
- Eraser (optional): A soft eraser can help lighten or adjust your lines before firing, though some marks may be permanent depending on the surface.
- Finishing Tools: Brushes or sponges can be used to soften or blend the pencil marks into the surface if desired.
- Fixative Spray (optional): Some artists use a ceramic fixative to stabilize underglaze pencil designs before glaze application.
- Glaze (optional): Depending on your project, you may choose to apply a transparent or colored glaze to seal and enhance your work.
Having these materials on hand will ensure that you can explore the full potential of underglaze pencils and bring your creative ideas to life.
10 Methods How to Use an Underglaze Pencil
1. Choose the Right Surface: Use on Bisque-Fired Clay
The first step in using an underglaze pencil effectively is choosing the correct surface. Underglaze pencils are designed to be used on bisque-fired ceramic pieces, not on greenware or fully vitrified clay.
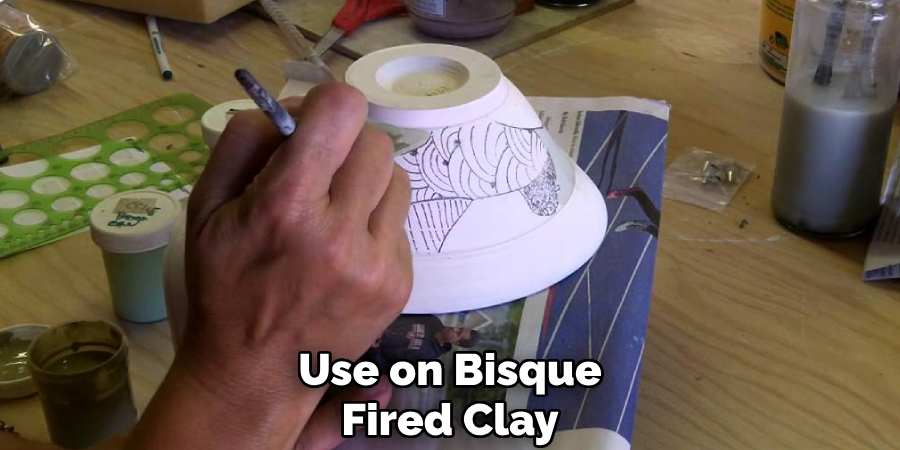
Bisque ware has been fired once at a lower temperature and is still porous, making it ideal for absorbing underglaze materials. Before applying the pencil, ensure the surface is clean, dust-free, and dry. A smooth bisque finish allows for more precise and continuous lines, while textured bisque can produce a more rustic, sketch-like quality. Always test the pencil on a small area if you’re unsure how it will behave on a specific clay body.
2. Use a Light Hand and Build Up Layers Gradually
When using an underglaze pencil, pressure control is crucial. Begin by drawing with a light touch, much like sketching with a graphite pencil. You can build up layers gradually by applying more strokes over the same area to deepen the tone or create shading effects.
Pressing too hard can cause the pencil tip to crumble or scratch the bisque surface. Layering with varying pressure can give your design depth, ranging from soft lines to bold outlines. This method is especially useful for creating gradient effects or crosshatching in your artwork.
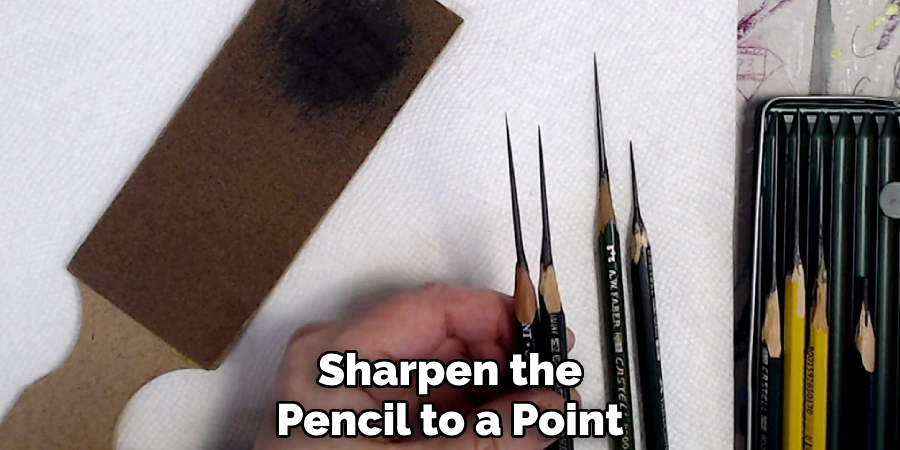
3. Sharpen the Pencil Carefully for Fine Detail
For detailed work such as lettering, line drawings, or intricate patterns, a sharp underglaze pencil is essential. Use a fine sanding block, emery board, or a standard pencil sharpener with caution—preferably one that allows manual control to avoid breakage.
Sharpen the pencil to a point, but not too fine, as the ceramic binder is more fragile than graphite and may snap under pressure. Keep a small container to collect shavings, which can be reused as powdered pigment with a brush for added texture or background shading.
4. Experiment with Different Drawing Techniques
Underglaze pencils can mimic various artistic styles, such as stippling, hatching, scribbling, or even calligraphy. Use crosshatching to add shadows and dimension, or stippling for a textured look. If you enjoy realism, you can create fine line portraits or landscapes. For abstract pieces, play with expressive mark-making or geometric repetition.
These techniques translate beautifully to the ceramic surface when done with intent and control. Blending is limited due to the dry surface of bisqueware, but layering and overlapping strokes can simulate tonal variations.
5. Set the Underglaze Drawing with a Fixative (Optional)
Although not strictly necessary, using a ceramic fixative can help stabilize your underglaze pencil work before glazing. Fixatives prevent smudging when brushing on glaze and help preserve delicate line work. Choose a fixative that is compatible with ceramics—typically a light, non-toxic spray designed for underglaze use.
Hold the spray about 8–10 inches away and apply a thin, even coat. Let it dry thoroughly before moving to the glazing stage. Avoid heavy application, as it may create a resist that prevents glaze adhesion.
6. Choose a Clear Glaze to Preserve Line Work
Once you’ve completed your drawing, it’s time to apply the glaze. Clear glaze is the best choice to preserve the visibility of your pencil work. A transparent glossy glaze tends to enhance the colors and contrast, while a matte clear glaze offers a more subtle, subdued finish.
Brush the glaze gently over the decorated surface, being careful not to smudge the lines. Alternatively, dipping or spraying can yield smoother results without disturbing your drawing. Keep in mind that some glazes may slightly blur or soften the pencil lines, especially if applied too thickly.

7. Fire at the Right Temperature for Color Retention
Each underglaze pencil is formulated for a specific temperature range—typically up to Cone 10, though some are optimized for mid-range (Cone 5–6) firing. Firing too high can cause color fading or distortion, while firing too low might underdevelop the color. Always check the manufacturer’s recommendations for optimal firing range.
The color of underglaze pencil lines often changes slightly during firing, becoming darker, more intense, or even changing hue. Testing on sample tiles alongside your work helps you anticipate the final result and choose the right firing schedule.
8. Combine with Other Underglaze Techniques
To create more dynamic pieces, try combining underglaze pencils with other underglaze methods. For example, use underglaze washes or painted backgrounds to add color, then draw over them with the pencil. Alternatively, you can create a pencil drawing first and enhance specific areas with underglaze colors using a fine brush.
Layering pencils with underglaze transfers, stamps, or stencils also yields interesting mixed-media textures. These combinations allow for more visual complexity and artistic expression in your ceramics.
9. Use Pencils for Signatures and Personal Marks
Underglaze pencils are excellent for adding your signature, date, or maker’s mark to your work. Unlike incising or stamping, which can be intrusive or hard to read after glazing, pencil signatures can be delicate and precise. Simply write your name or initials on the back or bottom of the bisqueware before glazing.
This not only personalizes your work but also maintains a consistent and professional presentation. Pencil marks will remain visible through a clear glaze and withstand multiple firings if applied correctly.
10. Clean and Store Your Underglaze Pencils Properly
Proper maintenance ensures that your underglaze pencils stay in good condition and last longer. After each use, gently wipe the tip with a soft cloth to remove bisque dust and residue. Store them in a dry, cool place away from moisture, which can degrade the binder.
Use a pencil case or ceramic tool roll to protect the tips from breakage. If the pencil gets too short to hold comfortably, you can use a pencil extender. Label your pencils if you use multiple colors or brands, as they may look similar but behave differently when fired.
Maintenance and Upkeep
To ensure your underglaze pencils perform optimally over time, regular maintenance is essential. Sharpen them carefully with a specialized sharpener or fine sandpaper to maintain a precise tip without wasting too much product. Avoid over-sharpening, as this can weaken the core and cause breakage.

Periodically check for signs of drying or cracking, and discard pencils that are no longer functional. Keep your tools organized by storing pencils separately from other art supplies, preventing accidental damage or contamination. By incorporating these simple upkeep practices, you can extend the lifespan of your underglaze pencils and maintain the quality of your artwork.
Conclusion
Using underglaze pencils opens up new dimensions of expression in ceramic decoration, especially for artists who love drawing, illustration, or fine detail. By mastering techniques such as pressure control, surface preparation, layering, and glaze compatibility, you can fully harness their potential to enhance your ceramic pieces.
Whether you’re sketching a botanical motif, signing your work, or experimenting with mixed-media effects, underglaze pencils offer a flexible and rewarding way to bring your ideas to life in clay. Thanks for reading, and we hope this has given you some inspiration on how to use an underglaze pencil!
Specialization:
- Master of wheel-throwing, hand-building, and advanced glazing techniques
- Focus on creating both functional pottery and decorative art pieces
Recognition:
- Celebrated by collectors and art enthusiasts for creating one-of-a-kind pieces that blend artistry with functionality
- Participates in local and national exhibitions, earning accolades for his innovative designs and craftsmanship
Passion:
- Deeply committed to exploring and pushing the boundaries of ceramic artistry
- Continuously experiments with new materials, firing techniques, and artistic concepts to evolve his craft
Personal Philosophy:
- Believes in the transformative power of art, aiming to evoke emotions and connections through his ceramic creations
- Advocates for sustainability in ceramics, using eco-friendly materials and practices whenever possible