


Indigo dye is a timeless, plant-based dye renowned for its deep, rich blue hues. Historically associated with textile dyeing, indigo has crossed into the world of ceramics, offering potters an exciting palette to explore. Its vibrant tones have captured the attention of ceramic artists seeking to infuse their work with unique visual allure. Indigo dye is more than just a colorant; it provides a versatile medium that enhances creativity through varied application techniques. From solid color swathes to intricate patterned designs, the possibilities are endless.
This article serves as a comprehensive guide on how to use indigo dye on ceramics effectively, aiming to inspire artists with techniques and insights for achieving stunning design results. Whether you’re a seasoned ceramicist or a curious beginner, exploring indigo’s potential can lead to beautifully captivating creations with vivid depth and artistry.
Understanding Indigo Dye and Its Characteristics
What is Indigo Dye?
Indigo dye is a traditional, plant-based dye extracted from the leaves of the Indigofera plant. Originating in prehistoric times, it has been notably used across cultures, from ancient Asian textiles to African art and European garments. The dye’s profound cultural significance is complemented by its chemical properties, which paved the way for natural and synthetic production. The natural indigo dyeing process involves fermentation and reduction to produce its characteristic deep blue hue, while the synthetic variant, developed in the late 19th century, offers a cost-effective alternative. Both forms remain popular in various artistic and industrial applications today.
Characteristics of Indigo Dye on Ceramics
When applied to ceramics, indigo dye imparts rich, deep blue tones that can transform any piece into an artistic masterpiece. Its versatile nature allows artists to achieve a variety of effects, from uniform solid applications to delicate, intricate patterns. The dye interacts uniquely with ceramic surfaces, offering opportunities for creative experimentation. Depending on application methods like brushing, dipping, or resist techniques, its appearance can range from bold color washes to subtle gradient shifts. This adaptability enables ceramic artists to push creative boundaries, using indigo dye to accentuate their work with vibrant and engaging visual results.
Preparing Your Ceramic Surface for Indigo Dye Application
Preparing Bisque-Fired Ceramics
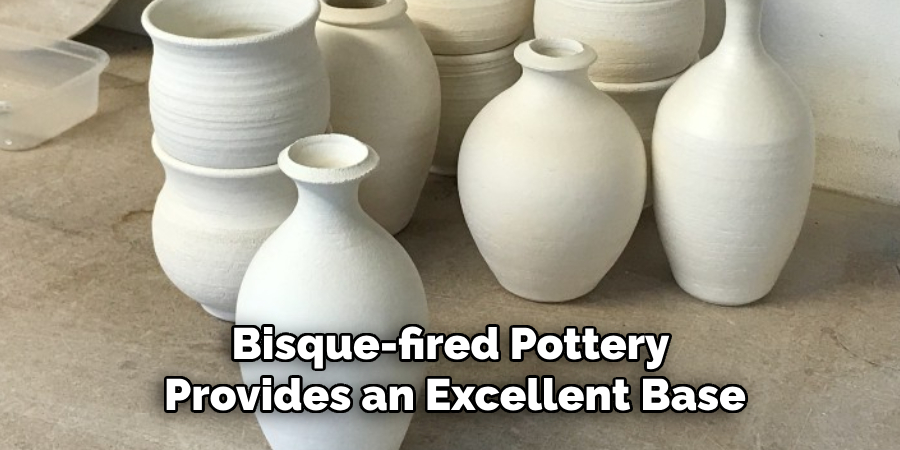
Bisque-fired pottery provides an excellent base for indigo dye application due to its porous surface, which allows the dye to absorb effectively. This initial firing process transforms raw clay into a durable, slightly absorbent canvas that drinks up the dye, ensuring vibrant color results. Before applying indigo, it’s crucial to thoroughly clean and smooth your bisque ware. Gently sand any rough spots and wipe the surface with a damp cloth to remove dust and debris. Doing so ensures the dye adheres uniformly, preventing streaks and uneven coloring. Proper preparation sets the stage for successful dye application, highlighting the intricate details of your pottery.
Masking and Design Planning
Design planning is essential to achieving aesthetically pleasing and precise patterns when using indigo dye on ceramics. Techniques such as masking with tape, using stencils, or applying wax resistors can help create intricate and detailed designs. Thoroughly plan your layout to avoid accidental dye marks or undesired bleeding, which can detract from the final appearance. By defining boundaries and controlling the areas where dye is applied, ceramic artists can achieve clean lines and complex patterns that stand out beautifully after firing. This thoughtful approach not only enhances the artistic impact but also maximizes the potential of the indigo dye.
Types of Indigo Dye Available for Ceramics
Natural vs. Synthetic Indigo
Natural indigo is derived from the leaves of the indigo plant, offering a traditional option that has been used for centuries. It is known for its rich, authentic color and eco-friendly origin. However, natural indigo can be more expensive and less readily available, requiring careful sourcing. In contrast, synthetic indigo is created through chemical processes, offering a more consistent and cost-effective alternative. This version is widely available and often used in industrial settings. Although synthetic indigo is more monochromatic, it lacks the eco-friendly attributes of its natural counterpart. Each type has its merits, and choosing between them depends on factors such as project needs, environmental considerations, and budget.
Recommended Brands and Products for Ceramics

Selecting high-quality brands is crucial for achieving optimal results when working with indigo dye on ceramics. Popular natural indigo brands include Maiwa and Dharma Trading Co., both renowned for their authentic products. For synthetic indigo, Jacquard and RIT offer dependable options with consistent quality. These brands can be found online or at specialized art supply stores. When mixing and applying indigo dye, it’s best to use products formulated for ceramics to ensure the dye adheres well and maintains vibrant color through the firing process. Testing different brands can help artists discover which products suit their creative goals and processes best.
How to Use Indigo Dye on Ceramics: Techniques for Applying Indigo Dye on Ceramics
Applying Indigo Dye by Brushing
Brushing is a versatile technique for applying indigo dye to ceramics, offering precise control over the amount and placement of color. First, use a soft-bristled brush to apply the dye evenly across the ceramic surface, ensuring smooth strokes and avoiding streaks. Apply multiple layers for more depth and variation, allowing each to dry before adding the next. Gradients can be created by gradually altering the dye’s concentration or blending transitions between colors. This method is perfect for achieving a nuanced, painterly effect that highlights the artistry involved in ceramic dyeing.
Dipping Ceramics into Indigo Dye
Dipping offers a comprehensive method for applying indigo dye and saturating ceramics with a uniform wash of color. To begin, submerge your piece fully into a vat of prepared dye, ensuring even coverage from all angles. Hold the piece securely to prevent slipping and rotate as needed for an all-over coat. To avoid drips or pooling, allow excess dye to drain back into the vat before setting the piece to dry. Consistently checking and adjusting the dip duration can ensure more even and consistent results, helping to avoid unwanted color discrepancies.
Using Resist Techniques with Indigo Dye
Resist techniques like wax resist and slip resist can be used to craft intricate patterns by preventing the dye from penetrating certain areas of the ceramic surface. These methods allow for striking designs, as the resisted areas remain the original clay color. Such techniques add layer of creativity and precision to indigo dye applications.
Firing Process for Indigo-Dyed Ceramics
Firing After Dye Application

Applying indigo dye before the final glaze firing is essential, as it allows the dye to properly adhere and integrate into the ceramic surface. This process typically involves using a kiln firing at cones 5-6, which is optimal for achieving the desired color vibrancy and ensuring the piece’s structural integrity. Firing at this stage seals the indigo dye into the ceramic body, setting the color before the application of a glaze or any additional firing steps. It is crucial to carefully plan and execute this stage, as proper preparation affects the final aesthetic and durability of the ceramic piece.
Effects of Firing on Indigo Dye
Firing indigo-dyed ceramics at high temperatures can significantly affect the dye’s appearance, potentially intensifying or muting the blue tones. During the firing process, it is common for the dye to develop deeper pigmentation, as the heat enhances the richness of the color. However, over-firing or improperly controlled temperatures might result in fading or unexpected color variations. Artists should test and possibly adjust their dye application techniques based on their desired outcomes, ensuring they achieve the intended hue following firing. Monitoring and customizing the firing schedule can help attain predictable and desirable effects in indigo-dyed ceramic artistry.
Troubleshooting Common Issues with Indigo Dye on Ceramics
Common Problems
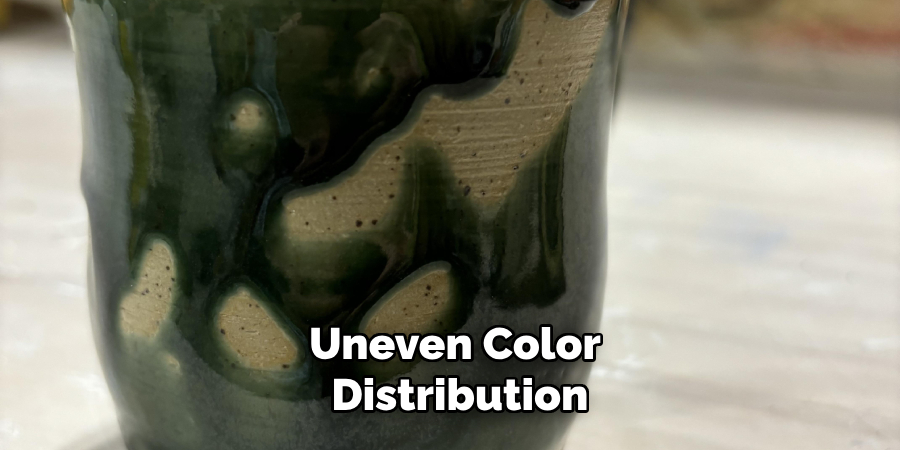
When working with indigo dye on ceramics, artists might encounter issues like uneven color distribution, dye bleeding, or fading after firing. Uneven color can result from inconsistent dye application or drying conditions, while dye bleeding often occurs when the dye is too diluted or applied in excess. Fading may be due to over-firing or not sealing the dye properly. To troubleshoot these problems, consider adjusting your dye application techniques, ensuring even coverage, and carefully controlling the kiln temperature to prevent color loss.
Preventing Defects
To avoid saturating the ceramic surface improperly, begin by testing the dye on small areas or using test tiles. This practice helps gauge the dye’s behavior and color intensity before applying it to the final piece. Additionally, use brushes or dipping techniques that allow for precise control and incremental application. Employing these best practices reduces the risk of defects and ensures that the finished piece meets the desired artistic standards.
Enhancing Indigo Dye Effects with Other Ceramic Techniques
Layering Indigo with Other Colors
Layering indigo dye with other underglazes or glazes offers a rich, multi-dimensional effect that can elevate the visual appeal of ceramic pieces. To achieve this, artists can apply indigo as a base color, ensuring it adheres well after the initial firing. Following this, additional layers of complementary or contrasting colors can be brushed, sponged, or sprayed over the indigo. These layers should be applied carefully, allowing each to dry thoroughly before moving on to the next. Techniques such as layering translucent glazes can add depth and create intriguing visual dynamics, enhancing the overall complexity and artistry of the piece.
Techniques for adding texture or contrast with glazes over the indigo-dyed areas include using specialized brushstrokes or applying glazes that react differently during firing. Utilizing a matte glaze over glossy indigo can create striking contrasts. Furthermore, textured glazes may be used to add a tactile element, offering both visual and physical interest. Experimentation with these methods can yield unique effects and contribute to a more personalized artistic expression.
Incorporating Additional Decorative Techniques
Incorporating additional decorative techniques after the dyeing process can further enhance the indigo-colored ceramics. Carving, engraving, or stamping can introduce intricate details that interact with the base colors, creating an enriched design narrative. These techniques allow artists to imprint their style into the clay, adding a personalized touch to each piece.
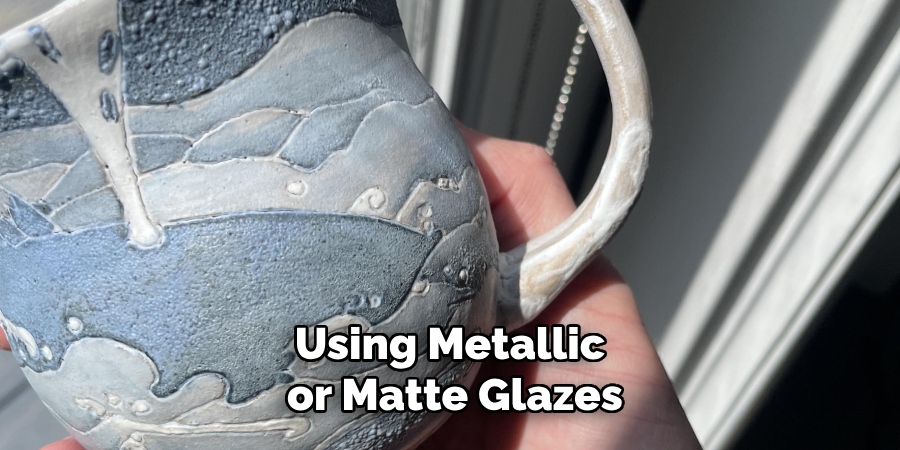
Using metallic or matte glazes to accentuate the indigo color can result in captivating contrasts and highlights. Metallic glazes introduce an element of shimmer and luxury, drawing attention to specific areas, while matte finishes offer a softer, subdued backdrop that allows the indigo hue to stand out. Together, these methods provide diverse opportunities to enrich the visual language of indigo-dyed ceramics, opening up new pathways for creative exploration.
Caring for and Maintaining Indigo-Dyed Ceramics
Cleaning and Maintenance
Indigo-dyed ceramics require gentle cleaning to preserve their vibrant colors. Use mild soap and a soft sponge, avoiding harsh chemicals and abrasive scrubbing that can dull the indigo finish. Always dry thoroughly with a soft cloth to prevent water spots and ensure the longevity of the design.
Displaying Indigo-Dyed Ceramics
To safely display indigo-dyed ceramics, place them on soft, stable surfaces to avoid scratches. Handle carefully to prevent chipping or fading; use two hands for support. Avoid direct sunlight exposure to maintain color intensity and move pieces occasionally to ensure even color retention.
Conclusion
In understanding how to use indigo dye on ceramics, we’ve explored critical steps from surface preparation, dye application, and firing to finishing touches. Each phase demands careful attention to detail, affecting the final aesthetic and durability of the ceramic piece. As you experiment, embrace the vibrant, rich visual effects that indigo dye can infuse into your projects. Don’t shy away from exploring diverse design possibilities, incorporating additional techniques for a personalized touch. Though these guidelines provide a basis, each endeavor offers a unique opportunity for innovation. With indigo dye, the pathway to creativity is boundless, promising impactful artistic results.
Specialization:
- Master of wheel-throwing, hand-building, and advanced glazing techniques
- Focus on creating both functional pottery and decorative art pieces
Recognition:
- Celebrated by collectors and art enthusiasts for creating one-of-a-kind pieces that blend artistry with functionality
- Participates in local and national exhibitions, earning accolades for his innovative designs and craftsmanship
Passion:
- Deeply committed to exploring and pushing the boundaries of ceramic artistry
- Continuously experiments with new materials, firing techniques, and artistic concepts to evolve his craft
Personal Philosophy:
- Believes in the transformative power of art, aiming to evoke emotions and connections through his ceramic creations
- Advocates for sustainability in ceramics, using eco-friendly materials and practices whenever possible